Pinterest

Showing posts with label Belinda Basson. Show all posts

Tuesday, 27 June 2023

A few projects

                                                                    Hello Friends


I have been very remiss over the last couple of years and neglected my blog, mainly because I thought Blogger was not publishing content anymore, so this is really just a test run, to share a few projects I have made!  Fingers crossed it will post!

It has been a bit of a difficult time here, with breast cancer, surgery, chemotherapy and radiotherapy but I think I am back to my old self, more or less, albeit without any mojo at all.  I hope it comes back soon because I miss it!  Mind you, it has not stopped my from buying crafty goodies the whole time!  I now have a large stash which is mostly unused.... my bad.

My most recent make is a tag I created in April using Tim Holtz's new Inspector stamp set (CMS465) by Stampers Anonymous.  I just love this guy.  I used lots of Tim's products to create him including the new Etcetera Facade frames on top of an Etcetera tag.  The little lantern on the bottom right hand side lights up too!

 Around Easter I created a project using one of Tim Holtz's Reliquary Domes, the new Salvaged Rabbit and some older Idea-ology products.  This was such fun to make.

My dear friend Jo Rice bought me a kit whilst I was ill, in the hope that it would aid my recovery. It did and I really enjoyed adding lots of bits and pieces to it from my stash.

I did do some crafting prior to this, working for the lovely Sarah Gray of Funky Fossil who kindly invited me to be a guest designer for her.  It was so lovely to make things for Sarah, just a few of which are shown below.  The stamps and stencils used were designed by my dear friend Belinda Basson.


I think that is more than enough for now, I hope you are all well and that I see you again soon.


                                                                    Crafty hugs,  

                                                                     Anne  xxxx

Tuesday, 8 March 2022

Lady Vagabond Lifestyle Mantle Clock

 Hello Friends

This is my last official post as part of Belinda's Lady Vagabond Team, as Belinda has left Stamperia and it would just not be the same without her.  Thanks to Belinda and Stamperia for an amazing 15 months, I have enjoyed every minute.

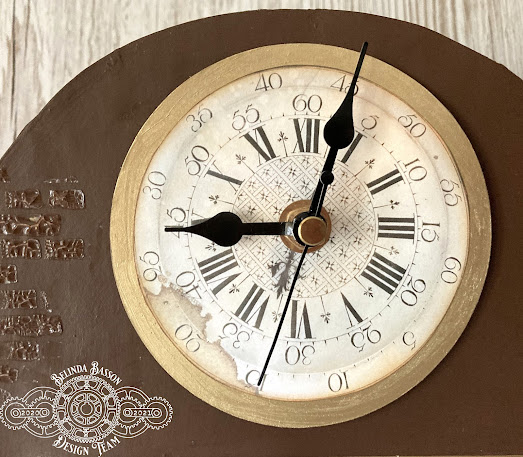
My final project is a Lady Vagabond Mantle Clock, created from scratch.  I was inspired by Belinda's Grandma's Mantle Clock that appears in Belinda's Lady Vagabond Lifestyle 3D Paper Kit.  My clock is much larger but I wanted to incorporate a little  'room' with a fireplace inside the clock.

I started by building the little mantle clock from the Stamperia kit, along with the fireplace so that I could assess the size of the aperture that I wanted in my clock.

I used some heavy cardstock from my stash, drew the shape of the clock and cut out a front and back, measuring 11.1/2" x 16.1/2" with an aperture of 5.3/4".  I then created a 'box' to fill the aperture, as shown below.  
Once the box was in place I added a piece of card to the edge of the clock to give a finished appearance.  Below is a view of the front of the clock before I added the clock face.  The aperture measures 2 inches deep.
The next task was to paint the whole of the clock and I used Stamperia Allegro paints, a mix of Earth Brown and Nocciola to give a nice rich brown colour.  I added patches of Stamperia Crackle Paste (Transparent) through Belinda's new Brickwork stencil, to add some interest to the Mantle Clock before attaching the clock face.  It is a fully working battery operated clock.
To decorate the aperture I used Stamperia Rice Paper for the walls before adding the constructed fireplace and mini Mantle clock.  To finish off I added chipboard Lady Vagabond, chair and cat.
To add a little more interest I decoupaged the grate of the fireplace and placed lights behind.  They give a nice glow in the dark!
This project certainly taxed my paper engineering skills but I was really pleased with the outcome and the clock now sits proudly in my craft room.

A list of the products I used to create the clock can be found at the end of this post.  Thanks, as always, for your visit, it is much appreciated.  I apologise for not visiting you recently, I am dealing with some health issues but hope to be back to visiting soon!

Crafty hugs, Anne xxx

Stamperia Products Used:

Stamperia Lady Vagabond Lifestyle 3D Paper Kit - SPBOP08
Stamperia Rice Paper White Blossom DFSA3083
Stamperia Lady Vagabond Lifestyle Die Cuts - DFLDC52
Stamperia Crackle Paste Transparent K3P50
Stamperia Lady Vagabond Brick Stencil - KSTDL51
Stamperia Allegro Paint - Earth Brown KAL40
Stamperia Allegro Paint - Nocciola KAL108


Tuesday, 14 September 2021

Belinda Basson DT - Exploding Box

 Hello friends

My project this month for the Belinda Basson (Stamperia) Design Team is An Exploding Box.

I used Stamperia Lady Vagabond papers, moulds, paints and chipboard to create the box and all of the items are listed at the end of this post.
I wanted the box to hold quite a lot in the middle part, so I made it larger than the standard 4" x 4" sized box.
To make the base I used black cardstock that is 16" x 16" square, the centrepiece is 4" square and the sides each measure 6" x 4".  You would normally cut away the 'side' pieces but I wanted the box to be quite sturdy, so I simply cut away the corners so that it would fold in properly.

I covered each of the outside and inside pieces with Lady Vagabond papers.
Each of the inside sections contains a different scene.
Top left:  I added some chipboard pieces, mounted onto black cardstock.
Bottom left: The frame is made with a Stamperia mould and painted.  The Sir Vagabond chipboard pieces are mounted onto watercolour paper.
Centre: I created a bookcase from cardstock and mounted books that I fussy cut  from the Lady Vagabond 8" x 8" cardstock.
Right:  I mounted the pieces using chipboard pieces from the Lady Vagabond chipboard set.
The centrepiece for the box is made from Stamperia moulds, using resin and painted with Stamperia paints to create a rust effect.
I created the top, in black card, just slightly larger than the base at 4.1/8" square and covered it with Lady Vagabond papers.
The cogs on the top were created using a Lady Vagabond mould and painted with Stamperia paints.
And finally, here is a view of all four sides of the box.

I have never made one of these boxes before but I enjoyed this one and will definitely be making more!

Thanks so much for your visit, I hope to see you again soon.

Crafty hugs, Anne xxx


Stamperia Products Used:

Lady Vagabond 12 x 12 Paper Pad - SBBL82 

Lady Vagabond 8 x 8 Paper Pad - SBBS27

Sir Vagabond 8 x 8 Paper Pad - SBBS25

Lady Vagabond Soft Maxi Mould - K3PTA482

Sir Vagabond Soft Maxi Mould - K3PTA488

Stamperia Picture Frame Mould - K3PTA496

Lady Vagabond Wooden Shapes - KLSP091

Sir Vagabond Wooden Shapes - KLSP085

Stamperia Chipboard - Lady Vagabond - DFLDC27

Stamperia Chipboard - Sir Vagabond - DFLD25

Stamperia Allegro Paint - Earth Brown - KAL40

Stamperia Allegro Paint - Turquoise - KAL25

Stamperia Allegro Paint - Warm Red - KAL06

Stamperia Allegro Paint - Nero Black - KAL03


Tuesday, 13 July 2021

Belinda Basson DT - Lady V Steampunk Jewellery

 Hello Friends

Another month has passed and it is my turn to share a project created for Belinda Basson's Stamperia Design Team.  I had great fun creating some jewellery for Lady Vagabond to wear.

This first one is one of four pieces I created and I have to say it is my favourite (I do love dragonflies).  I created a 'bust' to display them on, details of which I will share at the end of this post along with details of all the Stamperia products I used.

For this first one I used Belinda's Stamperia Keys & Locks  Mould  to create the key in resin.  Once ready I covered the key in Cerantica Ancient Wax - Copper.  I used some copper wire from my stash to fashion the wings of the dragonfly and backed these with Belinda's White Flowers Rice Paper.  I attached the wings to the key with more copper wire, adding some decorative details to the key before hanging the dragonfly on a chain.
The second necklace was created using Belinda's Chipboard elements in the form of the cat and trunk.  I placed these in a metal pendant from my stash and added Stamperia clear Crystal Resin to encapsulate the chipboard, and then added some chain elements to finish off.  

(Note:  before adding any chipboard or paper elements to a Resin piece they should be 'sealed' with a matte medium on all sides to prevent warping and discolouring once the Resin is added).  
This third piece (above) was perhaps the easiest of all.  I used Stamperia's Atelier Frames Mould to create the pendant from resin.  Once set I applied Cerantica Ancient Wax in Turquoise and then added some Cerantica Metallic Silver to highlight areas.  Lace was applied around the edge and I finished off the back with some plain card to hide the lace edges and the metal pendant fitting.
My final piece was created using a Sir Vagabond Greyboard Gear, simply painted in brown and then I added some large and small Stamperia metal gears and some chipboard clock faces.  I added these to both sides of the pendant so that it looks finished from the front and the back.

Here is a view of all four necklaces:
For the bust stand I created a simple pattern from white card and then transferred this to heavy black card and cut it out.
I drew a bustier shape and cut this out in some calico fabric.  I glued the Stamperia White Flowers Rice Paper to one side using some fabric glue from my stash and once dry I machine stitched some shaping into the bustier and finished the top off with some bias binding to give a neater finish and glued the whole piece to the card bust.

I hope Lady Vagabond will be pleased with her new jewellery!

Thanks so much for taking the time to visit, I really appreciate it and I hope it is not another full month before I post again.  In the meantime take care and keep crafting!

Hugs, Anne xxx


STAMPERIA PRODUCTS USED

Stamperia Rice Paper - White Flowers DFSA3083
Stamperia Mould - Lady Vagabond Keys & Locks K3PTA485
Stamperia Mould - Atelier Frames K3PTA496
Stamperia Chipboard - Lady Vagabond DFLCB18
Stamperia A4 Greyboard - Sir Vagabond Gears & Clocks KLSPDA414
Stamperia Metal Gears - Assorted SBA406
Stamperia Metal Gears - Large SBA407
Cerantica Ancient Wax - Metallic Silver - K3P1S
Cerantica Ancient Wax - Turquoise - K3P15T
Cerantica Ancient Wax  - Copper - K3P15R
Stamperia Crystal Resin - KEN13


Tuesday, 15 June 2021

Belinda Basson DT - Stamperia - Cog Bookends

 Hello Friends

My Belinda Basson Design Team project for Stamperia this month is a set of steampunk cog book ends which are very grungy.  I think it shows the real versatility of Belinda's beautiful moulds in that they can be used to create 3D projects.  All of the Stamperia products I used are listed at the end of this post.

I started by creating the cogs, using quick setting white Resin and Belinda's large cog mould.  Once the cogs were released from the mould they were painted with black gesso.  I find the gesso works better if you do this stage as soon as possible after de-moulding.  I made four of the large cogs and glued them back to back to create the two large 3D cogs, this was not necessary for the smaller cogs as they were going to be layered up individually.

Next, I used a combination of paints to colour the various cogs before applying Stamperia's Mix Media Art Rust Effect paste and reagent.  The rust effect takes 24 hours to 'cure' but it comes out beautifully textured and rusty!  The rust covered up some of the paint colour and so I used the Stamperia Turquoise Paint (KAL25) to create a patina look in small random areas.

The final step was to layer the cogs up to create my dimensional piece.  I used my glue gun to attach the pieces to the finished bookend bases.
I purchased the bookends on line, they are very sturdy and came unfinished.  I started by applying Stamperia Black Paint to the bases and then I applied Stamperia's gorgeous Transparent Crackle Paste and left this overnight, just to ensure the crackle was completely dry.
Once the crackle was dry (left of photo), I applied Stamperia Cerantica Rame Metallico (Copper) using a soft brush and getting it into all the little nooks and crannies.  I left it to dry for a short time and then I wiped over the whole bookend to remove any extra wax.  There is such a lovely sheen....
I just love these cog chippies by Stamperia and I thought they would finish the bookends off beautifully.  I dabbed Black and Brick Red Stamperia paints over the chippies to give a rusty look (I did not use the grey paint in the end).  Once dry I added the chippies to the book ends.
The final step was to add the chippies to the book ends.  The picture below shows the lovely crackle on the bookends and the beautifully rusty cogs!

Stamperia Products Used:

Stamperia Mould - K3PTA482
Stamperia Mould - K3PTA488
Stamperia Paint - Black KAL03
       Stamperia Paint - Brick Red KAL20
Stamperia Paint - Earth Brown KAL40
Stamperia Paint - Turquoise KAL25
Stamperia Crackle Paste - Transparent K3P50
Stamperia Decorative Chips - SCB37
Stamperia Centrica Metallic Copper - K3P15R
Stamperia Rust Effect Kit - KE41M


I am so pleased with the way the bookends turned out and they are now happily sitting on a 
bookcase in my craft room.

Thanks so much for your visit, I really appreciate it and I look
forward to seeing you again soon.

Take care,  Anne xxx


Tuesday, 16 February 2021

Belinda Basson DT - Stamperia - Music Box

Hello Friends

Welcome to my blog.  Today I am sharing my second Stamperia blog post as part of Belinda Basson's Design Team.  If you are a follower of Stamperia on social media you will have seen some of the absolutely incredible projects that my team mates have been sharing there.

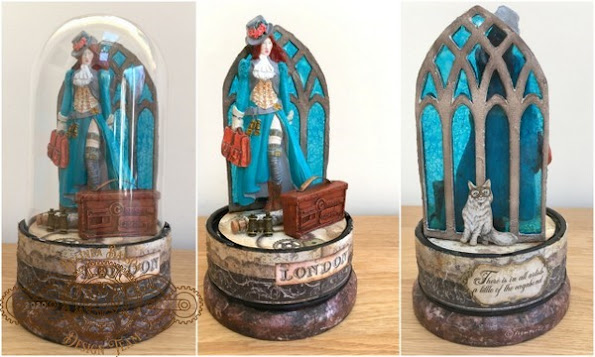
For my project this month I created a rotating music box.


The glare from the dome makes it difficult to see properly so here is a view without the dome:

And so you can see the movement, I did a little video...  I had all kinds of problems trying to load it up so I hope it works!
 

https://www.youtube.com/watch?v=92gthkZtRZU

To start, I created Lady Vagabond and the suitcase from quick setting resin, using Belinda's Stamperia Mould and then painted her using Stamperia Allegro paints. 
Since Lady V was going to rotate on the music box, I decided she needed to be 3 dimensional, so I applied some Stamperia Extra Light soft clay to the back of the moulded Lady V and painted it.  It did not need to be a 'perfect' back as she was going to stand in front of a stained glass window.  Once the paint was dry I applied a thin coat of Stamperia Fluid Gloss Medium to give a slight sheen to Lady V and her suitcase. 
I turned my attention to the rotating base part (a purchased deconstructed mechanism that has been in my stash for a while).  I used some of Belinda's Stamperia Rice Paper (White Flowers) and used Glossy Gel to adhere it to the bottom twist part of the mechanism.
Next, I applied some of the Lady V design paper to the upper part of the mechanism and gave it two coats of Stamperia Transparent Crackle Paste, it dries clear and gives THE most wonderful crackles.  I added some design paper to the rotating base part along with a 'message in a bottle' and a binocular charm.  I added a small handle to the suitcase.  The suitcase is part of Lady Vagabond mould, I created it with Stamperia Extra Light Soft Clay and just cut it away from the larger luggage piece, sandwiching two pieces back to back to give it a 3D appearance.
I created a 'stained glass window' using two Tim Holtz die cuts (a  gift from my dear friend Kath) with some alcohol inked acetate sandwiched in the middle.  The window fitted perfectly on the base and looks gorgeous when the sun shines.

Of course I had to add Belinda's famous cat (the Supervisor) from Belinda's die cut chipboard range to complete the base of the music box.  I added labels to each side of the music box, the London word is cut from design paper and the other is a chipboard piece which says 'there is in all artists a little of the vagabond'.
A final view :


I had great fun and absolutely loved making this project and play it at least once a day - I think David is resigned to hearing it now - lol !
 
I added a list below of the Stamperia products I used, they are widely available around the world.  I have added some UK links to shops that sell a variety of Stamperia products.

Thanks so much for your visit, I really appreciate it.

Keep safe and well.

Hugs, Anne xxx


Stamperia Products Used:

Stamperia Lady Vagabond 8 x 8 paper pad
Stamperia Lady Vagabond Rice Paper - White Flowers (A3)
Stamperia Allegro Paint (various colours)
Lady Vagabond Mould - K3PTA487
Lady Vagabond chipboard die cuts
Stamperia Extra Light Soft Clay
Stamperia Transparent Crackle Paste (K3P37)
Stamperia Fluid Gloss

UK Stockists of Stamperia Products:

Tuesday, 19 January 2021

Stamperia - Belinda Basson Design Team - Project 1

 Hello Friends

  I am very excited as today is my first post as a member of Belinda Basson's Design Team for Stamperia! 

For those of you who follow Stamperia, you will know that my hugely talented blog friend and artist, Belinda has brought out her very own range for Stamperia, called Lady Vagabond and this coordinates beautifully with the Sir Vagabond release by Antonis Tzanidakis.  I see it as a love story between Lady Vagabond and Sir Vagabond and this little video explains the beginning of their lovely story.....

For my first project I have (re)created Lady Vagabond's telescope along with a box to keep her telescope safe whilst she is travelling...

First, I constructed the box.  I cut the pieces from black mountboard.

For those interested in the sizing of the box, this is as follows:
1) For the bottom of the box, cut mountboard pieces:  
    Base 9.1/2" x 3".  
    Cut two sides 9.1/2" x 1.3/4" and 
    Cut two end pieces 3" x 1.3/4" 

2) For the lid of the box, cut mountboard pieces:
    Top 9.1/2 " x 3"
    Cut two sides 9.1/2" x 1.1/4" and
    Cut two end pieces 3" x 1.1/4"

My box was quite a snug fit for the telescope so I added an extra 1/4" to the long measurements above, just in case you want to make one. 

Join and glue all the elements together and cover with Lady Vagabond paper of your choice.  I painted the inside of the box with Stamperia Glamour Paste in Gold, it gives a lovely sheen to the box.  I wanted the telescope to have a 3D appearance and so I added a 'shelf' inside the box to raise the telescope up and I set the telescope at a slight angle to give it a more rounded look.

I prepped the telescope, the wheel and the lock (all created with Stamperia's Extra Light Soft Clay and Belinda's Maxi Mould K3PTA484 (telescope and lock) and K3PTA487 (ship's wheel).  I used Stamperia's Black Primer to give them a good base.
I created some faux leather using Kraft paper and Distress Stain, cut this to size and mounted it onto the telescope (Belinda added some real leather to one of her projects and I loved the look).  I used Stamperia Cerantica Wax over the gessoed items, using my finger and a small paint brush and then buffed the items up with a soft cloth, before attaching them to my prepared box.
Here is a view of the outside of the finished box.  I did add a set of hinges to the back of the box after I covered the box with papers.
Finally, I added a chipboard sentiment to the inside of the box, which says 'Leave the road, take the trails'.
I had great fun making this project and am already looking forward to creating the next one, below is a picture of all of the Stamperia products I used to create my box.
Belinda Basson/Stamperia/Lady Vagabond 12 x 12 paper pack
Belinda Basson Maxi Mould  K3PTA484 (telescope and lock)
Belinda Basson Maxi Mould K3PTA487 (ship's wheel)
Stamperia Extra Light Soft Clay - white
 Stamperia Glamour Paste - K3P61B Gold
Stamperia Cerantica - K3P15G Metallic Gold (Antique Wax)
Stamperia Primer Spray Black (similar to gesso)

I hope it will not be such a long time before I post again, my mojo went on walk about over Christmas and New Year but it is slowly coming back.... I think!

Thanks so much for your visit and I hope to see you again soon.

Stay safe and keep well.  Hugs, Anne xxx


Wednesday, 11 November 2020

Wonderful News!

 Hello Friends

I have some exciting news to share with you today!

The hugely talented Belinda Basson has developed a new line for Stamperia, called Lady Vagabond and I am honoured and thrilled to have been asked to join Belinda's brand new Design Team!  Thank you SO much Belinda!

There are a host of talented designers from different countries joining Belinda's new team.

Belinda has put together a little video to show the team (fingers crossed I have added it correctly!)


Belinda's fabulous range of products (SEE HERE) will be available towards the end of November.  It includes gorgeous papers, stamps, moulds, stencils, wooden shapes, die cuts and rice papers.  

Belinda shares a tutorial on her blog showing some of the newly released products HERE, all created in Belinda's trademark Steampunk style.  Belinda and the team will be sharing projects each week in future and speaking for myself I cannot wait to get my hands on the new products to make a start!

I am so happy to be part of this amazing new team and I hope you will pop back to see what I create with Belinda's fabulous new range!

In the meantime, please stay safe and well in this crazy world.

Hugs, Anne xxx


Related Posts Plugin for WordPress, Blogger...

Labels