Pinterest

Showing posts with label Eileen Hull Wrapped Journal. Show all posts

Monday, 16 September 2019

Simon Says Stamp - Designer Spotlight Week 3

Hello Friends

The weeks are flying by, this is my third week in the Designer Spotlight with Simon Says Stamp Monday Challenge.


A new week means a new challenge and the challenge at Simon Says Stamp Monday Challenge this week is 'Monochrome'.


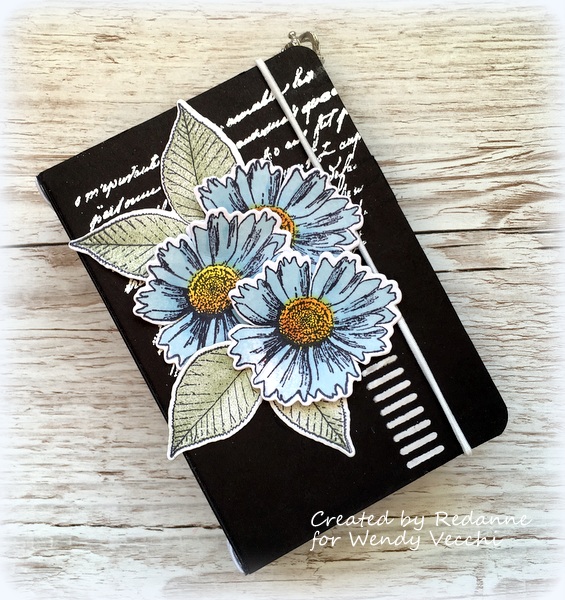
I still had the stamps and die out on my desk from last week's celebration of STAMPtember® and it gave me an idea straight away for the Monochrome Challenge.  I created a monochrome journal as my project.


I used Eileen Hull's Wrapped Journal die for my base, cutting it in Black Mount Board before stamping with the beautiful STAMPtember® Flora Background stamp, and then embossing it in white embossing powder. 

I added some ribbon from my stash as a closure for the journal. 

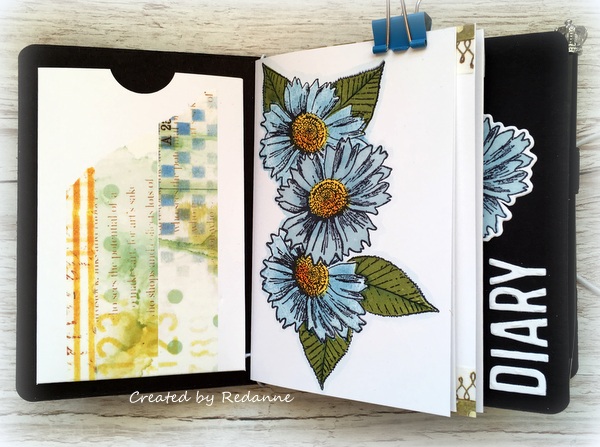
For the inside I made four signatures and I used the STAMPtember® Shimmer Rounded Rectangle die set to add decoration to the front of the plain signatures.

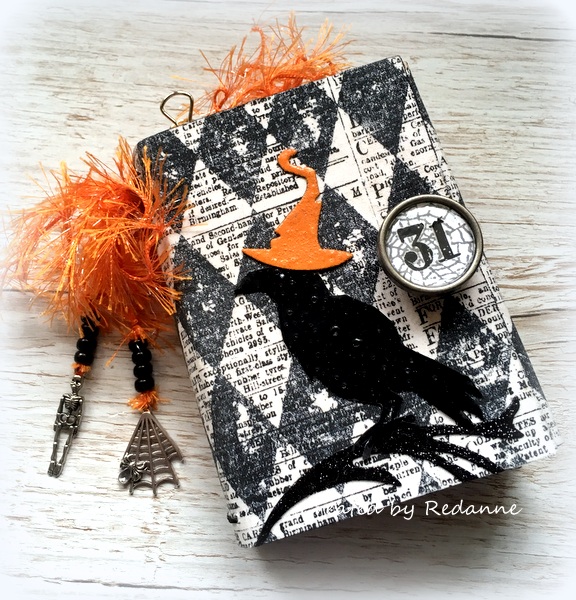
 I handmade a black and white bead adornment to finish off my journal.

As always, if you join in the Monochrome challenge there is the chance of winning a Gift Voucher to Simon Says Stamp on line shop.

The products I used that are available from Simon Says Stamp are listed below.


Thanks so much for your visit, 
I hope to see you again soon.

Hugs, Anne xx


PRODUCTS USED

Eileen Hull Wrapped Journal die
Simon Says Stamp Flora Background Cling Stamp
Simon Says Stamp Shimmer Rounded Rectangle
Simon Says Stamp Black Cardstock 100#
Ranger White Embossing Powder
Studio Katia Snow Dust Seed Beads

Monday, 1 April 2019

'Professor' Tinkham for Mini Album Makers

Hello Friends

A new month means a new challenge at Mini Album Makers!  My very dear and generous friend Kath Stewart gave me lots of the new Tim Holtz stamps and I have incorporated two of those stamp sets into my journal, plus one older set.

A little story - Kath has always called Tim Holtz her 'adorable Professor' and Tim designed this 'Professor' stamp set and credited Kath with the name, how lovely is that!

The Professor in my case is an explorer and adventurer....

I am including a tutorial today, as I have recently joined Eileen Hull's Educator Group and Eileen is our generous Sponsor this month at Mini Album Makers, so the two go hand in hand quite nicely.  This is a picture heavy post!
I started with some cream Calico fabric and some of Tim Holtz Eclectic Elements Transportation Ticket fabric (a gift from my lovely friend Zoe Hillman).  I used Pebeo Matt Gel to attach both fabrics, one to each side of a sheet of mat board (mount board), gel is less tacky than glue.

Using Eileen Hull's Wrapped Journal die, I die cut the journal.  I felt the cover was a bit too 'light' and I dry brushed some Gathered Twigs Distress Paint over the cover and then used the same colour to dab through a Tim Holtz Burlap stencil quite randomly.
I used three stamp sets by Tim Holtz, Ledger Script, Distinguished and The Professor.
Here is a view with all the stamping added.  I also added some rough machine stitching all around the edges (I keep a separate needle for stitching card/paper)  and I cut out a couple of tickets from the left over material and used Matt Gel to affix them.  I also added some colouring to a few of the elements just to make them 'pop' more.  I used watercolour paints that are permanent once dry.
I created four signatures, using the same method for each.  I used 12" wide cardstock by Tim Holtz, cutting four pieces 12" x 5".  Scoring at 2.1/2", 6" and 9.1/2", fold on each score line.  You can glue each end flap in place completely or create two pockets by just attaching the flaps at the top and bottom.  Making your signatures this way gives the covers more stability.
I usually attach the inserts to my signatures using a simple pamphlet stitch.  As you can see I also added some more stamping to my signature covers.  I also added some Tim Holtz Idea-ology tabs to each of the signatures for added interest.
I always like to add a pocket in my journals and here is how I did it...
Using more Tim Holtz cardstock I cut one piece of card  to 4.7/8" x 5.1/4" and scored as shown above, at 1/4", 3/4", 4.1/8" and 4.5/8" and I scored at 4.5/8" across the bottom.  Fold the sides in an accordion style to give some depth to the pocket.

For the fold over top cut a piece to 3.3/8" x 2.1/2" and score at 7/8" and 1.1/8".  Cut and shape as shown above.

 I attached some closures (punched circles attached with eyelets) and then added the envelope to the middle part of the journal (glue the top part in first and then add the pocket element last so that you can 'fit' it properly to the journal).  At this point I added the elastic holders for the signatures and also the band to close the journal, all with 1.5mm black elastic, tying both off neatly.
I decided to add a ticket pocket to the inside front cover (a Tim Holtz die).  The tickets were made using another TH die and Tim stamps and coloured with Distress Inks.

Here is a final view of the back of the journal.

Our Sponsor this month is Eileen Hull who is offering a $35 Gift Voucher for her Etsy Shop to one lucky winner over at Mini Album Makers.


Website: http://www.eileenhull.com/
Blog: http://www.eileenhull.com/blog
Facebook Live: http://www.eileenhull.com/video-tutorials
Facebook: https://www.facebook.com/eileenhulldesigns
Pinterest: https://www.pinterest.com/eileen_hull/
Twitter: https://twitter.com/EileenHull
Shop - https://www.etsy.com/shop/EileenHull?ref=pr_shop_more

We do hope you will join us at Mini Album Makers this month, we would love to
have you join in.  The rules are very simple and are outlined in detail on the blog.

Thanks for your visit, I hope to see you again soon!

Hugs, Anne xxx

Saturday, 16 February 2019

Wendy Vecchi Country Flower Journal

Hello Friends

I feel so thrilled and honoured to have been asked by Wendy Vecchi and Ranger Ink to try out some of Wendy's latest release of products including Wendy's Make Art Stamp/Die/Stencil - Country Flower set. Thank you again, to Wendy and to Ranger Ink for giving me this opportunity!

I have been down and a little subdued this week due to the death of a lovely friend and neighbour but I sat down yesterday and created one of my favourite things, a journal.
The gorgeous flowers on the front are from Wendy's new Make Art Stamp/Die/Stencil set called Country Flowers.  They remind me of blue Cornflowers. 

In the UK, Wendy's new releases are available to pre-order from Art From the Heart (I am not on commission!).
This is the contents of the beautiful parcel I received.  It includes Wendy's new stamp/die/stencil sets, her new Washi Tape range and new colours of  Wendy's Make Art Blendable Dye Inks.
After die cutting the journal (Eileen Hull's Wrapped Journal with the flap cut off), I stamped and embossed one of Wendy's older background stamp sets (Script WVBG022) to the front and back.

The thing I love about Wendy's new stamp set is that it has a stamp for the image, and another one to add colour to the image and then a die set to cut the flower (and leaves) out.  So quick and easy and such a reasonable price £14.99 in the UK (and $14.99 US) for the set!  I also love the way the stamps take the inks, (both archival and dye inks) and they stamp with just a tiny amount of pressure (great for those of us who have dexterity issues!).
Here is a view of the completed cover, you can see that I added some stencilling, using part of the stencil that comes in the set.
I added two pockets to the inside of the journal.  The left hand side was decorated with some of Wendy's gorgeous Washi tape.  The pocket on the right hand side was stencilled, again, with the stencil that comes with the set.
I created three signatures for the inside of my journal, again using stamps, dies and stencils from the set and I incorporated some Washi tape too.
 Finally, here is a view of the completed journal.

I will have a few more projects to share over the next couple of weeks, using Wendy's products, I hope you will visit to see them.  Do check out Wendy's blog HERE to see more of her new release.

On Monday and Tuesday next week I will be attending Stitches (the UK's much smaller version of Creativation) with my dear friends Kath and Enfys, and we are meeting up with other friends, Zoe and Kaz, and no doubt lots of others, to discuss all things crafty.  I am really looking forward to it.

Have a lovely weekend and I will have another post to share on Monday for That's Crafty.

Hugs, Anne xx


Thursday, 29 November 2018

Checkmate

Hi Friends

My project as Guest Designer for AALL & Create is a fabric covered journal.  This week I have used Stamp Set #122 Chess pieces by Bipasha BK.
 As soon as I saw this gorgeous checkerboard fabric, I knew I wanted to use Bipasha's Chess Pieces stamp set to make the chess pieces.
I started by using Eileen Hull's Wrapped Journal die, the fabric and the stamp set.
 I stamped out onto white card.
After fussy cutting the chess pieces, I coloured the pieces with watercolour paints and then added Glossy Accents to give a lovely shine.
After covering the outside of the journal with the fabric, I painted the inside in plain black.  A pocket was added to the inside back and the red elastic was threaded through.  Seam binding, dyed red with Distress Stain was added these to the front and back covers, as my closure.
Extra chess pieces were coloured and added to the three signatures.
To finish off some silver coloured chess piece charms were added.

So, there we have it, Project #7 for AALL & Create completed!  If you wish to purchase products from AALL & Create, you can do so HERE.

Hope to see you again soon.  Hugs, Anne  xx

Thursday, 15 November 2018

AALL & Create Project #5 - A Journal

Hello Friends

The weeks are flying by!  I have another project to share with you, using AALL & Create products.  This week I have created a journal using my favourite Eileen Hull Wrapped Journal die along with two stamps by the hugely talented Tracy Evans.
I absolutely LOVE making journals and Tracy's stamps are perfect for this kind of project.  Stamping onto tissue paper is my favourite technique at the moment, it allows beautiful stamped images to be added to textured surfaces.
I started by brayering colours of paint onto mountboard.  Several layers later I had some wonderful texture and beautiful muted colours.
I stamped the beautiful dragonfly from Tracy's stamp #113 and then painted the dragonfly on the reverse. This mutes the paint colour just slightly but gives a lovely finish. I always use a waterbrush to dampen around the image so that it tears unevenly - this helps the tissue to blend into the background, once it is glued down.
I decided I wanted some detail on the back of the journal too so I stamped Tracy's stamp #119, again onto tissue paper and coloured the flower in (shown below).
The same colours were used to colour this second flower.
I finished the whole journal off by covering the whole of it with Tim Holtz Distress Collage Medium - Crazing.  It gives a slightly crackled background and helps the tissue to 'melt' into the background.  I think the crackle just about shows in the photo above.

To finish I stamped the dragonfly again, coloured it, cut out the wings and layered them up, and I added a clock hand and brad to add some interest to the dragonfly.

The stamps I used to create the journal are:
Tracy's stamp #113
Tracy's stamp #119
You can find a list of worldwide stockists HERE.

To finish off any journal I always like to create a hanging embellishment, this time I added some beads from my stash, simply adding them to head pins and for the closure I dyed some seam binding and attached this to the opening flaps.

As always, thanks for your visit, I appreciate any comments you may wish to leave.  See you soon.

Hugs, Anne xxx

Tuesday, 18 September 2018

Fall-O-Ween (2) for Eileen Hull

Hello Friends!

This is my second post this month for Eileen Hull, this time using two of Eileen's journal dies and Halloween papers from DCWV (Die Cuts with a View).

Sadly, this is my last post as part of Eileen's Inspiration Team, I have taken the difficult decision to step down from the Team after four and half wonderful years.  I will miss my Teamies a lot but I will still be using Eileen's dies and inks as often as possible, I do believe that Eileen designs some of the best dies in the industry.  My grateful thanks to Eileen and the whole team!

I have two projects to share with you, one using Eileen's Wrapped Journal and one with Eileen's Passport die along with papers from DCWV (thank you DCWV!).
I am not going to take you through step by step this time, but I have some photos to share of the cover and inside of each album.  This one is made with Eileen's Wrapped Journal (Sizzix 662816).  It will hold four signatures, with plenty of room for more.
The papers are wonderful for creating the signatures, I have used a whole range of them - although choosing was quite difficult.  I always like to add a tag/ticket holder in my journals and I love to add pockets to the inside front and back.

Journal Number 2
For this journal I used Eileen's Passport die (Sizzix 660331), which is my favourite (currently) of Eileen's journal dies.  It is such a handy size.
Again, my signatures were made with the beautiful DCWV Halloween papers, the paper pad comes with stickers and elements that can be used as tags.  Some of the papers are beautifully foiled too.

I added tabs to the signature covers to add some interest.

Here are the DCWV paper pads that I used, one is pattered and one is plain - the plain one is full of gorgeous Halloween coloured papers.

To finish off both journals, I added some handmade charm hangings, a few die cuts and Sari ribbon, sparkly twine and yarn.  I had such a lot of fun making these!

So there we have it, two more Halloween journals finished, I seem to be building up quite the collection!  I may even be back with more before Halloween.

Thanks so much for all your support whilst I have been part of Eileen's team, I hope to see you in Eileen's Fan Club (there are over 3,000 members now!) or here in the future!

Hugs, Anne  xxx

Tuesday, 11 September 2018

Fall-O-Ween for Eileen Hull

Hello Friends

This month Eileen Hull's Inspiration Team are celebrating Autumn by creating Fall-O-Ween projects, either creating an Autumnal project or a Halloween project!  Of course, I went for Halloween!

Do please check out Eileen's blog HERE all this month for inspiring projects.  Eileen also has a Fan Club of Facebook HERE where over 3,000 members share ideas and projects.

For my project I used Eileen's new Wrapped Journal (Sizzix 662816), Tim Holtz latest Halloween fabric gifted to me by Jenny Marples and Halloween buddy Juli Riedel (of Voodoo doll fame).  Thanks again ladies!

The journal was created during a super fun crafty day with some dear and fabulous friends - Rita McGranthin, Annie Gilmour and Tracy Evans, three exceptionally talented ladies!

I covered the journal, inside and out with Tim Holtz latest release of Halloween fabric, it gives the journal some added strength.  I don't have any process shots (sorry) but we were having fun playing and I forgot, so I am showing you how I finished the journal off instead.  Having said that, all of Eileen's journals are just a dream and very easy to put together.
Here, on the inside cover you can see how the fabric (on the cover) goes with Tim's latest Halloween paper (on the signatures).  The gravestones, cat and hat are all from older dies from Tim Holtz.  The gravestones were covered in two of  Seth Apter/Emerald Creek's Baked Textures in Rocky Road and Patina Oxide.  The words are from a Tim Holtz stamp set.
You can see here that I used Tim's Design Tape to give strength to the signature.  The fabulous witch is a die from one of Tim's previous Halloween releases.  She is missing her broomstick and cat here!

The signature cover this time was stamped with Tim's Gothic background stamp and white embossing powder was added.
Again, another of Tim's Halloween dies and word for the ghosts, the bats are from a very old Memory Box die.
The spider's web was stamped with Tim's cobweb stamp and embossed with white, the spiders are from one of Tim's very old die sets.  They were embossed with Rocky Road Baked Textures - they look quite creepy in real life!
From Tim's latest Halloween release, Mr Bones just had to make an appearance - I bought him for my Guest month with Simon Says which you can see HERE if you missed it.
On the cover I used an old Tim flourish die as a branch for the Raven to sit on.  The Raven is actually one of Tim's older stamp releases, he was stamped, fussy cut and then covered with embossing ink and coated with Seth Apter's Rocky Road Baked Texture.  The closure is one of Tim's Idea-ology Custom Knobs.

The tag was created using Tim's new Alcohol Lift Ink on Yupo - my first experiment with this new technique, it was so easy and such fun to do!  Thank you to my lovely friend Kath who bought me the set for my birthday whilst we were at a craft event!

To finish off I added some charms from my stash and some sparkly orange yarn.

Another Halloween project done and dusted!  Thanks so much for your visit,
I hope to see you again soon, I have a couple more Halloween journals to
share next week using Eileen's journal dies and papers from DCWV.

Hugs,  Anne  xxx
Related Posts Plugin for WordPress, Blogger...

Labels