
Hello Friends
Although I have made many journals in the last year or so, I have never made a Junk Journal, so I thought I would take the plunge and make one for the Mini Album Makers Challenge for April.
I visited lots of blogs and watched many, many videos on how to create a junk journal and was inspired by lots of people, including Candy Colwell, Nik the Booksmith and Jenny Marples, all of whom have made beautiful Junk Journals. In the end I was a bit overwhelmed and just did my journal with things I like using, including tea stained papers, a few digi pages (from Nik the Booksmith) and lots of fabric, modern and vintage lace, ephemera and charms from my stash.
This is a picture heavy post, but it is a big journal measuring 8" x 6" x 2" deep. I don't want to overburden with photos so I have collaged some.
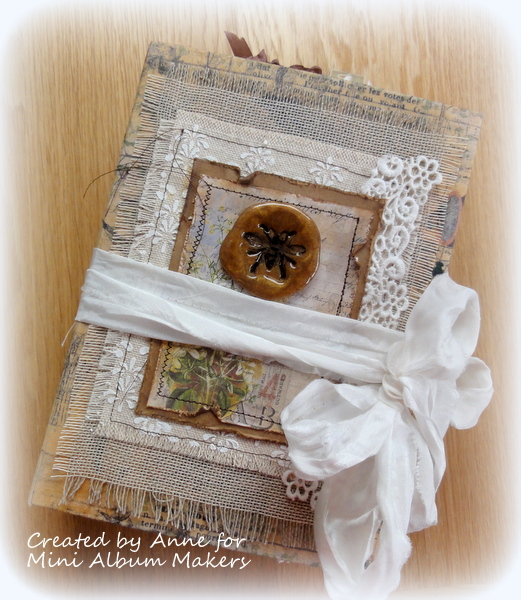
This is a Nature Journal and it contains many images of dragonflies, bees and butterflies.

1) Choose your covering, I used some of Tim Holtz Eclectic Elements fabric - Wallflower.
2) Cut medium weight board onto two 8" x 6" pieces and one 8" x 2"
3) Cut a piece of fabric 17" x 11" in one continuous piece
4) Apply your glue of choice (I used my Xyron) to one side of each piece of board
5) Apply the fabric to the glued side of the board leaving 1/8" gap between the pieces.
6) Optional extra - glue a piece of Tyvek to the joints to provide extra security
6) Use Matt Medium to glue the fabric to the inside of the binding as shown, ensuring you mitre the corners carefully to avoid extra bulk on the inside.

7) Cut design paper to fit the inside covers and glue these with Matt Medium
8) Make a pocket for the inside back cover if desired

9) Gather together your elements for the cover

10) Add these elements to your cover (I did not use the felted flower). I decided to 'vintage up' the cover by applying a coat of Distress Collage Medium - Vintage to the cover - this also helps to protect the cover.
I created three signatures for the inside of the Journal and below is a small selection of the pages I created for the signatures.

I added lots of lace, pockets, tuck spots, tags, stamped insects and for the front and inside I created a couple of 'insects preserved in faux amber'....

To create the faux amber on the cover and in the
signatures I used the new Baked Textures Embossing Powder from Emerald Creek/Seth Apter. I used my Melt Pot and added some Baked Texture - Amber along with small amount of clear UTEE. The beauty of this technique is that you can re-stamp into the EP once it is cold, if you need to 'darken' your chosen stamp.

I poured the melted compound onto my non stick craft sheet and immediately pressed Tim Holtz Entomology stamp (s) which had been inked with Black Archival Ink, into the molten EP. I was really pleased with the outcome of both. I mounted this one into one of Tim Holtz's cabinet cards.
Our generous sponsor this month is Gypsy Soul Laser Cuts who will provide a prize pack to one lucky winner! You can see an example of how I used their wonderful products here.

Website - http://www.gslcuts.com/Store/
Blog - http://gslcuts.blogspot.co.uk/
Instructionals and Kits - http://gslcuts.blogspot.co.uk/p/blog-page.html
I hope will have time to visit Mini Album Makers to see what my talented teamies have made, and hopefully join in this month! As always, our challenge is Any Handmade Book Goes. Enter any form of handmade mini albums, scrapbooks, journals and book arts. Our focus is on completed works, so no layouts or journal spreads that are not part of a complete handmade book project. You do not have to provide a tutorial, but we wish you would. Feel free to use one of the DT tutorials to make your project and give proper credit where due.
Thanks so much for your visit, I hope to see you again soon...
Hugs, Anne xxx
