Pinterest

Showing posts with label Wendy Vecchi. Show all posts

Tuesday, 31 May 2016

More May Flowers

Hello Crafty Friends

I wanted to share some more of Eileen Hull's newest release of dies, which include
some beautiful flowers and also a new  Heart and Soul Flower Pocket die (#661112).

I made a couple of sets of flowers, the first one is the Heart & Soul Flower die (#661108)
along with the Heart and Soul Pocket die and also Eileen's new Honeycomb Embossing
Folder (#661447).

The flowers are simply die cut with some patterned paper from my stash and the bee is
from a Wendy Vecchi Art Parts set.
Die cut the holder and emboss.
Paint the whole of the pieces with Deco Art Media Fluid in Yellow Oxide.
Coat with a layer of  Deco Art Antiquing Cream in Raw Umber, leave to dry and rub
over with a damp cloth to remove some.  Antiquing Cream dries but it never 'cures' so you can
always rub it back, to age your items.
A close-up of the bee, coloured with Deco Art Media Fluid Paint in Carbon Black
and Yellow Oxide.  The wings were coated with Tim Holtz Distress Rock Candy
Crackle Paint.
My second project uses Eileen Hull's new Flower die, Pansy (#661109).  This is my favourite
of the new flower dies because, even though it is a pansy, it is a shape that can be
used to form different types of flowers, I was trying for a Camellia here...
You can see the shape of the petals in this picture.  To create the centre of the flower I
glued the petals to a wooden bead and then shaped the other petals with a pencil and added
them in layers around it.
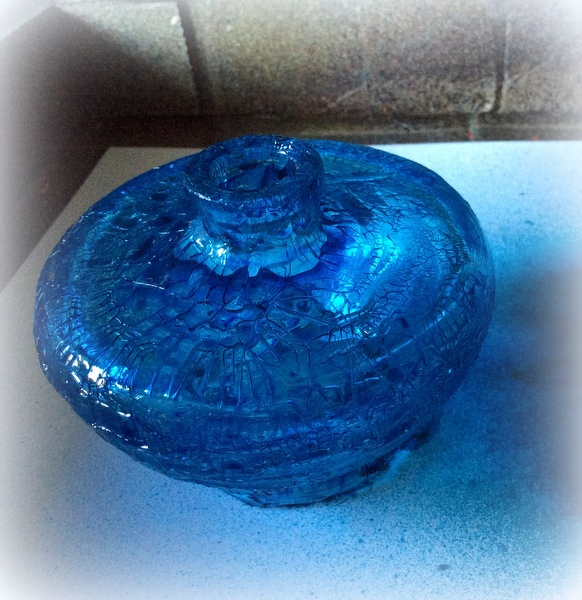
The jar was given a coat of matt medium, followed by a layer of Distress Rock Candy
Crackle Paint (a technique I first learned from Wendy Vecchi)  and then sprayed with
Distress Spray Stain in Blueprint Sketch.

The leaves on both projects are from Eileen's Spring Leaves die (#661111).

Thanks so much for your visit, I hope to see you again soon.

Hugs, Anne xx
 ..........
PS, we have visitors arriving on Friday and I doubt whether I will have time to visit
and/or comment on your blogs, I apologise in advance, I will do my best to catch
up with you all in about two weeks time.  Take care! xxx


Saturday, 5 March 2016

Crazy for Colour !

Hello Everyone!

At Anything But Cute this month the wonderfully talented and lovely Branka is hosting our challenge, which is 'Crazy for Colour'.  To celebrate the Springtime we would like to see you create a mixed media project using Vibrant Colours.  It can be a tag, a card, an art journal page or anything else, just as long as you use vibrant colours!

I decided to give an old air freshener bottle a make-over.


I absolutely love the 'faux crackled glass' technique that both Wendy Vecchi  and Tim Holtz use and I thought it would look beautiful using some vibrant colour!


The first step is to wash the glass well in soapy water, rinse and dry thoroughly - as any oil or dirt will affect the outcome.  Cover the whole piece evenly with Ranger Glue 'n' Seal (Matte).  Leave to dry naturally.

Coat well with Ranger Clear Rock Candy Distress Crackle Paint.  Try to make it a fairly even coat, you don't want big blobs of paint as these will be more likely to chip off later.  I find it best to leave this to dry overnight, I never use a heat tool when doing this technique.
When it is dry you should have some lovely big crackles!
Now for the fun part!  I use an old pizza box as a 'spray booth'.  This part is messy.
I used Mermaid Lagoon Distress Spray Stain (you can use alcohol inks too if you prefer) to cover the whole of the piece.  It doesn't look great when you first do it, the stain seems to 'pool' in some of the cracks but don't worry, it will look great when it is dry.  Leave it to dry naturally for a couple of hours at least.  Don't be tempted to use a heat tool, natural is best!
Next up is the flower.  I used a mixture of Red and Orange DecoArt Media Misters (the colours are really vibrant), mixing them in a separate bottle and I just sprayed the whole flower.  The flower came as part of the air freshener set and is made of a very lightweight material which took the colour beautifully!
Now, for the most important step (in my opinion).  I covered the glass with a coat of Ranger Glue 'n' Seal, this time in the gloss finish.   At this stage you will feel like your colour is lifting from the glass, Distress Stain is water based and will react with any liquid you put over the top, but just keep applying it in small gentle strokes.   I left it to dry thoroughly and then applied a second coat.  It gives the glass a lovely glossy sheen and it protects the crackle from chipping off.  I would not recommend washing the glass but a gentle dusting from time to time should not dislodge the crackles.
Another view of the finished pieces.
If you have not tried the technique before, I hope you will now!

So, if you feel inspired to go 'Crazy for Colour' then please do join us at Anything But Cute, we would love to see you join in Branka's wonderful challenge.

As always, thanks for looking and I hope to see you again soon!

Hugs, Anne xx

Tuesday, 17 November 2015

A Stitch in Time

Hello Everyone!

It seems ages since I blogged but I had a few days away.  I am here to share my Inspiration Team piece for Eileen Hull's Art With Heart Challenge - A Stitch in Time.  Do come and join in the fun!

Eileen has designed a fabulous new range of sewing themed dies which are either in the stores now or will be coming very soon!  This week I chose to use the Cantilever Sewing Box die and next week I will be sharing projects made the new Stitchlits border and flower dies.  The sewing box is SO clever, just like the one your Mum or Grandma used to have, only in miniature!

This is a picture heavy post so I have kept the words to a minimum.
Using the die I cut out all the pieces and looked at the brief instructions.
Since I intended to cover my box with paper I attached strong red liner tape all around each box and painted the bottom and edges with Tim Holtz Aged Mahogany Distress Paint.
I chose the fabulous new Graphic 45 Christmas Carol papers to cover the box.
With the boxes covered, I painted the struts with DecoArt Media Fluid paint in Titan Buff.
I used some metal brads from my stash (the colour matched too!!) for the struts, and two knobs by Wendy Vecchi's Blossom Bucket range on the top.
At this point I decided to make it a jewelry box and lined each compartment with more of the papers and then some black felt.  Two of the compartments were fitted with concertina folded felt to create places for rings and earrings.
To decorate the top I cut a Tim Holtz Poinsettia, partly from G45 paper and partly from canvas fabric which was backed with Wendy Vecchi's Clearly For Art so that I could shape the flower and it would stay in place.  The greenery is from more Tim Holtz dies and the pearly embellishments are by Anna Marie Designs
Here is a close up of the finished top.  I also painted the stars on the little knobs.
One final look at the completed box.  The finished set measures 6.1/4" x 2.1/4" approx.
(16 cm x 7 cm approx) - perfect as a little jewelry box or for several small gifts.
I do hope you like it!  I can see myself making a few of these to put small Christmas gifts in, they would be brilliant for Valentine gifts too, but I also think they would make wonderful mini sewing boxes to keep all your sewing bits and bobs in.  They go together incredibly easily too.

So do please come an join us at Art With Heart in our A Stitch in Time Challenge HERE, where you could win one of Eileen's fabulous new dies!  At the moment you stand a very good chance of winning - just saying.....!

Thanks so much for looking, I hope to see you again soon.  Hugs, Anne xx

Sunday, 12 July 2015

Travel Document Holder for Inspiration Journal

First, I would like to thank my latest new followers for joining me on my crafty journey.  Next, I would like to apologise to any of you that I have not visited lately.  I have been full of a summer cold which has made me feel pretty miserable and I have been trying to spend less time on the computer.

I am off to London at the end of the month so see the wonderful artist that is Wendy Vecchi and I made a Document Holder to carry all the things we need for the trip.

To start I used a Manila File Folder which I cut in half, folded to create two inner pages and then I got out Tim Holtz's fabulous Correspondence Paper pad to create this:


Once folded I covered the inside and outside of the file folder with Correspondence Papers.  For the front I used the Picture Wheel die and then added the word London using Tim's Alphanumeric Thinlits die set.


Big Ben is stamped from London Sights and the view is from the Cityscapes stamp set.


A couple of pockets were added to the first two pages along with Alphanumeric letters, Remnant Rubs and the rest of the Cityscape view.


On the inside back pages I added an envelope from the Bigz envelope die and attached another pocket on the inside back page.


I used Wendy Vecchi's Archival Ink and Embossing Powder in Red Geranium to cover the Idea-ology clip and the double decker bus charm is from my stash.

A view of the back cover and Tim's beautiful papers.  The finished folder measures 6" x 4.1/2", is not too bulky and will fit nicely into my handbag/purse.

Many of the items I used can be purchased from Inspiration Emporium, if you do shop there and use my code Redanne, you will receive a 10% discount from your whole purchase.

Thanks for looking, I will be back on Tuesday to share some 3D projects for Eileen Hull's
  Art With Heart Challenge.  Hugs, Anne xx


Products from Inspiration Emporium

Monday, 15 June 2015

A Vintage Journey - Destination Inspiration June #2

Hello Everyone
Just a quick sneak peek, I hope you will go over to A Vintage Journey where it is my turn to use a 'recipe' devised by four of the Creative Guides, which is:
Product:  Any Tattered Die
Technique: Layering Stencil : Texture Paste
Colour:  Walnut Stain
Substrate:  Watercolour Paper


As always, thanks for looking,  Hugs, Anne xxx

Tuesday, 26 May 2015

Manila file mini album for Inspiration Journal

On our recent visit to Scotland I had the pleasure to meet up with some crafty friends (Rita, Annie and Astrid) for a day of chat, great food and a bit of crafting.  Astrid gave each of us a large manila file and showed us how to fold into a mini album shape and we set about decorating them.  

I decided right away that I wanted mine to hold photographs from the visit - those of you who are expert at these folders will see that I folded mine wrong but I didn't let that deter me - you know what Tim Holtz says - embrace imperfection and so I did!!


Mine will ultimately hold photos, so I didn't want to over-embellish mine or add texture paste, the whole folder is covered simply with Distress Inks in Cracked Pistachio and Gathered Twigs and I used a few of Tim's stencils to add some interest.  The words are from Tim's Big Chat stickers.


I stamped, coloured, fussy cut and mounted two of the gorgeous Cone Flowers from Tim's Flower Garden set of stamps.  The flowers were coloured with Ripe Persimmon, Gathered Twigs and Mowed Lawn Distress Inks.

I took one of Tim's mini clips and embossed it with Wendy Vecchi's Red Geranium Embossing Powder and then distressed it with some Ranger Black Archival ink.  The other two pieces are from Tim's Idea-ology range, I swiped the 'Authentic' piece with Ripe Persimmon Distress Paint.


I kept the inside fairly simple, with just some stenciling and a little stamping.


A bit more stamping and stenciling and a piece of Tim's Idea-ology film strip.

There are still a few days left to join in the challenge at Inspiration Journal which is 'Get Pasted' where you just need to include some Embossing Paste somewhere on your creation.  As always, there is a fabulous $50 prize for one randomly selected individual to spend at Inspiration Emporium.  If you use my code Redanne you will get a 10% discount off your entire purchase.

I would like to enter this into the lovely Hels Sheridan's Sunday Stampers, where this week is a Free Theme week.

Thanks for looking, hope to see you again soon!  Hugs, Anne xx


Products from Inspiration Emporium
Tim Holtz Distress Inks
Tim Holtz Distress Paint
Tim Holtz Idea-ology
Tim Holtz Stencils
Tim Holtz stamps
Archival Ink
Wendy Vecchi Embossing Powder

Wednesday, 29 April 2015

Perspective Butterfly for Inspiration Journal

The month is nearly over and this is my Project #4 for Inspiration Journal, where the challenge theme is Everything Goes - you only have a day left to enter but there is a great prize on offer of $50 to spend in Inspiration Emporium's on-line shop.

I have a question for you first, have you seen Jenny (Buttons) videos on the British Craft Network TV yet?  If not, you are missing some great tutorials, tips and techniques.  My piece today, was inspired by a couple of Jenny's shows where she used a layered paper technique, dribbles and splats!


The card base is 6" x 6", I cut up strips of Tim Holtz  paper (1" x 6"approx) from my stash, ripped the ends off and glued them down, overlapping in the left top corner as you can see below. 


I added some Tissue Tape  here and there and then painted over the whole piece with a light coat of Picket Fence Distress Paint.  A few dribbles of Chipped Sapphire Re-inker were added along with some builder's scrim for texture. 


Now for the fun bit!  Using several colours of Distress Spray Stain, these were spritzed and dried in turn, over the whole card.  Once dried fully I used a paint brush to add splats of paint all over - it is hard to know when to stop, it is such a fun thing to do - but make sure you cover the whole of your desk/work surface with paper and protect your clothing too!


The butterfly was one I had left over from another project, it was coloured with Distress Stains and then coated in Clear Rock Candy Distress Paint.  I added some gauze I raided from the medicine cabinet and some rusty wire to the background, attached with my Tim Holtz Tiny Attacher.  I also added some random stamping to the background using a Wendy Vecchi Vintage Mesh stamp.


To finish off I added some of Tim's Remnant Rubs for some added interest.


So, there you have it, my completed Jenny inspired card.  Apologies for the long post but I wanted to do justice to Jenny's techniques and tips. 

If you do shop for supplies at Inspiration Emporium, don't forget to use my code - Redanne to get 10% discount off your whole order and shipping rates are very reasonable.

As always, thanks for looking, see you again on Friday!  Hugs, Anne xx


Inspiration Emporium Products Used:

Thursday, 23 April 2015

Make Art Challenge

Hello and a big welcome to friends and followers old and new, I always appreciate your support.

Having just received my DT package from Inspiration Emporium I decided to create another Wendy Vecchi inspired project to enter in her Make Art Challenge - Use Re-Inkers, you can find the challenge details HERE.

I have been trying, unsuccessfully, to do a background using Wendy's Alcohol and Re-Inker Technique for a while now and to create this one I used a lot of Rubbing Alcohol but I was determined to get a result!  You can see how Wendy does the technique HERE.  I omitted the metallic mixative on my background.


I kept the card quite CAS because I wanted the background to show up nicely.


After creating the background using Re-Inkers in Potting Soil and Cornflower Blue, I stamped out the beautiful Tulip three times from the Art From the Heart (LCS003) set of stamps and  coloured them with Archival Inks in Red Geranium and Fern Green and a Tim Holtz Blending Tool.  I decided against using the blue flower (coloured with Sky Blue Archival) and the ribbon (coloured with Forget-Me-Not Archival mixed with Rubbing Alcohol- it is great for colouring ribbon).  I fussy cut the flowers and layered them up to give dimension.


The wonderful sentiment is from the Blooming Art (SCS119) set of stamps, it suits my mood at the moment!  The stripes at the bottom were used to 'ground' the flower and were created with Wendy's Dots and Stripes Border stencil using Potting Soil Archival Ink.  To finish off I added one of Wendy's Blossom Bucket bees.

There is still time to enter Inspiration Journal's Anything Goes Challenge this month, there is a $50 gift voucher for one randomly selected individual to spent at Inspiration Emporium, our generous Sponsor.  If you use my code Redanne you will receive a 10% discount from your whole order.

I am entering my card into Wendy's Make Art Challenge - Use Re-Inkers.

Thanks for looking, hope to see you again soon.  Hugs, Anne xx


Products used from Inspiration Emporium
Archival Ink
Archival Re-inkers
Wendy Vecchi Dots and Stripes Border Stencil
Wendy Vecchi Blooming Art stamps
Wendy Vecchi Art from the Heart stamps

Wednesday, 15 April 2015

Guest Designer at Artist Trading Post

I am very excited and thrilled to tell you that I was asked to be Guest Designer for Artist Trading Post where the fabulous Wendy Vecchi is the Featured Artist all this month.  I adore Wendy's style and products, of which I have many, the hardest decision was - which ones do I use!

I created something that is very much in Wendy's style but I used a 'variation' on her faux 'splattered plaster' technique to create the background you can see below....

Please do pop over to Artist Trading Post, if you have the time, to see how I created it and what I did with this background and also to see what Wendy created HERE and HERE already this month.


I do hope you like what I created for Artist Trading Post.  Thank you again to ATP for having me as Guest Designer and to Wendy Vecchi for bringing us such wonderful products! 

Hugs, Anne xx


Related Posts Plugin for WordPress, Blogger...

Labels