Pinterest

Showing posts with label Maja Design Papers. Show all posts

Tuesday, 10 April 2018

Spring Showers

The theme this month for Eileen Hull's Inspiration Team is 'Spring Showers'.  If you live in the UK, we certainly get plenty of those!

But this is slightly different, we are celebrating Showers of a different kind - Baby Showers, Wedding Showers or different types of parties.  I chose to create for a Baby Shower/Party.
I made a Shabby chic card using beautiful Maja Design papers and Eileen Hull's Pansy Flower die (Sizzix 661109), and hand felted a little blue teddy to go into the Eileen Hull Book & Pages, Trinket Box & Frame die (Sizzix 662360).

Starting with the card, I simply mat and layered the beautiful Maja Design papers, added a Scrapiniec frame which I embossed with Stampendous Frantage Shabby Blue Embossing Enamel.  I die cut the word 'baby' and coated the letters with Glossy Accents.
The flowers are made from Eileen Hull's die - Pansy Flower.  Just a few steps:
1)  Die cut flower petals, 6 for each flower, 2 of each size
2)  Spritz the petals with water and scrunch up
3)  Carefully open the dampened petals and leave to dry naturally
4)  Layer up the petals and scrunch up again
5)  Add ready made stamens to each of the flowers
Next, I made the Trinket Box.  I covered the Mount Board with Maja Design paper and then die cut the elements for the box.  I followed the instructions on the die to construct the box and I added a button and elastic closure.  The word 'baby' was die cut and coated in Glossy Accents.
Here is a picture of the inside of the box, covered again in Maja Design papers.  I lined the 'floor' of the box with some beautiful soft felt.

Long before I had my wrist replacement I loved doing wet felting, but afterwards, I was unable to put the pressure required to rub the felt, so sadly, I stopped.  Once I saw my friend Rachel's beautiful felted creations (you can see one HERE) I wanted to see if I could make something using felting needles - much easier to do than all that rubbing!!  Thank you Rachel, I have had an absolute ball creating these little creatures! 

So, to complete my project, all that remained for me to make was the teddy, one that would fit in the box!  I had to make several before I got the right size to fit in the Trinket Box - and that just happened to be the blue one, the last one I made.
I thought I would share the whole 'motley crew' of bears that I made, the three sitting bears were my first attempts and to me they look a bit cock-eyed but I am happy with the three standing bears on the right hand side.

Thanks for 'bearing' with me through this post!  My team-mates have made some fabulous creations so far this month, you can check these out HERE on Eileen's blog.

I hope to see you soon!

Hugs, Anne  xxx

Tuesday, 20 February 2018

Favourite Eileen Hull die.....

Hello Friends and New Followers!

This month, Eileen's Inspiration Team are sharing their favourite of Eileen's dies - that is a difficult ask for me because anyone who knows me knows that I love ALL of Eileen's dies, her Scoreboard dies have been a revolution in die cutting and a pure joy for those of us who love 3D crafting!

In the end, after much deliberation, I went for Eileen's Cantilever Sewing Box die (660768) and her beautiful Flower, Pansy die for my creation, I hope you like it!
I made this as a thank you gift for a friend I am visiting, I am away at the moment, if I missed a post, I apologise!
I die cut all the elements for the sewing box, using Sizzix Matboard.
To construct the boxes I used a strong wet glue and wrapped an elastic band around the box until dry.  I then applied strong tape to add my paper.  You could attach your design paper first (or paint the board) and then die cut, but I just prefer to do it this way.  Once dry, I assembled the sewing box according to the instructions.  You can download the instructions by clicking download, HERE.
I lined the insides of the box with the reverse side of the same beautiful Maja Design papers I used for the outside.  I painted the box struts with PaperArtsy paint in Cherry Blossom and added some knobs to the top, after painting them with the same colour of paint.
The flowers were die cut using Eileen's Flower Pansy die (661109) and using a product called Flower Making Foam, after seeing my lovely blog friend Lisa use it so beautifully... here.  I had so much fun making my flowers!  After die cutting and giving them a little touch of Eileen's Color Box Blend Ink in Tutu, I pressed the petals onto my hot craft iron and let them 'curl' into shape and assembled them, adding some stamens to the centre.

I hand dyed some seam binding, colouring it with Picked Raspberry Distress Spray Stain and assembled my little floral decoration.
A final look at the finished sewing box, these wonderful little boxes are ideal for storing lots of bits and pieces and/or sewing items.

All month long, my teamies on Eileen's Inspiration Team will be sharing their favourite Eileen dies.  If you do have time I hope you will pop over HERE each week for some wonderful inspiration!

Thanks so much for your visit, I hope to see you again soon!

Hugs, Anne  xxx
Monday, 1 January 2018

Mini Album Makers January Challenge

Happy New Year Friends!

Since it is the first day of the month, not to mention a new year, it is time for a new challenge at Mini Album Makers.  As always, it is an anything goes challenge as long as you make a complete album, book  or journal.

I decided to make a mini album this month.
As another new year begins, my thoughts turned to Valentine's Day and I made a 4" square mini album from two sheets of 12" x 12" paper and some fabulous Gypsy Soul Laser Cuts... (all of the Gypsy Soul products I used are listed at the end of this post).
1.  Score a 12" x 12" piece of heavyweight paper at 4" and 8" on two sides
2.  Cut so that you have three single folded pages and one page with an extra flap (see above)
3.  Punch a half circle in the flap element, and use strong tape or glue on three sides to form a pocket - this would form the inside back page of the album.
4.  Glue all four of the page pieces back to back to form a 'booklet' style album
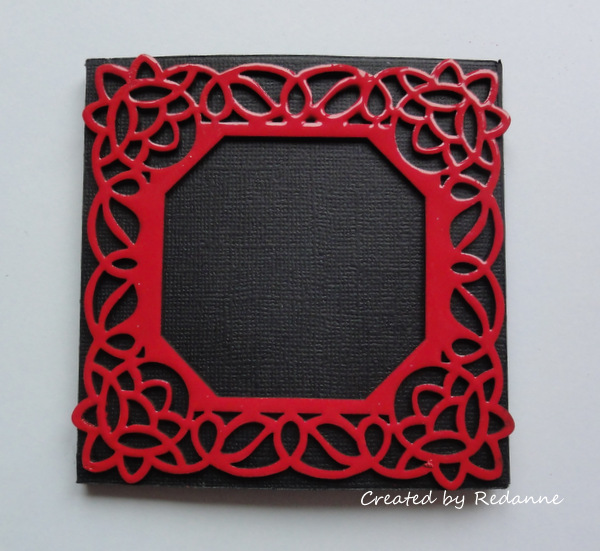
I chose this beautiful Gypsy Soul frame for my front cover and embossed it with Wendy Vecchi Embossing Powder in Red Geranium.  I gave it two coats so that it is beautifully glossy.
I glued the frame to the front cover of the album. At this stage I was undecided about decoration for the cover.

Since I had Valentine's Day in mind I opted for two hearts and embossed them with the same red embossing powder.  Whilst the EP was still hot I stamped into each heart with a script stamp to add some texture.

I dyed a piece of vintage seam binding with Festive Berries Distress Stain, attached it with a staple on the front and then glued the hearts on top as shown above.
To decorate the inside pages I chose a 12" x 12" piece of Maja Design double sided paper and cut this into 4" squares.  I trimmed five pieces, used Festive Berries Distress Ink to finish the edges and attached them to the inside pages.  For the remaining pages (including the pocketed back page)  I cut a half circle in the top and added glue to three sides to create further pockets.

I decorated one side of each pair of pages with some more beautiful Gypsy Soul Laser Cuts, each of which I embossed with the same embossing powder as before.
I used the remaining square of patterned paper to cover the back of the mini album.

There is plenty of space on the pages to add photos and/or memorabilia.  This is such a quick and easy design to create and I think it would make a wonderful substitute for a Valentine's card - it would be lovely filled up with personal messages and sentiments.....

So, I do hope you will join in at Mini Album Makers this month!

Our Sponsor this month is the wonderful Lindy's Stamp Gang who are offering a $25 Gift Voucher to one lucky winner.


Website - https://www.lindysgang.com/
Blog - https://lindysgang.blog/
YouTube - https://www.youtube.com/user/lindysgang/


As always, thanks so much for your visit and I hope to see you again soon!

Hugs,  Anne  xxx


Products used from Gypsy Soul Laser Cuts

Monday, 16 January 2017

Baby It's Cold Outside...

Hello!

I don't make New Year Resolutions, mainly because I always fail to keep them, but this
year I have resolved to start making Christmas cards early.  I don't want to be caught out again
this year, having to rush at the last minute...

The lovely ladies at Creative Carte Blanche have a new adventure for us this month, 
called 'Baby It's Cold Outside' - a perfect opportunity to make my first Christmas card
of the year, with a view of a cold winter scene through a window.

In addition Frilly & Funkie would like to see what we are inspired to achieve this year, for me it is to create Christmas cards all year long!
 I am not sure of the technical term for this kind of card but I call it a book box card, I am not going to go into any detail about it's construction as there are so many tutorials available on YouTube.
I started by making the 'book' element which measures 6" x 5", stamping the Tim Holtz Scribble Woodland view and die cutting the Sizzix window, which was cut twice, along with a piece of acetate for the 'glass'.
The sky was coloured with Distress Ink, the cabin and trees were coloured with Distress Markers and I used Distress Stickles on the ground part.
The outer part of the book box was created by cutting a piece of patterned cardstock (Maja Design) 6" wide and 11" in length to cover the front, back and spine of the book box in one single piece.  I added the strip of card around the middle to hide the ribbon closure.
To create the inner part of the box I cut a piece of patterned cardstock 6" x 5" with an aperture measuring 4.1/2" x 3.1/2".  The tree and deer die cuts were a gift from my lovely 
friend Sara Emily of Sarascloset  - thanks again Sara!
Another aperture was cut into the front part of the book box, measuring 3.3/4" x 2.1/2" to fit the window frame.  One window was attached to each side of the aperture with a piece of acetate between to form the 'glass' part.
Finally, I added some die cut foliage (Tim Holtz).  The berries are from Tim's Idea-ology range (Pearls) and I coloured them using Ranger Alcohol Ink in Red Pepper.  The sentiment was stamped in Ranger Black Archival Ink.

So that is one card down, just a few dozen more to make.

I am joining in Craft Stamper's January challenge which is Anything Goes!

I would also like to join in Emerald Creek's latest challenge - #4 - Bring on the New - my new items are the gorgeous Tim pearls and the Maja Design papers I purchased specifically for this project.

Thanks for your visit, hope to see you again soon.

Hugs, Anne xx

Friday, 9 December 2016

Secret Santa at Anything But Cute

Hello Friends

Is there anything nicer for a crafter, than getting a handmade gift from a crafty friend at Christmas?!

This year at Anything But Cute we decided to do a Secret Santa and I got to make a gift
for the uber talented Pamellia of  My Little Craft Things. So, what to make for such a talented crafter?  It had to be a 3D project using one of Eileen Hull's fabulous dies!  I used the Cantilever Sewing Box die to make Pamellia a little box to store some of her crafty bits and bobs.  I am happy to report that Pamellia loved her gift....

I added a flower to the top using Tim Holtz's fabulous Poinsettia die.  The flower is removable so that the box will look a little less Christmassy....
The box opens up and there are lots of little compartments to store crafty things.
I used some beautiful Maja Design papers for the inside and outside of the box.  The struts and insides of the trays are painted with IndigoBlu English Cottage Acrylic paint - Grandma's Teacup, it matched the papers so beautifully.
I also made a tag and included one of Tim Holtz's Idea-ology watches, decorated inside with the words 'Remember the Now'.  The little knobs on the top of the box are also from the Tim Holtz Idea-ology range.

Finally, I sent Pamellia quite a simple card.  Those who know Pamellia well will know how much love she has for the neighbourhood woodland creatures, particularly the squirrels.  When I saw this delightful image I knew it just had to go on Pamellia's card and I wanted it to be the centre of attention.


I was so lucky to receive my gift from my lovely and talented friend, Sara Emily of  Sara's Closet.  Here is a sneak peek of what Sara sent me, you will never guess what it is!

 I hope you will find the time to go over THERE and have a look, it is quite exquisite.  About a year or so ago Sara did a tag with a similar technique and I lusted after it for ages, the tag has been shared over a 1,000 times on Pinterest, so I think a lot of others were lusting after it too!  Sara, I LOVE MY GORGEOUS GIFT, it will be so incredibly useful, particularly over Christmas!

It has been such a pleasure participating in the Secret Santa with my lovely teamies at Anything But Cute this year!  It has been great fun ladies!!  We are taking a little break during December at Anything But Cute but we will be back with our Winners Post on 12th December and with a new challenge in January!

I am adding this to Country View Challenges where the challenge theme is - Christmas
I am also adding my little sewing box to Simon Says Monday Challenge where the challenge theme is Christmas Gifts.

Thank you for looking, hope to see you again soon.

Big hugs,  Anne xxx
Related Posts Plugin for WordPress, Blogger...

Labels