Pinterest

Showing posts with label Bipasha BK. Show all posts

Wednesday, 23 September 2020

Frida

 Hello Friends

The Guest Designers at AALL & Create this week are creating cards.  I just received a DT package with some new stamps and stencils and the Frida stamp by Janet Klein seemed the perfect choice to go with my new goodies.

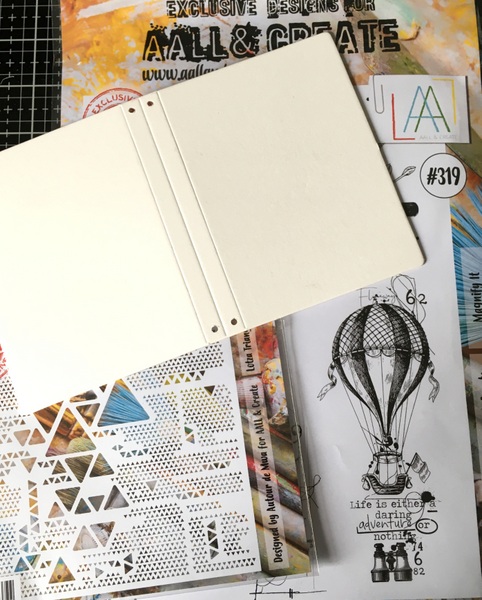
I used all of these goodies to create my little 6" x 6" card.
Hands up, I had to Google how to draw a Hexagon.  Once I had my template I traced it onto some watercolour cardstock and then cut out my card shape.

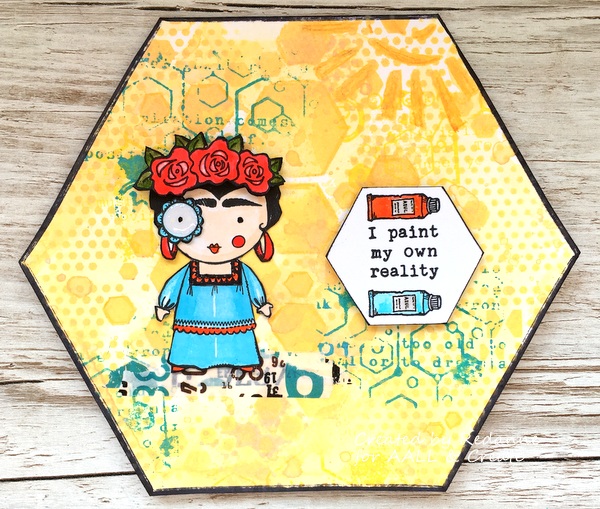
I used Scattered Straw Distress Oxide to create a background.
I used my new stencil Heapza Hexagonz (#112) and Scattered Straw Distress Oxide to create a background pattern before accenting this with stamp #384 - Lined Hexagons by Bipasha BK using Peacock Feathers Distress Oxide.
I stamped the beautiful Frida - stamp #377 by Janet Klein onto a separate sheet of watercolour card, coloured Frida with watercolours and then fussy cut her .  I used Autour de Mwa's fabulous new Washi Tape to create a grounding for Frida.
I used another fabulous new stencil - Hugely Hexagonal #108 to trace a Hexagonal shape and stamped my sentiment and two tiny paint tubes using the Frida stamp set. 
 I coloured the sentiment with watercolours before attaching to my card.

I decided to add a little more stencilling in the top right corner by using stencil #95 - Sunrise by Janet Klein.  Finally, I edged the card with black marker pen.
Here is a close up of the beautiful Frida.

Worldwide stockists for the stamp, stencils and washi tape I used on this project can be found HERE.

Thanks so much for your visit, I really appreciate it and hope to see you again soon.

In the meantime please keep safe and well.

Hugs, Anne xxx


Wednesday, 9 September 2020

Magnify It for AALL & Create

 Hello Friends

I am here this week to share my Guest Designer project for AALL & Create.  I created a mini travel journal using two stamp sets by Bipasha BK - Magnify It (#319), Navigate Home (#323) and Autour de Mwa's stencil Lotza Trianglz (#105).

I started by using Eileen Hull's Notebook die (Sizzix 663635) as my base.
Using Paper Artsy paints in Aquamarine and Snowflake I brayered the paint over the journal base and then applied Snowflake paint to the stencil, spritzed it with water and applied it to the journal.  This gives a nice gentle reproduction of the stencil.
Next I stamped the balloon onto the cover, and the binoculars onto the back.  I coloured the balloon with the fabulous new Crackling Campfire Distress Ink by Tim Holtz.  I added the words using Tim's Ideology Big Chat Stickers.
I created two signatures by painting with the same paints and then using the Lotza Trianglz stencil with a white pen to trace through the stencil onto the background.  Again, this gives a nice gentle image.
The first signature was stamped with the Binoculars from stamp set #323.
The second signature was stamped with the stop watch from stamp set #323.
To finish off I created a charm set.
Another look at the finished journal.

A list of worldwide stockists for the stamp sets and stencil I used are available from AALL & Create HERE.

Thanks so much for your visit, I hope to see you again soon.  In the meantime, stay safe and well.

Hugs, Anne xxx


Wednesday, 15 July 2020

Vintage Typewriter

Hello Friends

I hope you are all well, we are into our 19th week of lockdown here, strangely enough it just feels like the norm now and I am not anxious to go out anytime soon!

My Guest designer project this week for AALL & Create has a vintage vibe to it.
I used two of Bipasha's beautiful stamp sets - Time Out #325, Janet Klein's Background Noise #338 together with the Abundance Stencil #85 by Olga Heldwein.

I started by creating the background using Distress Oxide inks and the wrinkle free technique.  I covered the stencil with Seedless Preserves, spritzed it and applied it to the background.  This left a lovely delicate pattern.
I stamped the typewriter image onto white card and used an edging die to create the torn page look.
I stamped and fussy cut the typewriter again and also stamped the wording from stamp set #338, to use in the typewriter.
I gave the page and the note for the typewriter a vintage look with Distress Ink in Gathered Twigs.
I layered up the typewriter, added it to the page and then some corrugated card and fixed it to the background.  To finish off the card, I added the sentiment from my stash.

Worldwide stockists for the stamps and stencil I used are listed on the AALL & Create website HERE.

As always, thanks so much for your visit, I hope to see you again next week.

Hugs, Anne xxx

Wednesday, 8 April 2020

Tracy Evans' Happiness & Nature

Hello Friends

I hope you are all keeping safe and well in these difficult times.  After our third week in lock down we are getting quite used to it now and have established a simple routine, which helps!

My Guest Designer project for AALL & Create this week uses Tracy's beautiful Happiness & Nature stamp set (#281) along with a left over piece of brayered card, to create a card.
I loved the background colours and decided not to cover it up too much.  I had some die cuts left over too from a couple of Bipasha's dies - Code #12 and Cells #14.

I stamped Tracy's flowers onto watercolour card.
I watercoloured four flowers in the end, using two different colour combos.
I trimmed the brayered cardstock and mounted it onto a red mat and then stamped the flowers onto the base.  I prepared the die cuts that I wanted to use and in the end I went for the lighter of the two sets of flowers.
Before adding the die cuts I felt I wanted a little more texture so I stamped Tracy's Mesh stamp (#262) here and there using Red Carnation Archival ink, and also some Distress Oxide (Spiced Marmalade).
Here is the finished card again, with the die cuts added.  I finished off by adding a sentiment from the Happiness & Nature stamp set.
You can find a list of worldwide stockists for all of the stamps and dies I used HERE.

Thanks so much for your visit, it is much appreciated.

Stay safe and well.  Hugs, Anne xxx

Thursday, 25 July 2019

Birthday Card Organiser for AALL & Create

Hello Friends

I am back again this week with my Guest designer project for AALL & Create, it is a Birthday
Card Organiser which holds cards for 12 months of the year.  It was quite easy to make and is a great idea for organising cards for the whole year long.
The book itself is quite large, approximately 9 inches square by just over 2.1/2 deep (finished book) and I decorated it in my favourite theme!
 I cut some mountboard for the cover and spine.
I joined the spine to the covers with strong tape, leaving a gap so the cover was flexible. I also went around all the edges with the black tape (not shown) as I wanted a black border on the finished organiser. I set this aside to work on the inside folders.
I cut six pieces of card for the inside folders.
To create each folder, fold up from the bottom and fold back so that you have a pocket on each side.  You do not need to glue anything, folding back gives the pocket strength.  Using a standard hole punch, punch holes in the open side, through all the layers as shown above.
If desired, decorate the pages, I used some pretty papers from my stash.  I also decorated the pocket edges (not shown.  Adding paper gives the folders a lot of strength.
For the organiser cover I created two masterboards.  I brayered several layers of paint onto the card, applying a final layer of watered down gesso to tone down the colour.  I used AALL & Create stencil #39 to add some extra texture.

I cut a piece to fit the inside spine before attaching the ring binder mechanism (by Tim Holtz).  You need to do this before covering the spine on the outside of the organiser, otherwise the fixings will show on the outside of the organiser.
I cut the covers to size and added them to the organiser.  I used AALL & Create stamp #210 by Tracy Evans to add some further texture and then add some splatters of white gesso and black paint.
To decorate the cover I used stamp sets #137, #198 by Olga Heldwein and stamp set #196
 by Bipasha BK.
 I coloured these and fussy cut them out and applied these to the cover.
Here is a view of the inside, I added months to the folders and also added a card so I could list the birthday each month.

Finally, I added pockets to the inside front and back covers.  I am really pleased with the results of the organiser and it is very practical too!

You can find a list of worldwide stockists of all of the stamps and the stencil I used HERE.

As always, thanks for your visit, I really do appreciate it.

Hugs, Anne xx

Thursday, 27 December 2018

VW Campervan

Hello Friends

I hope you had a lovely Christmas and are now looking forward to the New Year!

I am sharing my weekly project as Guest Designer for AALL & Create, using Bipasha BK's beautiful VW Camper van stamp #141.  Having a holiday in a Camper van has been on my 'bucket list' for years and so I created a travel journal, just in case I ever get the chance!
The finished journal measures 5.1/2" x 3.1/2" by 7/8" deep.  I sized it so that the Camper van stamp would cover the front and back in one stamping.
The above is a view of the back.  I have a few steps to share with you, should you be interested in making a simple journal.
I cut three pieces of chipboard as shown above. 
I used a stamp platform and black archival ink to stamp my image onto a piece of calico cotton and coloured it with 13 Arts Watercolour paints.
I attached the painted calico cotton to the chipboard, leaving a small gap between the covers and the spine, to allow for easier closing.
The above is a view of the finished outside of the journal before adding the signatures.
The inside of the journal was finished off by adding card to cover the inside back, front and spine.  I added elastic for the closure and I also used elastic to hold the signatures in place.

The stamp set I used is available from AALL & Create Boutique, HERE.

Thanks so much for your visit, I will be back on 31st December with some exciting news!  In the meantime, if you are on holiday, enjoy your break.

Hugs, Anne xx


Thursday, 13 December 2018

Calendar Girl

Hello Friends and a huge welcome to my new followers.

Today I am sharing a project made with one of the newest stamps in the AALL & Create range (you can see the whole range HERE).

I was not sure at first how to showcase this beautiful stamp, I wanted to bring out all the elements in the stamp so I went for bold colours and then mounted it simply onto a 5" x 7" canvas base.
This is quite a large stamp and so I stamped it onto tissue paper and then painted it from the back
I didn't think the background was bold enough so I added more of the blue paint (Paper Artsy - Glass Blue Translucent Paint) and then decided that the dark background mat was too dark.
I kept adding paint until I was happy.
I placed the coloured (and dried)  tissue onto a white canvas base, this really showed up the beautiful blue colour.  I added a small amount of stencilling to the bottom left and top right to balance the project.
For the calendar element I used a purchased 2019 calendar and for my 2019, on the cover,  I traced the numbers from AALL & Create Stencil #30, cut them out, painted them and then triple embossed them before adding them to the calendar.


This beautiful stamp #141 is featured on Hochanda TV today (13 December) by Autour de Mwa from AALL & Create.  If you didn't catch the live shows you can always watch them on Rewind at www.Hochanda.com

I am pleased to have a calendar to add to my craft room wall.  If you would like to see the whole range of stamps and stencils by AALL & Create, they are HERE and you will find worldwide stockists.

As always, thanks so much for your visit, I really do appreciate it.

Hugs, Anne xx
Related Posts Plugin for WordPress, Blogger...

Labels