Pinterest

Showing posts with label Tim Holtz Idea-ology. Show all posts

Friday, 3 May 2019

Book It for A Vintage Journey

Hello Friends

It is time for a new challenge at A Vintage Journey and the theme this month is 'Book It' and the lovely Deb is our host.

Deb says 'there is nothing better than curling up with a good book to take us away to another place!  This month we'd like you to think about books - perhaps you will make a book, or a journal, create a journal page showing a scene from one of your favourite books (do please tell us what book) or a card showing someone reading or made using text stamps, stencils or word stickers.  Just remember to create in one of our preferred styles of vintage, shabby, mixed media, art journalling, industrial, timeworn or steampunk'.

I have a real love for old cameras and for making journals, so I combined the two for this month's challenge and created this grungy notebook journal, using a wonderful new camera stamp from Inventor 8 (CMS375) by Tim Holtz, one of many gifts from my dear friend Kath Stewart.
After die cutting the journal base, using Eileen Hull's latest notebook journal die (Sizzix 663635), I used Distress Oxide in Vintage Photo and Pumice Stone, smooshing it on my mat and picking it up with the notebook journal, drying it off, picking up some more until I was happy with the result.
I did the inside of the cover in the same way.
I stamped the camera onto the front cover, I also stamped the back of the notebook with another of Tim's new stamp sets, Fragments (CMS 368).  I stamped more of the elements and gathered the Idea-ology items together that I wanted to use to decorate the notebook.

I added a ready made collaged pocket to the inside front cover and I used Tim's Stitched Slots die (Sizzix 662697) for the inside back cover.
I layered up the camera on the front of the journal, added elastic stringing and placed an Idea-ology drawer pull to the side of the journal.
I created one signature, added some Remnant Rubs and a film strip (a very old Tim Holtz die), along with some Idea-ology film strip which I added to the pocket.
To finish off the inside I made a file folder and added some charms attached to an Idea-ology clip.  I added an elastic closure for display purposes only, the finished journal is free of the closure, I didn't want it to interfere with the camera.

EDITED:  I have been asked how I made the File Folder above, here is a 'pattern' that I created for Eileen's Passport Journal which is a similar size to the new Notebook.

I do hope you can join us at A Vintage Journey and I hope you will visit to see the wonderful projects that the team has made.

Thanks so much for your visit, it is much appreciated.

Hugs, Anne xx

Tuesday, 11 September 2018

Fall-O-Ween for Eileen Hull

Hello Friends

This month Eileen Hull's Inspiration Team are celebrating Autumn by creating Fall-O-Ween projects, either creating an Autumnal project or a Halloween project!  Of course, I went for Halloween!

Do please check out Eileen's blog HERE all this month for inspiring projects.  Eileen also has a Fan Club of Facebook HERE where over 3,000 members share ideas and projects.

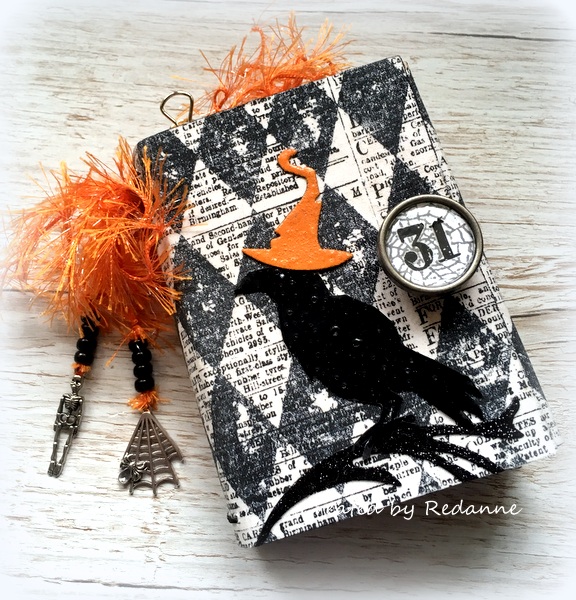
For my project I used Eileen's new Wrapped Journal (Sizzix 662816), Tim Holtz latest Halloween fabric gifted to me by Jenny Marples and Halloween buddy Juli Riedel (of Voodoo doll fame).  Thanks again ladies!

The journal was created during a super fun crafty day with some dear and fabulous friends - Rita McGranthin, Annie Gilmour and Tracy Evans, three exceptionally talented ladies!

I covered the journal, inside and out with Tim Holtz latest release of Halloween fabric, it gives the journal some added strength.  I don't have any process shots (sorry) but we were having fun playing and I forgot, so I am showing you how I finished the journal off instead.  Having said that, all of Eileen's journals are just a dream and very easy to put together.
Here, on the inside cover you can see how the fabric (on the cover) goes with Tim's latest Halloween paper (on the signatures).  The gravestones, cat and hat are all from older dies from Tim Holtz.  The gravestones were covered in two of  Seth Apter/Emerald Creek's Baked Textures in Rocky Road and Patina Oxide.  The words are from a Tim Holtz stamp set.
You can see here that I used Tim's Design Tape to give strength to the signature.  The fabulous witch is a die from one of Tim's previous Halloween releases.  She is missing her broomstick and cat here!

The signature cover this time was stamped with Tim's Gothic background stamp and white embossing powder was added.
Again, another of Tim's Halloween dies and word for the ghosts, the bats are from a very old Memory Box die.
The spider's web was stamped with Tim's cobweb stamp and embossed with white, the spiders are from one of Tim's very old die sets.  They were embossed with Rocky Road Baked Textures - they look quite creepy in real life!
From Tim's latest Halloween release, Mr Bones just had to make an appearance - I bought him for my Guest month with Simon Says which you can see HERE if you missed it.
On the cover I used an old Tim flourish die as a branch for the Raven to sit on.  The Raven is actually one of Tim's older stamp releases, he was stamped, fussy cut and then covered with embossing ink and coated with Seth Apter's Rocky Road Baked Texture.  The closure is one of Tim's Idea-ology Custom Knobs.

The tag was created using Tim's new Alcohol Lift Ink on Yupo - my first experiment with this new technique, it was so easy and such fun to do!  Thank you to my lovely friend Kath who bought me the set for my birthday whilst we were at a craft event!

To finish off I added some charms from my stash and some sparkly orange yarn.

Another Halloween project done and dusted!  Thanks so much for your visit,
I hope to see you again soon, I have a couple more Halloween journals to
share next week using Eileen's journal dies and papers from DCWV.

Hugs,  Anne  xxx

Tuesday, 22 August 2017

A Witches' Brew Journal - or is it?

Hello Friends

All this month Eileen Hull's Inspiration Team are creating different/unusual projects using Eileen's Heartfelt range of dies.  I have used Eileen's Journal die in two different ways.

First up is A Witches' Brew, it looks like a Journal / Book....  
I was inspired by my Teamie, Tracy, who created a gorgeous shadow box HERE.  Since writing up this post, another friend Alison (Butterfly) created a stunning shadow box HERE, with a fabulous idea to create the box element, do check it out if you have the time!
Inside, my box looks like this:
I am so lucky to have dear friends who share with me, Kath die cut the fabulous spider's webs, the word wicked and the witch along with the starry background and some of the Idea-ology pieces and Jenny (Buttons) gave me the wonderful set of stamps which included the beautiful Raven, which I stamped and fussy cut to sit on the 'wicked'.  The word itself was coloured with Spiced Marmalade Distress Oxide and when dry, Glossy Crackle Accents.
The cover was die cut using Eileen Hull's Journal die (Sizzix 661906) and then covered with tissue paper, glued in place with Matt Medium.  Once dry a layer of Tim Holtz Distress Collage Medium (Vintage) was applied.  I wanted it have a 'vintage book' look.  The book label was 'aged' and Tim's Industrious Stickers and Remnant Rubs complete the look.
To create the book 'lip' I cut a piece of mountboard the same depth as the spine of the constructed journal.  I 'indented' the piece so that the lid would have a platform to rest on.  The edge was covered in striped cardstock to give the impression of book pages.  I used Wilted Violet Distress Oxide ink to create the background.
I love Tim's latest Halloween Idea-ology pieces (skull, bones, pumpkins and rose - thanks again Kath).  The little bottles are from Tim's previous release and the labels are from my stash.

And now for something completely different!
I used Eileen's Journal die to create the base, made it into a shadow box (like above), cut it to shape, added some shelving and and fake drawer.. and voila`... a bookcase!
I had lots of fun making mini books and other items to fill the shelves.

So there you have it, two different ways to use Eileen's Journal die!

Finally, Eileen Hull's amazing Journal Treasury eBook is still available at a discounted price £9.19 / $11.87 - 30% off) until 31 August, it is full of wonderful inspiration for journal making!  You can buy a copy by clicking on the link in my left sidebar.

I am joining in Frilly and Funkie's Challenge which is to use dies, punches or other cutting tools.  The majority of items in my witches' brew project, including the journal cover are die cuts.

Thanks so much for looking, hope to see you again soon...

Hugs, Anne xx


PS.  If you are still looking for Eileen's Journal die, in the UK, Countryview Crafts have it in stock again.  In the USA, Eileen has a few in her Etsy shop and the Funkie Junkie has stock too.

Wednesday, 21 September 2016

Tim Tag September 2016

Hello Friends!

It is hard to believe that it is September already, not sure where this year has gone.... but it is my favourite time of the month - Tim Tag Time!  You can see Tim's original here.

This month the technique Re-mix is Paint Patina/Alcohol Ink Resist.  I feel very lucky to have
met Tim at the NEC this year and he showed me the Alcohol Ink Resist on Yupo technique in real life - it really is a fabulous technique and he is such a wonderful teacher...
 I love the images on this one - I used the Dapper stamp set (CMS 267) for this tag.  I pretty much followed Tim's instructions and just used different images.

I enjoyed the techniques so much that I made another one.
I really love the background Paint Patina on this tag, the colours are a little more vibrant.  I used the Sideshow set of stamps (CMS 263) for this tag.
And here they are side by side.

As always, thanks for looking, hope to see you again soon, I am gearing up for all things Halloween at the moment!  Take care.  Anne xx

Monday, 9 February 2015

Faux Granite for Inspiration Journal

My first DT project for Inspiration Journal this month uses Wendy Vecchi's fabulous technique - Faux Granite.  The challenge this month at Inspiration Journal is 'Love Is In The Air' and you will find all the details HERE.

I had such a lot of fun turning a plain and simple little jar into something that really does look like granite!  Wendy demonstrates this wonderful technique HERE on the Ranger blog, so I won't go into any great detail as Wendy explains it so much better!

I used Wendy Vecchi Sky Blue Archival Ink and also Sky Blue Embossing Powder to create the base on my little glass jar. The stamping was done with Wendy's Splatter stamp from the Ticket to Art set (LCS001) and white Archival Ink.  The little heart has had the same treatment but with Red Geranium Archival Ink and Embossing Powder.

I  attached the little heart (from Tim Holtz Idea-ology range) with some twine from my stash.


The flower is made from Tim Holtz's Tattered Floral die and card from Tim's Core'dinations Distress Collection, in Fired Brick.  The stem and leaves were created from florist wire and tape.

The sponsor at Inspiration Journal, as always, is Inspiration Emporium who offer a very generous prize of $50 to spend in their on-line shop, to one randomly selected individual.  Postage rates are excellent - $5 in the USA and $10 to Europe.  Also, if you do purchase from Inspiration Emporium and use my code Redanne you will get 10% off your whole order.

I would like to enter my piece into Wendy's  Make Art Challenge, the theme this month is 'Hearts'.  

Thanks so much for looking, even bigger thanks if you leave a comment, it means such a lot.  I hope to see you again very soon.  Hugs, Anne xx


Inspiration Emporium Products Used
Wendy Vecchi Sky Blue Archival Ink
Wendy Vecchi Sky Blue Embossing Powder
Wendy Vecchi Carnation Red Archival Ink
Tim Holtz Core'dinations Distress Card - Fired Brick
Wendy Vecchi Ticket to Art stamp set (splatter)
Tim Holtz Idea-ology Heart Charms
Tim Holtz Tattered Floral Die

Monday, 20 October 2014

Inspiration Journal - In Disguise - Project #3

Hello Everyone

Here I am back today with Project #3 for Inspiration Journal's 'In Disguise' Challenge which you can find HERE.  There is a fabulous $50 voucher for one lucky winner to spend at Inspiration Emporium.  I decided to keep away from Halloween for my third project and to make something practical.

I took a simple bamboo place mat, some beautiful Tim Holtz Eclectic Elements fabric, some elastic, glue and seam binding or ribbon...


And created this:


And opened out it looks like this:


A paint brush holder!  This could easily be used for knitting needles, pens, scissors or anything else that might fit in the holders.  You simply make the holders any size you wish.

This is so simple to make, you just need glue.  I suppose you could sew it if you have a sewing machine that takes quite thick fabric (the bamboo makes it quite thick) but my little craft sewing machine would not take it, so if you do want to make one, test it out on your sewing machine first!

The first thing to do is to thread the elastic through the bamboo at regular intervals.  You can put something in to test how big the loop on the top side should be.  You just need to make sure you use the same slats top and bottom on the bamboo mat, as you can see in the photo below.


Once you have threaded the elastic, just secure them at each end with some hand stitching.  This will be covered up later.


I did not take a photo of the next step because I was 'in the zone' but all you need to do is lay the mat on top of your fabric and cut around the fabric leaving approx 1" - 1.1/2" border of fabric all round.

Turn the bamboo mat over and apply glue (I used Ranger Glue N Seal) to the whole of the wrong side of the mat.  Lay the fabric onto the glued mat (pattern side up) and press firmly all over and then set it aside to dry.  This is important!  I did not heed my own advice and have a few ripples in mine...


Once dry, turn over and then fold the edges over to the inside.  I did this by gluing the fabric again with Ranger Glue N Seal, folding it over half way to hide the raw edge, gluing again and then folding it over to the inside as you can see in the photo above.  This gives a lovely neat and tidy edge and gives strength to the piece.  Do this on all four sides, cutting some bulk from the corners if you wish.

To finish off I sewed a piece of ribbon (or you could use some seam binding folded over and machine stitched) to one end (as you can see in image 2 above) so that the the piece can be rolled up and tied closed.


To finish off, because the corners are quite thick and I did not want them to come apart, I added some of Tim's Idea-ology corners, they keep the corners nice and snug.

So there you have it, a bamboo place mat disguised as a brush holder.  Thanks for looking and I hope you feel inspired to join in the challenge at Inspiration Journal where one lucky winner will receive a $50 voucher to spend at Inspiration Emporium.  You have got to be in it to win it!

If you make a purchase from Inspiration Emporium, don't forget to use my code Redanne to receive a 10% discount off your whole order.  Postage and Packing is very reasonable - $5 in the USA and $10 to Europe.

Hugs, Anne xx

P.S.  I have typed up some very basic instructions, if anyone wants them, just email me (address on my sidebar) and I will send them to you....

Items Used from Inspiration Emporium

Tim Holtz Eclectic Elements (Documentation)
Ranger Glue N Seal
Idea-ology Mini Corners

Related Posts Plugin for WordPress, Blogger...

Labels