Pinterest

Showing posts with label Mini Album Makers. Show all posts

Saturday, 1 February 2020

Masculine/industrial for Mini Album Makers

Hello Friends

The first day of the month means that we have a new challenge starting over at Mini Album Makers and I have gone Masculine/Industrial, creating a mini sketchbook using my newfound skill of Coptic binding and adding some industrial covers to give a masculine feel to the book.

I have watched quite a few videos on the Coptic binding technique but my favourite tutorial, which shows the process very simply, can be found HERE by Sea Lemon.  I will admit, it does take a bit of practice but once mastered, it allows the sketchbook to lie flat, making sketching and painting so much easier.  I have not repeated the process here as Sea Lemon explains it so much better than I could ever do!
The difference between her book and mine is that I created a set of five bindings spaced 1" apart across the whole edge and I used 7 signatures (you could add lots more to create a thicker book).  However, I do suggest using a small number of signatures until you really get the hang of it.
The photo above shows how beautifully the Coptic bound book lies flat, perfect for a sketch or watercolour book.  My finished book measures 6" x 4" and for each signature I folded paper sized 8" x 6", one paper for each signature.
For the covers I cut 300gsm cardstock to just over 6" x 4", one for the front and one for the back cover, as I wanted to cover up the binding on the front and back.  I used Tim Holtz's 3D embossing folder (Mechanics) and embossed each of the covers.

I took silver gilding wax (Pebeo) and used my finger to lightly coat each of the covers and then used a soft cloth to buff over each cover.  I just love the industrial look this creates.
To decorate the cover I die cut Tim Holtz's Bigz die -  Steampunk Parts and pieced it together before applying gilding was again to the pieces, silver for the outer edge and gold for the 'propeller' to make it stand out a little more.

Below is a close-up.
Another view of the completed sketchbook.
We hope you can join in the fun at Mini Album Makers this month, it would be lovely
 to see you there.

This will be my last month with Mini Album Makers, I have taken the difficult decision to
step down from the team.  I would like to thank Autumn for giving me the opportunity to be on the team and my lovely teamies who I have enjoyed working alongside.

Thanks so much for your visit, I hope to see you again soon.

Hugs, Anne xx

Friday, 1 November 2019

Fabric Diary for Mini Album Makers

Hello Friends

It is time for a new challenge at Mini Album Makers.  Our rules are very simple, any Handmade Book goes, our focus is on completed works.  Check out the blog for full details.
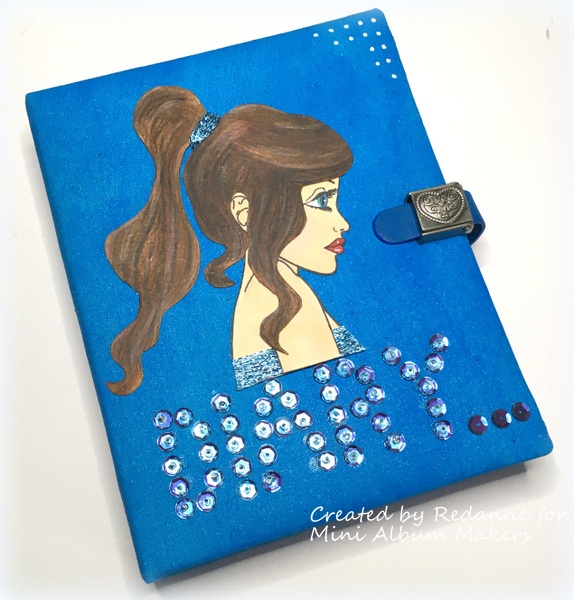
Using a mask and stamps from our wonderful Sponsor this month, Paperbabe Stamps I created a Diary for a young lady, perhaps a teenager.  I am not great at colouring hair but I am enjoying practicing and hope I will get better!

I have quite a few steps to share so I have condensed the photos so the post won't be too long!
To begin, I cut two pieces of heavy board (greyboard weight) to 5" x 6.1/2" and one piece to
1.1/4" x 6.1/2" for the spine.  I attached construction tape to create the diary shape, leaving a small gap between the three pieces so that the diary would close easily.
To create the cover I cut a piece of calico fabric a little larger than the diary size.  I painted the cloth with PaperArtsy paint in Glass Blue which I watered down and added a small amount of Iridescent Medium (Windsor & Newton) to give it a little 'sparkle'.  I also painted the leather closure with the same paint so it would match.

Before adding the covering, I attached a Tim Holtz Idea-ology Ring Binder to the centre so that the user can add or take away inserts, once filled.  I added a piece of wadding/batting between the board and the fabric as I wanted the diary to have a nice soft touch.  I then glued the fabric to the board, as shown above.  The next step was to add my closures (bottom right photo).
I am not sure whether these closures are still available but this one was perfect for my diary.
I have had some lovely modern papers in my stash for years and it finally got it's day.  The first photo shows the papers I used for the inside front and back of the diary.  The stamp on the second photo is also by Paperbabe.  I created three lined notebooks, two using the same papers and the cat one is a purchased notebook.
Now it was time to decorate.  I coloured up the stamped image of the girl and used the mask to trace out the hair image - it was so easy to use!  I coloured the hair and then cut it out.
I added the hair to the coloured face and then used some sparkly string to create her 'dress' and ponytail decoration.
My final step was to spell out the word 'diary' using some blue sequins from my stash.  I added a small blue bead to each of the sequins to give some extra 'sparkle'.
This is a view of the back of the completed diary.  I stamped the Paperbabe sentiment and applied this to the back.
Here is a final view of the completed diary.

Our Sponsor this month is the wonderful Paperbabe Stamps who are offering a
£20 Gift Card to spend in the Paperbabe Stamps Etsy Store.


 Paperbabe Stamps Blog - http://paperbabestamps.blogspot.com/
Website/Etsy Store - https://www.etsy.com/uk/shop/PaperbabeStamps

We really do hope you will join us at Mini Album Makers this month, it would be lovely
to see you there.  I also hope that you can pop over there to see what my talented
teamies have created for inspiration.

Thanks so much for your visit, I hope to see you again soon.

Hugs, Anne xx

Sunday, 1 September 2019

Birthday Blog Hop for Mini Album Makers

Hello Friends!

We are back from a summer break at Mini Album Makers and since it is our 2nd Birthday, we are celebrating with a BLOG HOP and a prize of $25 from Lindy's Stamp Gang!

For your chance to win this prize, please become a follower of our challenge blog, then comment on this post AND the design team's posts (links below and on the challenge blog).  We will draw one winner from all of the comments and announce the winner along with our October challenge.
https://www.lindysgang.com/

For my project this month I am sharing a Pocket Notebook Holder.
 I used Eileen Hull's Notebook die by Sizzix (663635), it is such a handy size to create a notebook holder.  The finished holder measures 5" x 3.3/4" approx., by 3/4" deep.
I knew I wanted to cover the notebook, inside and out with a gorgeous Stamperia rice paper so I wanted to create a toning piece to use on the inside pocket and notebook holder.  This piece was created using Tim Holtz Distress Oxides in Rusty Hinge, Weathered Wood and Ground Espresso.  I smooshed them onto my craft mat and dragged the card through the inks, drying at each stage.  I just love the rusty look!
This is how the inside looks at this stage.
To create the pocket on the left hand side, I used the pattern below, I am sharing the pattern in cream card so that the measurements show up better.  The finished pocket measures 4.1/2" x 3.1/4".  I used an accordion fold on the sides to give the pocket a little depth.
For the right hand side I created a 'sleeve' which will hold a notepad, using the pattern below.
The finished 'sleeve' is just slightly larger than my notepad, this allows for a little 'wiggle room'.
Before attaching the 'sleeve' I used a piece of leftover card to make a pen holder.  To get the size, I wrapped the card around my pen and then added 2 inches.  I glued the holder in place (keep the pen in the holder so that you get the measurement right when gluing in.  Glue this piece before adding the sleeve and it will then be hidden.
 I stitched around the edge of the notebook, which also helps to keep the pen holder in place.  I added an eyelet to the top of the notebook so that could add a key chain.
Here is a view of the outside of the notebook which shows the full beauty of the gorgeous Stamperia Rice paper image.

Our generous prize sponsor this month is StencilGirl Products.  One lucky participant will win a Free Stencil Girl Studio Class ($49 value)!   

Website - http://www.stencilgirlproducts.com/
Blog - http://www.stencilgirltalk.com/
YouTube - https://www.youtube.com/user/StencilGirlProducts


We hope you will join us this months Mini Album Makers Challenge Blog.  You could be in with a chance of winning a $25 voucher from Lindy's Stamp Gang for visiting our  Mini Album Makers  Challenge Blog, together with a visit to my talented teamies, listed below.  If you participate in the challenge you have the chance of winning a class with Stencil Girl Studio!

My teamies are:

Tracey
Anne - you are here
Jennie
Inna
Autumn

Thanks so much for your visit, it is much appreciated.

Hugs, Anne xx


Tuesday, 1 January 2019

Artist Trading Coin Mini Album

Hello Friends!  Happy New Year!  I wish you all the very best for 2019!

A new year and a new challenge at Mini Album Makers.  As always, it is anything goes as long as it is any handmade mini album, scrapbook, journal and book arts.  Our focus is on completed works, so no layouts or journal spreads that are not part of a complete handmade book project.  Please ensure you read the rules over at Mini Album Makers.

Artist Trading Coins seem to be all the rage at the moment with lots of people swapping them.  I made a mini album to hold three coins securely for posting.

I cannot take any credit for the design of this mini album, I saw a YouTube video a few years ago by a lady called Kathy Orta King, HERE.  I wanted my album to be large enough to accommodate the ATCoins which are 2.1/2" in diameter, so I changed the measurements of mine.
I found a beautiful sheet of 12" x 12" paper in my stash and some Prima self adhesive letters that I thought matched nicely.
Take a sheet of 12" x 12" paper and cut it down to 9/3/4" x 12".  I am listing the score lines below:
On the 9.3/4" side - Score at 3.1/4" and 6.1/2"
On the 12" side - Score at 2", 2.1/4", 5.1/4", 5.1/2", 8.1/2" and 8.3/4"

Cut as shown above.  The 2" piece will be the cover for your album (shown middle, left above).  Make sure to keep the little 1/4" tabs intact as these will form the pockets. I used a hole punch to cut little finger holes in each of the small pockets.
Once all of the little tabs are glued into place, the inside of the completed album should look something like the above.

To finish off I used a left-over piece of card to strengthen the fold over tab.  I also added a metal eyelet to the flap and added a length of hand dyed vintage ribbon to act as a closure.  And so, there you have a quick and easy album to store ATCoins for sharing.  My ATCoins are not new, they are from a previous post here.

Our fabulous Sponsor this month is Gypsy Soul Laser Cuts who are offering a package of goodies to one lucky winner.

Website - http://www.gslcuts.com/Store/
Blog - http://gslcuts.blogspot.co.uk/
Instructionals and Kits - http://gslcuts.blogspot.co.uk/p/blog-page.html


We do hope you will join us this month at Mini Album Makers, it would be lovely to see you there.

In the meantime, I hope to see you again soon.

Hugs, Anne xxx


Monday, 1 October 2018

Mini Album Makers - October Challenge

Hello Friends

The first of October means that we are starting a new challenge at Mini Album Makers and as always Our Rules are very straightforward : Any Handmade Book goes.  Enter any form of handmade mini album, scrapbook, journal or book art.  Our focus is on completed works, so no layouts or journal spreads that are not part of a complete handmade book project. 
Since we are sponsored this month by Seth Apter, I have created a mini album using Seth's fabulous Baked Textures along with his dies and stamps and Paper Artsy paints.

Using heavyweight black card I brayered several colours randomly onto the card and then over-stamped with a 'crackle' stamp (make unknown) to add some texture.  I did several sheets of card.  I just love the way the colours look against the black card.
I die cut my pieces for the cover and two extras for the inside covers, in plain black.  I also cut three signature covers from the same brayered cardstock. The beauty of the Passport die is that it also cuts perfect signatures to fit inside the Passport journal.
After die cutting the spine in plain cardstock I used Seth's Baked Textures Embossing Powder  - Rocky Road to create a lovely contrast.  I also die cut several pieces from Seth's Steering Wheel die (S4-741) and his Broken Maze die (S4-743) for a couple of the signature fronts too.  These were also embossed with Rocky Road Baked Textures.  The EPs give a wonderful tactile feel to the die cuts.
I created a pocket for the inside of the journal and applied the 'steering wheel' due cuts to the signature covers.  The steering wheel on the front cover of the journal was layered up three times and I added a mini corked jar, filled with some Baked Texture powder (Vintage Beeswax).

I added the signatures to the journal and stamped the word Experiment from Seth's ESA08 stamp set, this was also embossed with Rocky Road.

To finish off I always like to add some handmade charms and I also added a black crinkle ribbon closure.
...............................................

Our generous Sponsor this month is Seth Apter who is offering one lucky winner a full set of his Baked Textures Embossing Powders by Emerald Creek - what a fabulous prize!!

Website - http://www.sethapter.com/
Blog - https://thealteredpage.blogspot.com/
Instagram - https://www.instagram.com/sethapter/
Facebook - https://www.facebook.com/thealteredpage
Twitter - https://twitter.com/sethapter


I hope you will visit us at Mini Album Makers to see what my talented teamies have made and also to join in - you might just win the wonderful prize from Seth Apter!

Thanks so much for your visit, I hope to see you again soon!

Hugs, Anne xxx

Sunday, 1 July 2018

Mini Album Makers July Challenge

Hello Friends

July sees a new challenge over at Mini Album Makers and we would love to have you join in!

Our Rules are very straightforward : Any Handmade Book goes.  Enter any form of handmade mini album, scrapbook, journal or book art.  Our focus is on completed works, so no layouts or journal spreads that are not part of a complete handmade book project. 
This month and I made a journal, using a new Wrapped Journal die by one of our Sponsors, Eileen Hull, along with some of my favourite paints, stamps and stencils.
I started by painting some A3 sized card, using Dina Wakley Heavy Body paints in Ruby and Turquoise and applied this with a brayer.  I added some white Gesso at the end to tone down the colours.
Next, I stamped onto the painted card, using Archival ink and Stamp Sets #63 (Olga Heldwein) and #33 (Tracy Evans) by AALLandCreate.  I wanted to have some real contrast so I stamped #63 again on plain painted card and cut the circles out.  These were glued on top of the stamped circles on the base card, as shown below.
 I glued one piece of this to some mount board and die cut a Wrapped Journal.  The rest was used to create signatures.  The die cut journal is shown below.  I added some splatters to the journal using the same colours of paint and added a few die cut numbers.
  To create the signatures I used the other piece of painted card, added some stencilling using Stencil #6 (Autour de Mwa) by AALLandCreate.  I mixed Eileen Hull's Color Box Blend ink in 'Stop' with some 13Arts 'Magic Powder' to create texture paste.
The paste was applied randomly through the stencil.

I used another of Eileen's new dies - Credit Card Sleeve & Tags (Sizzix 662810) to create a pocket on the inside cover.
A close up of the sleeve and stencilling.
I used the rest of the card to make further signatures and added more stencilling, using the same stencil as previously.
The photo below shows the back of the finished journal.  I added elastic for a closure and some die cut numbers.

I added some trinkets to the side of the journal.
A final look at the completed journal.
Our Sponsor for July is:

who are offering a $25 voucher to one lucky winner.

Website - https://www.lindysgang.com/
Blog - https://lindysgang.blog/
YouTube - https://www.youtube.com/user/lindysgang/
.................

I hope you will be able to join in with us at Mini Album Makers this month, we would love to see you there.  The Design Team have provided some wonderful inspiration!

Thank you for your visit, I hope to see you again soon.

Hugs, Anne xx


Related Posts Plugin for WordPress, Blogger...

Labels