Pinterest

Showing posts with label Tim Holtz Distress Oxide. Show all posts

Monday, 24 August 2020

Simon Says Stamp Designer Spotlight - Week 4

 Hello Friends

I hope you are all safe and well.  Time is marching on so quickly and I am here with my Week 4 Designer Spotlight project for Simon Says Stamp Monday Challenge.

The challenge this week is BEAUTIFUL BOTANICALS.

I have a few botanical books in my collection and one of my most favourite  botanical flowers is the Peony (Paeonia Officinalis L.) with its large blousy blooms, although I confess I have not had much luck in growing them.

As with many botanical plants, Peonies have many medicinal qualities and Peony petals can be used to flavour drinks and can be used in salads.  The Chinese use them to treat inflammatory conditions such as RA and Lupus, both of which I sadly have a great deal of experience in.

I chose to use the absolutely gorgeous stamp set by Olga Heldwein for AALL & Create called Blooming Field to create my tag.

I started by using an Etcetera tag by Tim Holtz and using Distress Watercolour paper for my background.  I used the wrinkle free technique with Distress Oxide Inks in Scattered Straw and Shabby Shutters, dipping the card in the inks until I was happy with the result.  Once dry I flicked some clean water over the tag to create some lighter areas.

Next, I took Tim Holtz's script stamp from the Entomology stamp set and stamped this in Distress Oxide Ink, Shabby Shutters as I wanted the background to be very subtle.  I really love this stamp for backgrounds and use it often.

I stamped the flowers, coloured them with Distress Inks in Scattered Straw, Picked Raspberry, Spun Sugar and Mowed Lawn and then fussy cut the flowers.  Yes, it took a while but I wanted the flowers to have some dimension and movement on my tag.  I went around each of the flowers with Distress Ink to get rid of the white edges.

To finish off I took some white ribbon from my stash, coloured it with Picked Raspberry Distress Ink for the top of my tag and I used a computer generated label for the bottom of the tag.

So, it would be lovely to see you join in the Beautiful Botanicals challenge here:

As always, there is a $25 Gift Voucher available for one lucky winner.

Listed below are the products I used to create my tag and are available from:

Thank you so much for your visit, I really appreciate it.  I hope you will join me again soon.

Stay safe and well.

Hugs, Anne xxx


Products Used:

AALL & Create Blooming Field Stamp Set #229

Tim Holtz Entomology Stamp Set CMS328

Tim Holtz Etcetera Tag Small

Tim Holtz Ranger Watercolour Card Stock

Tim Holtz Distress Oxide Ink

Tim Holtz Distress Re-inkers

Ranger Multi Medium Matte


Sunday, 1 September 2019

Birthday Blog Hop for Mini Album Makers

Hello Friends!

We are back from a summer break at Mini Album Makers and since it is our 2nd Birthday, we are celebrating with a BLOG HOP and a prize of $25 from Lindy's Stamp Gang!

For your chance to win this prize, please become a follower of our challenge blog, then comment on this post AND the design team's posts (links below and on the challenge blog).  We will draw one winner from all of the comments and announce the winner along with our October challenge.
https://www.lindysgang.com/

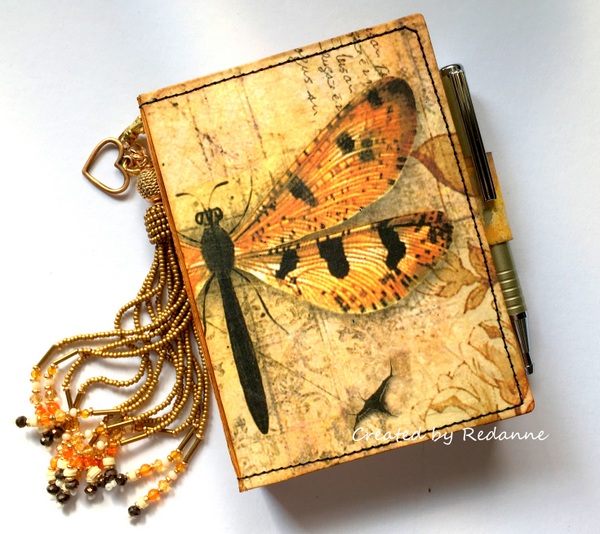
For my project this month I am sharing a Pocket Notebook Holder.
 I used Eileen Hull's Notebook die by Sizzix (663635), it is such a handy size to create a notebook holder.  The finished holder measures 5" x 3.3/4" approx., by 3/4" deep.
I knew I wanted to cover the notebook, inside and out with a gorgeous Stamperia rice paper so I wanted to create a toning piece to use on the inside pocket and notebook holder.  This piece was created using Tim Holtz Distress Oxides in Rusty Hinge, Weathered Wood and Ground Espresso.  I smooshed them onto my craft mat and dragged the card through the inks, drying at each stage.  I just love the rusty look!
This is how the inside looks at this stage.
To create the pocket on the left hand side, I used the pattern below, I am sharing the pattern in cream card so that the measurements show up better.  The finished pocket measures 4.1/2" x 3.1/4".  I used an accordion fold on the sides to give the pocket a little depth.
For the right hand side I created a 'sleeve' which will hold a notepad, using the pattern below.
The finished 'sleeve' is just slightly larger than my notepad, this allows for a little 'wiggle room'.
Before attaching the 'sleeve' I used a piece of leftover card to make a pen holder.  To get the size, I wrapped the card around my pen and then added 2 inches.  I glued the holder in place (keep the pen in the holder so that you get the measurement right when gluing in.  Glue this piece before adding the sleeve and it will then be hidden.
 I stitched around the edge of the notebook, which also helps to keep the pen holder in place.  I added an eyelet to the top of the notebook so that could add a key chain.
Here is a view of the outside of the notebook which shows the full beauty of the gorgeous Stamperia Rice paper image.

Our generous prize sponsor this month is StencilGirl Products.  One lucky participant will win a Free Stencil Girl Studio Class ($49 value)!   

Website - http://www.stencilgirlproducts.com/
Blog - http://www.stencilgirltalk.com/
YouTube - https://www.youtube.com/user/StencilGirlProducts


We hope you will join us this months Mini Album Makers Challenge Blog.  You could be in with a chance of winning a $25 voucher from Lindy's Stamp Gang for visiting our  Mini Album Makers  Challenge Blog, together with a visit to my talented teamies, listed below.  If you participate in the challenge you have the chance of winning a class with Stencil Girl Studio!

My teamies are:

Tracey
Anne - you are here
Jennie
Inna
Autumn

Thanks so much for your visit, it is much appreciated.

Hugs, Anne xx


Monday, 27 August 2018

Simon Says Stamp - Designer Spotlight - Week 4

Hello Friends!

This is my final week in the Simon Says Stamp Monday Challenge Designer Spotlight (sad face) and I would like to thank them, along with all of the Designers for having me back again.  It has been a real pleasure, I have really enjoyed making projects for the challenges.

So, it is time for a new challenge and this week the challenge is 'Fall'.


Fall, to me, means we are getting close to Halloween!  I have used some of Tim Holtz's new Halloween release Mr Bones stamp set, his latest Shifter Stencil along with lots of  Tim's older Halloween products to create 'Mr Sherlock Bones'.

Meet Mr Sherlock Bones!

I have grouped the 'how to' photos so that my post is not too long.
I could not wait to get my hands on Tim Holtz's new Shifter Stencils, this one is the Diamond shape and boy, are they clever!!
1)  I placed the stencil on white card and used Carved Pumpkin Distress Oxide through the stencil
2)  I placed the stencil back on the card (as Tim demonstrates HERE - starting around 22 minutes), shifting it over and used Black Soot Distress Ink (I wanted a really strong black)
3)  I wanted to experiment to see if I could fill in the white spaces left as it was a little too bright for my liking.  I shifted the stencil and used Pumice Stone Distress Ink
4)  I was not entirely happy with the grey colour so I placed the stencil back over half of the Pumice Stone coloured diamond shapes and used Shabby Shutters Distress Ink - now I am very happy!
5)  I wanted a shelf where I could put some bits and pieces, so  I cut off 1.1/2" from one of Tim's medium sized Etcetera Tags.
6) I covered the tag with my stenciled card and glued the 'shelf' to the bottom of the tag.
7)  I gathered together lots of Idea-ology pieces that would go on my shelf.  I also coloured some gauze with Black Soot
8)  I stamped the Spider Web stamp onto white card and toned it down with Pumice Stone Distress Ink and slid this inside the Cabinet Card
9)  I stamped Mr Bones onto white card, embossed the image with Black embossing powder, fussy cut him out and then attached a red glass bead to his eye
I attached the Idea-ology Monocle and Spider to the frame.
Here is a close up view of the shelf.  The word 'wicked' is from the Mr Bones stamp set.  I added some red alcohol ink to the mini corked bottle, to resemble blood.... and added lots of other spooky elements, including another one of the spiders....
To finish off, I attached a word band to the top, coloured with Distress Crayon and added some string and black ribbon to the top.

Products used:
Tim Holtz/Stampers Anonymous Stamp - Mr Bones
Tim Holtz/Stampers Anonymous Webbed Halloween Stamp
Tim Holtz Layering Stencil - Shifter Diamonds
Tim Holtz Etcetera Tag - Medium
Tim Holtz Cabinet Card Frames
Ranger Super Fine Embossing Powder - Black
Tim Holtz Idea-ology Incantation Word Band
Tim Holtz Corked Domes
Tim Holtz Tiny Vials
Tim Holtz Idea-ology Boneyard Skulls
Tim Holtz Idea-ology Pumpkin Pieces
Tim Holtz Idea-ology - Boneyard Bones
Tim Holtz Wicked Metal Adornment - Spider
Tim Holtz Assemblage Monocle
Tim Holtz Distress Oxides
Tim Holtz Distress Crayon

Each week there is a fabulous $50 gift voucher on offer!

All the of the products that I used, which are available from Simon Says Stamp 
are listed above.
I hope you like Mr Sherlock Bones and also hope that you will join in the 'Fall' challenge this week and if you have time please have a look at what the Design Team have created, there are some amazing 'Fall' creations.

Thank you again to Simon Says Stamp for having me in the Designer Spotlight.

Hugs, Anne xx
Related Posts Plugin for WordPress, Blogger...

Labels