Pinterest

Showing posts with label Richele Christensen. Show all posts

Tuesday, 14 October 2014

A Haunted House....!

Before I show you the house I just wanted to say that as well as being on the DT for The Artists on the Block, I have now also joined Eileen Hull's Inspiration Team - I am so thrilled !!  Eileen is the fantastic designer behind Artist Trading Blocks which so many of have come to love.  It is awe inspiring to see the wonderful way people use these little blocks and create some astonishing little works of art!

My Haunted House was made for both The Artists on the Block and also Eileen's Art with Heart Inspiration Team.

Eileen is offering a fantastic prize for her latest Art with Heart Challenge - Tricks and Treats which you can find HERE.  The prize is one of Eileen's Scoreboard Artist Trading Block Dies!  That's one challenge not to be missed!!

On to the house now........ here it is finished.


Those who know me, know how much I adore Halloween in spite of the fact that it is not widely celebrated here in the UK, so having some of Tim Holtz's dies is a must for me.  I gathered all my elements together first.

Two of Eileen's large blocks and four of the medium size all cut from mat board and heavy card.  I cut some windows from an old Spellbinders die and cut the rest of my embellishments from Tim Holtz dies - the fence, the little people, and the border trim to cover up the joins.


before constructing the boxes I cut a few windows and doors and used some cut up blocks to create the roof line.  One of the larger blocks opens at the back of the house so that a tea light (battery operated) can sit inside to provide some spooky light.


At this point I got a little carried away with the construction and did not take photos.....  The house was painted with my new favourite - IndigoBlu's black Gesso (Gee-Sso Good), it gives the most wonderful matte finish and it has chalkboard like qualities.  I dipped my fingers into Picket Fence Distress Paint to give the black walls a distressed look.

The roof tiles were simply strips of grey pearlised card which again was distressed with Picket Fence DP.  The curtains are made from white gauze stained with Spiced Marmalade Spray Distress Stain,  If you have not tried the spray stains yet - please do, they are fabulous to use.


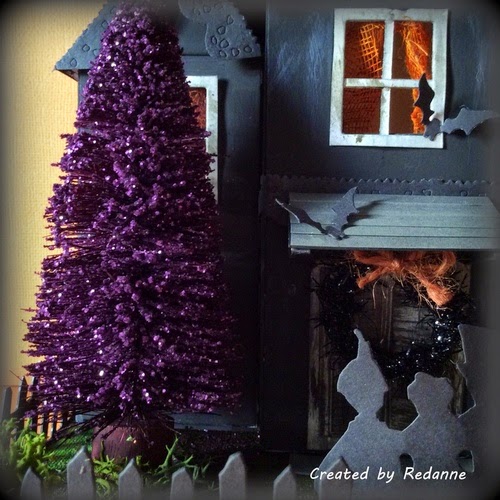
I made a wreath for the front door using Tim's tinsel and some string which was coloured with stain.  The tree was sprayed with Black Soot Spray Distress Stain, lightly coated with Ranger Multi Medium Matte and then dipped in Dusty Concord Distress Glitter, it has just the right amount of sparkle without being too 'in your face'.  Some florist moss was added in the garden.


The tree was created using one of Tim's embossing folders (I don't have the tree die yet), I embossed black card and fussy cut the tree out and added some Autumn Leaves from one of Tim's foliage strip dies.  I added a tombstone and a jolly pumpkin for added interest.


This is the best picture I could get to show how the house looks lit up!  I love the owl's eyes - very creepy!

I hope you like my Haunted House and feel inspired to create something for Eileen's Challenge - don't forget that great prize that is on offer!

This is my main Halloween piece for this year but I will also be bringing out my box from last year - for those who may have missed it..........


Can you see the same shaped house and also the tree?  I did this as part of a tutorial that the fabulous Richele Christensen did last year.

I would like to enter my Haunted House into Simon Says Stamp blog Monday Challenge where the challenge is 'O'.  My 'O' is October and owl for the owl in the tree...  there is a fabulous prize of $50 on offer for one lucky winner.

I am also linking up to the Sizzix Challenge - Halloween HERE as I used a number of Sizzix dies in my creation - Eileen Hull's Artist Trading Block dies, Tim Holtz Autumn Gatherings, Halloween Shadows, Vintage Lace and also the On the Fence On the Edge Die.  The fabulous prize is a selection of Tim's new releases!

Thanks for looking and I hope to see you again soon.  Take care.  Hugs, Anne xx

Monday, 21 October 2013

Tim Holtz Configurations Book - a labour of love

I am sharing something today that I have been working on for several weeks.  The very talented Richele Christensen shared a Tim Holtz Configurations Book HERE and invited people to make one along with her.  Since I love Halloween and I loved what she had created I decided to join in and I have had so much fun making this.  As ever, I did not have all of the elements that Richele used so I had to improvise on quite a few things but I am thrilled with the result and will be displaying it in my window on All Hallows Eve.

Richele has been doing the tutorial in stages but has been ill recently so I have taken the liberty of finishing the box off myself by following the photo on her blog.  I needed to get it finished because, as I will not be around much over the next week.

There are quite a few photos but not too much by way of explanation because Richele has gone into great detail, so if you want to make one you can follow her brilliant tutorial.  It does look much better in real life, but to see it better just click on the photos.


This is the front of the closed box.  Tim Holtz very kindly gave Richele permission to scale up the scary house die onto a template which was used to cut the house shape from the box cover - that was the hardest part because the configurations boxes are very strong.  The moon, bats, wrought iron fence and tree are all die cuts, all TH with the exception of the fence.


This is the inside of the whole box, each box has been trimmed with tissue tape.


The skeleton is holding a lighted lamp, the battery pack is threaded through and I'll show you where later.


These are my favourite sections, I love Tim's new Movers and Shapers clock die.  It was hard to photograph the bone dust but this section is actually a working shaker box and is filled with broken up Tim's Idea-ology wishbones.


For the bottom half of the box, my friend Mo helped me out with the owl (a new die that I do not have) and she created a melt pot one which I have coloured.  She also gave me the wonderful dome bottles at the top of the box and the fence on the front - thank you Mo!


This is a view of the back of the box.  The wire from the light has been threaded across the top and down the right side, hidden by Tim's Laboratorie papers and the battery pack is hidden behind that die cut bottle.


This is just a view from the inside of the box, looking out, to give you an idea of the shape of the house.  The box itself is approx 12 inches by 9 inches so there is lots of space to work in.

I hope you have enjoyed the tour of my little spooky house!  I am entering this into Simon Says Stamp/Monday Challenge this week, which is 'Spooky'.

Edited: In my haste to post this I forgot to mention that I would like to enter this into Country View Crafts Challenge which is 'Something Spooky'.

I am also including it in Richele's blogpost linky HERE.


               ****************************************************************


Finally - NOT FOR THOSE OF A NERVOUS DISPOSITION - please look away now if you have!


I was so inspired by Lynne's recent spooky skeleton creation (Mr and Mrs Bones) that I created one of my own.  I did this for my soon to be Son-in-Law, who is a History Teacher and loves skulls, a bit like me.  Lynne, these photos are just for you!


Mr and Mrs Skeleton are decked out in Graphic 45 Steampunk papers and Mr Skeleton is sitting in a Tando Creative coffin........... his top hat is handmade.  Mrs S wears a skirt of lace, coloured with Black Soot Distress Paint.  They are ready to go to the Halloween ball.......


I am entering this piece into Anything But a Card Challenge which is Colours of the Season - Orange and Black

Thanks for looking, hope to visit you all soon, but please forgive me if I miss a few posts over the next week or so.  Hugs, Anne xx


Related Posts Plugin for WordPress, Blogger...

Labels