Pinterest

Showing posts with label Remnant Rubs. Show all posts

Friday, 3 May 2019

Book It for A Vintage Journey

Hello Friends

It is time for a new challenge at A Vintage Journey and the theme this month is 'Book It' and the lovely Deb is our host.

Deb says 'there is nothing better than curling up with a good book to take us away to another place!  This month we'd like you to think about books - perhaps you will make a book, or a journal, create a journal page showing a scene from one of your favourite books (do please tell us what book) or a card showing someone reading or made using text stamps, stencils or word stickers.  Just remember to create in one of our preferred styles of vintage, shabby, mixed media, art journalling, industrial, timeworn or steampunk'.

I have a real love for old cameras and for making journals, so I combined the two for this month's challenge and created this grungy notebook journal, using a wonderful new camera stamp from Inventor 8 (CMS375) by Tim Holtz, one of many gifts from my dear friend Kath Stewart.
After die cutting the journal base, using Eileen Hull's latest notebook journal die (Sizzix 663635), I used Distress Oxide in Vintage Photo and Pumice Stone, smooshing it on my mat and picking it up with the notebook journal, drying it off, picking up some more until I was happy with the result.
I did the inside of the cover in the same way.
I stamped the camera onto the front cover, I also stamped the back of the notebook with another of Tim's new stamp sets, Fragments (CMS 368).  I stamped more of the elements and gathered the Idea-ology items together that I wanted to use to decorate the notebook.

I added a ready made collaged pocket to the inside front cover and I used Tim's Stitched Slots die (Sizzix 662697) for the inside back cover.
I layered up the camera on the front of the journal, added elastic stringing and placed an Idea-ology drawer pull to the side of the journal.
I created one signature, added some Remnant Rubs and a film strip (a very old Tim Holtz die), along with some Idea-ology film strip which I added to the pocket.
To finish off the inside I made a file folder and added some charms attached to an Idea-ology clip.  I added an elastic closure for display purposes only, the finished journal is free of the closure, I didn't want it to interfere with the camera.

EDITED:  I have been asked how I made the File Folder above, here is a 'pattern' that I created for Eileen's Passport Journal which is a similar size to the new Notebook.

I do hope you can join us at A Vintage Journey and I hope you will visit to see the wonderful projects that the team has made.

Thanks so much for your visit, it is much appreciated.

Hugs, Anne xx

Thursday, 27 March 2014

A Mini Storage Box .....

Thanks for all your comments on the Wedding Favour Artist Trading Blocks/Boxes, Jenny and I are both thrilled that you love them.

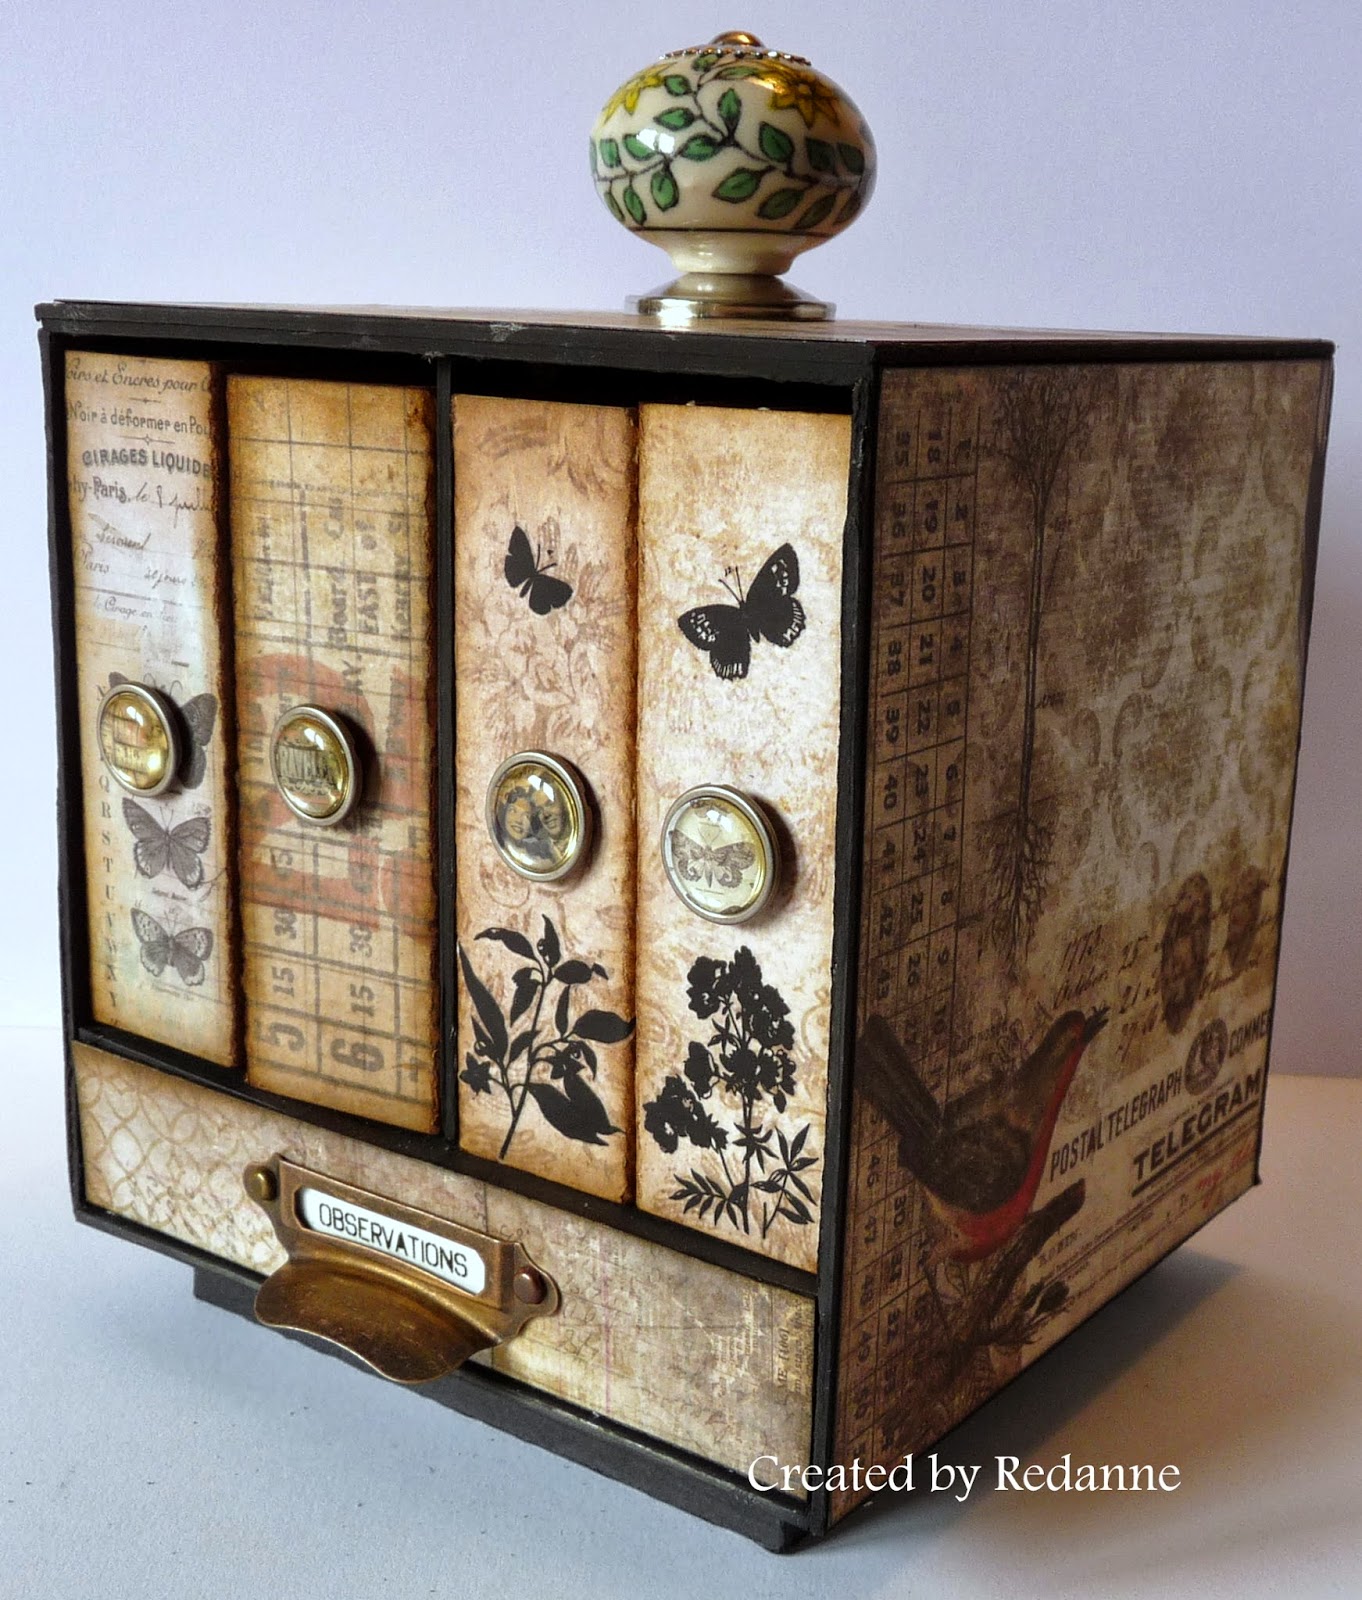
I still have boxes on the brain.  A couple of years ago I wanted to purchase a project for making a storage box HERE, but it had been discontinued in 2010, just my luck.  I kept the picture of the box and decided to have a go myself.   What's so hard about a bit of measuring and gluing (?)  ........well I persevered and here is what I created.  Apologies, there are a lot of photos, but not too much chat so I hope you will stay with me!

To make my box I used greyboard (about the thickness of mount board or mat board), Tim Holtz's new Wallflower 12" x 12" paper pad, black Distress Paint, Gathered Twigs Distress Ink, Idea-ology pieces, Remnant Rubs, Stampers Anonymous Classic Favourites #1 stamps,  a tiny door knob from Marks and Spencer, a lot of measuring and a few choice words!

This is the front view, the finished box measures 5" square. Lots of Idea-ology and Remnant Rubs were used here. Click on any of the photos for a better view. 


Side view, right side, love that bird!


I wish I had put this gorgeous piece at the side, instead of the back.


The left and final side.  For each side I cut the paper to fit, inked the edges with distress ink and simply glued them on to the assembled and painted box.


This is a view from the top showing the lovely little door knob, it is made from pottery and hand painted (not by me!) with some little flowers.


This first piece in my box is a little storage box, made to store ATC type projects


This is one of my books which is just under 4" x 5" in size.  I added some pages in thick card.

I won't show you inside as I have not added anything to the pages as yet.


Another little book.  All of the books are covered in the Wallflower papers and all the edges have been coloured with Gathered Twigs DI.


This shows the inside of the final book.  I have added lots of pockets, these will take mini tags or tickets or other small items.


Finally (if you are still with me!), in the little drawer I have stamped the dragonfly from Classics #1 and then I coloured some of Wendy Vecchi's Clearly for Art with alcohol inks, stamped the dragonfly in Stazon and fussy cut it to add to the base stamping.


Here is the final piece again.  You can just about see the little platform at the bottom.  It is simply a 4" square box that I made up from thick black card and glued to the base.

If, like me, you love all things Tim, there is still time to enter our challenge over at A Vintage Journey where the lovely Alison has chosen the theme, Say it with Words..... we would love to see you play along.

Speaking of challenges, I would love to enter this into Country View Challenges HERE which is 'Paperchase' and this month there will be two lucky winners, each receiving £20 voucher so spend at Country View Crafts.

Thanks so much for looking and hopefully leaving me a comment. Take care.  Hugs, Anne xx

Friday, 7 March 2014

A Vintage Journey begins...

Are you ready to go on a Vintage Journey? 

I am thrilled and delighted to say that today is the first day of our exciting new fortnightly challenge blog over at  A VINTAGE JOURNEY which I mentioned in some detail in my post here.  The challenge blog is the brainchild of the uber talented Brenda Brown.  The whole emphasis of the blog challenge is focussed on the shabby vintage style, ideas, techniques and products of Tim Holtz.  

  
Our very first challenge is being hosted by our Creative Guide (DT) Leader Brenda, who has chosen the theme of 'ANYTHING TIM'.  We would love to see your shabby vintage style entries based on Tim's style, his ideas and his techniques.  Do please, read the Travelling Instructions (rules) which are on the sidebar over at A Vintage Journey.

A winner will be chosen by the Creative Guides (DT), the winner will receive a £10 voucher sponsored by Country View Crafts (where p&p is always free!). You will also find many of the items used in my DT piece at Country View Crafts, there is a link to them on my sidebar.


If you need some further inspiration, on Monday next week our Creative Guide, Chris will share a Design Team Focus over at A Vintage Journey and provide you with a technique tutorial and step by step process for your inspiration, all linked to Tim, his style and his ideas, which are an inspiration to us all.

Those who have been following me for some time already know of my slight 'obsession' with all things Tim and I am so pleased to be involved in the first challenge.  I love using colour, whether it is Tim's inks, paints or stains and Tim's Blueprint stamps are some of my favourites. I loved making this, if you want to see a closer view just click on the photos:


The background was created with a combination of Festive Berries, Barn Door and Picked Rasberry Distress Inks which I layered up, one by one using a blending tool.  I then used one of my all time favourite of Tim's techniques, spritzing and flicking with water to create this lovely mottled effect.  It is simple but so effective - I just love it.  The edges have been distressed and I used a blending tool and Black Soot DI to finish the edges off.  


I then took my splatter brush (a technique Tim used HERE) and flicked Black Soot Distress Paint lightly over the whole background.  This can just about be seen in the photos above and below.  I stamped the game wheel from the Ringmaster Blueprint set of stamps, onto the card.  I stamped it again, twice onto white card and coloured the wheels with Distress Markers, being careful not to cover up the numbers on the wheel.


To give some dimension I fussy cut the wheels and layered these up with foam pads after colouring the edges with Black Soot DI.  I wanted to give the impression of looking into the Roulette wheel to make it look more realistic.  I added some of Tim's Idea-ology cogs to the centre of the wheel.

To finish the card I added some of Tim's Remnant Rubs to three of the corners and the word 'Play' in the last corner is from one of Tim's Alpha Part sets.

I hope you will go over to A Vintage Journey to see what my very talented Creative Guide teamies have made, there is an incredible amount of inspiration there.  Please come and travel along on this Vintage Journey with us. If you can't make it this time we hope that you will leave us a message to let us know what you think and we hope to see you in a future challenge.  And don't forget, there will be more inspiration for you over at A Vintage Journey on Monday too.

I would love to enter this into another new challenge blog That's Crafty where the challenge is Anything Goes and there is a prize of a £20 voucher to spend in the online store.

Edited:  I would love to enter this into Inspiration Emporium's 'Splash of Color' Challenge too.  There is a prize of $50 Inspiration Emporium dollars for one randomly chosen winner.

Thanks so much for looking and I hope to see you again soon.  Hugs, Anne xx
Related Posts Plugin for WordPress, Blogger...

Labels