Pinterest

Showing posts with label Eileen Hull. Show all posts

Monday, 21 September 2020

Halloween 'Arthur' Journal

 Hello Friends

Eileen Hull's Teams are creating projects this month to celebrate 'The Great Outdoors'.  Since we are blessed with the sound of owls most nights where I live, and we are so close to Halloween, I decided to use 'Arthur' again to create a spooky journal, using one of Eileen's very first journal dies, the Bigz XL Journal (Sizzix 661906).

This is my second time using Arthur, if you would like to see him in a different setting, you can see him here.

To start, I cut the two journal covers from matboard.

I decided to cut the journal down slightly and I took just under an inch from the top and bottom, I rounded the corners and then punched holes top and bottom for the elastic to thread through.
I used Distress Oxide in various colours to create the cover of my journal, adding Crackling Campfire to my Scattered Straw moon before applying Wilted Violet and then applying Black Soot to the edges.
A view of the front and back.  After covering with Distress Oxide I spritzed with water to give a more textured look.  I swiped some colour over the moon to give it a more realistic look.
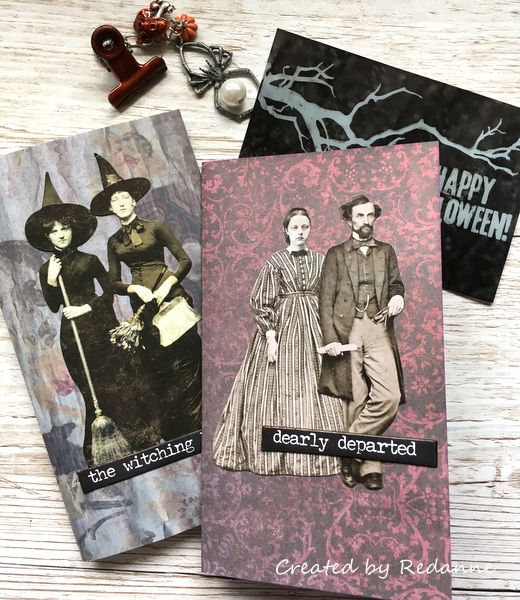
This is the inside of the covers, I covered these with some gorgeous paper from the Tim Holtz Departed paper pad.  I added orange elastic to hold my signatures in place.

I created a small pocket for the inside front cover and I added a Tim Holtz Found Relative to sit on the pocket along with a Quote Chip.
I created two signatures for the inside of my journal.  Again I used Tim's Departed paper pad and I decorated the signatures with more Found Relatives, along with some of Tim's Quote Chips. 
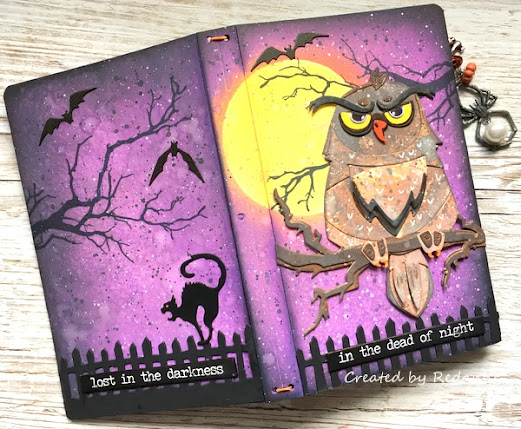
It was time to decorate the front of my journal. I used Tim's Mr Bones stamp set and Tim's Arthur die set, along with Tim's Bat Crazy die set.
I die cut Arthur, coloured him with Distress Oxide and constructed him.  I stamped the branch before attaching Arthur to the cover, along with a bat, a fence (a much older Tim Holtz On the Edge die) and a Quote Chip.
To complete the back, I stamped the branch again, added some more bats, a die cut cat (another older Tim Holtz Movers & Shapers die) and more of the fence.
Finally, I created a charm.  I used one of Tim's Ideaology clips, coating it with Distress Glaze in Fired Brick, along with an Ideaology Spider charm and a couple of others from my stash.
Another view of the completed journal.

Eileen will be posting more from her Design Teams HERE, where you can also see other 'The Great Outdoors' creations throughout this month.

Thanks so much for your visit, I will be back on Wednesday with another post, I hope you can join me then.  In the meantime, please stay safe and well.

Hugs, Anne xxx


Wednesday, 15 April 2020

Floral Journal

Hello Friends

I hope you are all well and coping with the lockdown and social distancing.

My Guest designer project for AALL & Create this week is a mini journal.  I decorated the journal with Tracy Evans'  Create It Grunge stamp set (#150) along with the Totally Dotty Stencil (#87) by Autour de Mwa.  I also used Eileen Hull's Notebook die (Sizzix 663635) for the journal base.

I am still trying to use up some of my brayered sheets of left over card, the one here was also used to clean off my stencil after using texture paste.

  • Top left shows the sheets of card that I started with.  They are both left overs from another project.

  • Top right shows the covers of my signatures, one is a left over and the dotty one was created by applying several colours of paint through the Totally Dotty Stencil.

  • Bottom left shows the die cut journal.

  • Bottom right shows the flower stamped three times, coloured with watercolour paint and then fussy cut to allow some depth to the flower.
I stamped the flower onto the front of the journal and then added the fussy cut flower on top.
The above is a view of the back of the journal showing how I added the elastic closure.  It also shows the lovely textures I achieved by cleaning off texture paste from my stencil and then brayering over the dried paste with red and yellow acrylic paint.  It feels lovely to the touch.

You can find a full list of the worldwide stockists of the stamp and stencil sets I used HERE.

Short and sweet this week, but if you do have any questions on anything I have shown,
please let me know and I will do my best to answer.

Thanks so much, stay safe and well!

Hugs, Anne xxx


Thursday, 22 November 2018

Winter Wishes Blog Hop

Hello Friends

Warm thoughts are unfolding, as we begin to enter a festive time of year.

 Eileen Hull (Eileen Hull Designs) and Kim Evans (Emerald Creek) and The Teams have created a fun Blog Hop Challenge to kick off the American Thanksgiving and Winter festivities - Winter Wishes.  I was thrilled to be asked to join in the Blog Hop.

To play, all you need to do is follow along and comment on every blog in the Hop.

If you play along and link up your own creation using Eileen and Emerald Creek products, you will get 2 bonus entries for the draw.  The Challenge closes on Sunday November 25th, with the Winner announced on Cyber Monday.

The PRIZE includes an Eileen Hull Journal Die and a $50 gift certificate to the Emerald Creek shop, how fabulous is that!!

I used Eileen Hull's Passport die (Sizzix 660331) and beautiful stamps from Emerald Creek (Snowy Trees and Country Lodge).........to create a 'Shaker' Journal
After die cutting the journal, I painted all of the elements with Dina Wakely Heavy Body paint in Ruby.  I stamped  the winter scene, embossed it with Emerald Creek Onyx Frost Allure Embossing Powder and painted it with watercolour inks.

To create the 'Shaker' element I die cut three further journal fronts and cut an oval into each one. Tip: To ensure the ovals match up, simply use one of the oval cut fronts, line it up and mark with a pencil before cutting.

The wintry image was added to the base of the front, two further journal fronts (with the oval cut) were glued on top, two teaspoons of glitter was added and a layer of acetate was placed on top to seal in the glitter and image.  Finally, the last journal front was added to seal all the elements.

The Christmas trees were stamped and embossed with Emerald Creek Onyx Frost EP, coloured with watercolour inks and applied to a snowy background cut from white card which had been glittered to represent snow.
A dyed seam binding closure was added, together with a fun reindeer charm.

I hope you will 'hop' around to visit the other designers to see what they have created with products from Eileen Hull and Emerald Creek and of course, we would love you to join in too.

The blog hop order:

Eileen Hull
Kim Evans
Gwen Lafleur
Pam Bray
Ann Barnes
Lisa Hoel
Jennalee Anderson
Diana Hetherington
Anne Redfern - you are here!
Elizabeth Robinson
Susana Magenheimer
Julia Aston

I hope you enjoy the hop and good luck!

Hugs, Anne  xxx

Tuesday, 22 May 2018

Artist Trading Block for Eileen Hull + Giveaway

Hello Friends

I wanted to celebrate the fact that it is my 4th Anniversary with Eileen Hull's Inspiration Team!  I started out on the Artist Trading Block (ATB) side of the team and  my lovely friend Tracy Evans was on Eileen's other Inspiration Team. I thought I would mix up the Spring Flower theme for this month by creating an ATB, using Eileen's ATB die and stamps designed by Tracy for AALLandCreate.
I have a few step out photos and some brief instructions for you.
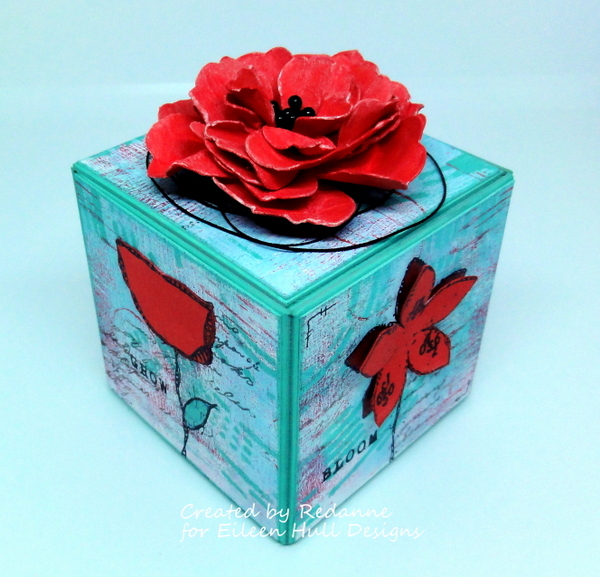
I started by created the large flower first.  I die cut the petals using Eileen Hull's Pansy Flower die and coloured them with Eileen's ColorBox Blend Ink in 'Stop' (bright red).  After spritzing the petals with water, I scrunched them up, dried them with my heat tool and assembled the flower.

The background was created by adding some ColorBox Blend to my craft mat (in 'Stop' and 'Bay' - a beautiful turquoise) and brayering this over a piece of A4 card, quite randomly until I got the desired effect.  Once dry, I used a stencil, by AALLandCreate (Stencil #28 by Autour de Mwa) and also added some marks here and there with stamps and the lid to the paint top.
Once I had die cut the 3 inch ATB, I coloured the edges with ColorBox Blend in Bay and left this to dry.  Then I cut the brayed and stenciled piece into 2.7/8" squares and inked the edges with Bay.
I stamped four of the squares with an AALLandCreate stamp (Set #70) set by my talented friend Tracy, and stamped and coloured the flowers in 'Stop' ColorBox Blend on a separate piece of card, fussy cut them and added them to the stamped flowers on the squares.  I added words to each side, again using Tracy's stamp set.

To finish off I added some black threads to the top before mounting my big flower on top.

All this month my team mates have been creating Spring Flower projects which you can see on Eileen's Blog, HERE.


Giveaway!

My other project this month was this Passport Journal die that I made into a little rusty and patina storage box and using another of Tracy's stamps for the butterfly.  To celebrate my 4th Anniversary as part of Eileen's team I would like to offer this project as a Giveaway.

If you would like a chance to win the box, please leave a comment below and I will choose a winner  on 30th May here on my blog.  You do not need to follow me but it would be quite nice if you did!  I am happy to post this box to anywhere in the world, to the winner.

Thanks so much for your visit, hope to see you again soon!

Hugs, Anne  xx

Tuesday, 8 May 2018

When is a Journal not a Journal.....?

Hello Friends

All this month Eileen Hull's Inspiration Team are sharing projects made with Eileen's flower dies.  My project includes the Pansy Flower die (Sizzix 661109).

I really do love using Eileen Hull's Passport Journal die, I have made many journals, but I wanted to see if there was another way of using it... so.... I have created a Book Box.  From the front and side it looks exactly like a journal....
A few steps on how I created the box... I was looking to create a 'rusty' box and a bright flower embellishment.
1)  To create the flower I coloured cream canvas fabric with ClearSnap Crafter's ink by Ann Butler for Color Box, in Aquamarine**.  I applied the ink to my craft mat, spritzed it with a little water and then painted it directly on the canvas.  This wonderful ink is permanent once heat set.

2)  I die cut the flower using Eileen's Pansy Flower die, cutting two sets of petals.  I wet each piece with lots of water, scrunched them up and left them to dry.  Once dry I assembled the flower and added a large pearl brad to the centre (embossed with Baked Texture Patina Oxide by Kim Evans/Seth Apter).

3)  The butterfly is from AALLandCreate *, designed by the talented Tracy Evans.  I coloured the butterfly with Ann Butler's Aquamarine and also DecoArt Quinacridone Gold and then fussy cut it.

4)  After die cutting the Passport die pieces (including the spine - not shown), I covered them with canvas.  The canvas was first painted with a wash of Paynes Grey by DecoArt.

5)  Next, I coated the pieces with Quinacridone Gold by DecoArt, this gives a beautiful rusty appearance.
6)  The covers were embossed with my favourite of Eileen's Embossing Folders - Sunburst (Sizzix 659879).
7)  I cut a strip of matboard to 11.1/4" x 7/8", painted it the same as the covers and embossed it, this was applied to three sides of the box bottom, with strong glue, to form the box element.
8)  I ran the ink pad over the embossing on both the covers and the box element, to give a slight 'patina' look.
9)  The spine element was not covered in canvas, I simply painted it in the same way as the covers.  I added the elastic to give the box the appearance of a journal.
10)  The front and back pieces were added to the spine before the box element was added, in the same way you would prepare a journal.  
11)  I also used Ann's ink to colour the vintage seam binding I used for the box closure.  I simply smooshed some onto my mat and dragged the seam binding through until coated.  I just love the versatility of these inks!  I dried the binding with my heat tool, to set the ink.
12)  I attached the seam binding to the top and bottom of the box. I die cut two further journal covers, painted them and added them to the inside of the covers for stability and also to hold the seam binding securely.
.A view of the inside of the assembled box.  I lined it with some turquoise felt and added another stamped image from Tracy's stamp set.

I really love the flower and butterfly on my box, but if you wanted to create a 'safe' box you could leave these off.

I hope you might be inspired to create a box yourself!  If you have any questions, please leave them in the comment section below.  

Stamps and Stencils challenge this month is 'Fake It' - I have created fake rust on my box and created a box to look like a journal..... and the butterfly and dragonfly are stamped (hope that is enough to qualify !).

I am also adding my rusty book box to Mixed Media Monthly Challenge #48 where the challenge is 'Rust'.

Image may contain: text
Thanks so much for looking.  You can see what my teammates are making this month by visiting Eileen Hull's blog HERE.

Hugs, Anne xx


Stockists for products I used:
** I was lucky enough to meet the very talented Ann Butler when I visited Creativation this year, she gave me a set of her beautiful inks to play with.  Sadly the inks are not available in the UK :( but other stockists can be found here.
*  A worldwide list of stockists for AALLandCreate stamps can be found here.
In the USA, Eileen stocks some of her dies in her Etsy Shop.

Friday, 2 February 2018

Melt It at A Vintage Journey

Hello Friends

It is time for a new challenge at A Vintage Journey and our wonderful Julia is hosting the challenge.  Here is what Julia has to say:

This month we're asking everyone to MELT IT! Get out the UTEE (ultra thick embossing enamel), beeswax, encaustic wax, embossing powders or good old wax crayons and a heat tool and get melting to create something in a vintage; shabby; mixed media; art journalling; industrial, timeworn or steampunk style!

 I had the pleasure of attending Creativation in Phoenix, Arizona this year and I attended a couple of classes with Seth Apter and watched his many demos with his new Baked Textures Embossing Powders by Kim Evans of Emerald Creek - they are fantastic!  This fitted so well into Julia's theme too!


I didn't take step by step photos as I did this at nightime and really, I was just playing.  Seth used a collage of vintage papers in his demos, I used some beautiful vintage music paper for mine, gluing it to a 5" x 7" piece of grey board and leaving it to dry thoroughly.

Now for the fun bit!  I applied three coats of the gorgeous Vintage Beeswax Baked Texture embossing powder - it is truly amazing how much this looks like Encaustic work, I almost didn't want to cover it up!

Next, I applied embossing ink randomly around the edges and then applied Rocky Road Baked Texture, it has a wonderful chunky feel to it, with a lovely mix of ingredients and it dries to a quite glossy finish.
Seth's Maze die is one of my favourites, I die cut two pieces and embossed the first one with Chunky Rust Baked Texture - this is so different to any other EP I have ever used, it has lots of 'fuzzy' bits in it and once melted, these fuzzy bits create a wonderful soft feel and gives a wonderful textural look.  It is hard to describe but wonderful to feel!

I cut down the second Maze and embossed this with the amazing Patina Oxide Baked Texture, the photograph does not do it justice, it has a wonderful mix of colours from green through to gold - it is quite delicious!

It needed something in the centre so I found some rusty Prima trinkets and stacked them along with one of Kim Evans of Emerald Creek's fancy brads, which I also covered with the Patina Oxide EP.

To finish off I used one of Tim Holtz Idea-ology drawer pulls, which I also coated with the Patina Oxide EP and added the chit chat sticker 'Grateful' because I have a lot to be grateful for this year already!

  I do hope you will visit us over at  A Vintage Journey where you will find some fantastic makes from my talented teamies.  We all hope that you will join in the fun with us this month.  Our wonderful sponsor for the month is:


www.countryviewcrafts.co.uk

who are offering a £20 voucher to one lucky winner!

I want to be slightly indulgent here, to say that I am grateful to my Son, Michael who treated me to a very special trip of a lifetime, to Creativation 2018; to Eileen Hull for making me feel so welcome in the team, allowing me to demo for a couple of sessions on the Sizzix stand, on the Gel Press stand and assisting her to run two of her amazing classes - I learned so much too.  And, not forgetting the shopping trip to Joann's! There were others on the team and elsewhere, who I had not met before that made me feel very special too, some dear long standing blog friends who invited me to dinner and unwittingly saved me from being  'Billy no-mates' in my hotel room that night.  Thanks to Jenny Marples too, for assisting me on the trip there and back which sadly, was more than a little bit eventful - sorry Jenny!  I am also grateful to the many people who gave me such wonderful products to bring home and try, it was like Christmas all over!  Thank you Eileen, Seth Apter, Kim Evans, Ann Butler and so many others, I really did have an amazing time!
I didn't take many pictures at Creativation but this one taken by Eileen says it all about our trip to Joann's, I am excitedly clutching a bolt of Tim Holtz fabric.... and yes, I did buy (ahem) a few other bits and pieces!

Thanks so much for your visit, it really does mean a lot!

Hugs, Anne xx

Monday, 11 December 2017

Gifts to Die For !

Hello Friends


For those of you who may not have heard the news, Eileen Hull has brought out a new e-Book called Gifts to Die For.  The e-Book, published by Bella Crafts Publishing contains over 65 wonderful projects, many by Eileen herself, projects from her Inspiration Team and also projects by friends of Eileen.  Each project, made with Eileen's dies, links back to an original blog post, with information on how each project came together.  There are projects to suit all tastes.

The e-Book will normally retail at $16.97, but until 31 December you can purchase it for $9.97 (£7.72), a fantastic reduction!  There is a link in the top left hand side of my sidebar, if you would like to purchase one.
I am thrilled that I have a project in the book, it is one of my favourite projects using Eileen's now infamous Journal die! 

As well as the new e-Book, two other of Eileen's publications are also reduced in price to $9.97 until the end of December 2017 - Journal Treasury and Die Cutting Magic so if you are stuck for Christmas or birthday gifts for crafty friends, these may be of interest!  Again, there are links in the top left hand sidebar.

Thanks so much for looking, I hope to see you again soon with some Christmas projects!

Hugs, Anne xx

Tuesday, 14 November 2017

Book Club New Release - Eileen Hull

Hello Friends

A while back I shared some sneak peeks of Eileen Hull's latest release in her Book Club range.  The new release has some amazing dies ranging from Bookmarks right up to ScoreBoard XL dies, including the Card Box, Planner Storage & Organiser.  The dies in the new range are intended to be used in several ways, which a great thing for us crafters - we all love to get value for our money!!

I am sharing the Sizzix ScoreBoard XL die (662361) - Card Box, Planner Storage & Organiser and also the Passport die, also a Sizzix Bigz XL die (  )
I know I shouldn't have favourites but this is one them from the new release, it is a lovely compact size and holds the Passport Journal beautifully.  Of course you can us the box to store your handmade cards, photographs, die cuts, whatever you like - I can imagine a whole row of these......
The die cuts in one piece as you can see above.  I brayered the whole piece using a blend of white paint coloured with Eileen Hull's ColourBox Blend ink to give a soft pink colour.  Once dry I brayered DecoArt Titan Buff over the top of the pink.

I painted some plain white cardstock in the same colour combo as the holder.  I used this to cut the Passport pieces.
To add some detail I stencilled onto both sides of the holder as shown above.

To decorate the Passport journal, inside and out, I used some beautiful papers and journal cards gifted to me by a wonderful crafty friend - they are so beautiful!
I added three signatures to the journal, each with two pages and I added some small envelopes to the front and back covers.
Here is a view of the journal inside the holder, but of course the holder has many other uses, the sky is the limit with this die!

All this month my very talented team-mates are sharing their samples too and you can see these on Eileen's blog HERE.

Thanks so much for your visit, I hope to see you again soon!

Hugs, Anne xx


Tuesday, 15 August 2017

Journal Treasury by Eileen Hull is published !

Hello Friends

 Eileen Hull's Journal Treasury EBook has been published!  Apologies, there have been a few technical hitches but I am happy to say, those have been resolved!  Thank you to all of you who commented on my original post, I really appreciate it.

If you love Junk Journals, Planners, Bullet Journals or Notebooks of any kind, you will LOVE this new EBook!  There are 85 inspirational projects in this 164 page EBook.  There are tips, tricks and ideas for creating beautiful journals - and inspiration galore from some wonderful Designers, many of whom I am sure you will already know.

The price (during August only) is $11.87 which is 30% off the regular price of $16.99.
You may have already pre-ordered the EBook, but if not, you can purchase it here using the link on my left sidebar or simply click on the photo above.  Once purchased,  you will be sent an email with a link (if you don't get a link please check your Spam box - I know that, because that's where mine went!).  It is a large book and it may take a few minutes to download.  Once you open the EBook you can scroll through the pages and if you want to find out more about a project, just click on the Designer's name and it will take you to their blog post for that project.

The link on my sidebar is an affiliate link and I get a small commission if you purchase through it, however, it does not affect the price to you in any way.

I thought I would share a new Journal with you, it was made for a beautiful young lady who is about to go to University, her favourite colour is yellow....

I was inspired by my lovely friend Tracy Evans' recent Journal where she used stencilling.  You can see Tracy's version HERE.  I used a Tim Holtz stencil on this Journal.

The Journal cover was painted using a brayer and a mix of Eileen Hull's ColorBox Blend inks and the lettering was applied with Vintage Photo Distress Oxide.  Once dry, I gently dabbed Matte Medium over the letters to seal them.  When the letters were dry I applied Matte Medium to the whole of the cover to give it some added strength.
Inside, I created lots of pockets, added a diary and a couple of notepads.
To finish off I added a bookmark, a full year calendar and lots of star shaped paper clips.  I always add a hinge clip to the side of the journals I make, this one is gold coloured with a key and heart charm set.

Eileen Hull shares projects all month long on her blog, you will find lots of inspiration there too!

Thanks so much for your visit, I hope to see you again soon!

Hugs,  Anne xx

Monday, 1 May 2017

Book Box Card Technique for Eileen Hull

Happy May Day!

At the beginning of each month Eileen Hull's Inspiration Team share card techniques.  May is my month and I have chosen a book box card technique.  A book box card is one that is shaped like a book, with a compartment inside to put small gifts, notecards etc.

The team has also been using some wonderful Kunin felt (manufactured in the USA in a 100% Polyester fibre made from recycled plastic bottles).  I covered my book box with this felt, it makes it wonderfully tactile!

I gathered the materials I wanted to use and started by cutting my base card and 'book' elements.
1.  Cut two pieces of card 5" x 4" and score along the long side at 1/2" intervals.
2.  Cut two pieces of card 5.3/4" x 4" and score along the long side at 1/2" intervals.
3.  Cut a piece of card 11" x 6" and score at 5.1/4" and again at 5.3/4".
4.  Fold along all the score lines on the four smaller pieces, use a bone folder to crease well.
5.  Take one long side and one shorter side and weave together as shown above and glue the edges.
6.  Add the two remaining folded pieces and glue the edges, to look like the picture below.
Check that the accordion shaped piece fits inside the book box before moving to the next step.
Cover the front with felt, gluing it in place with Multi Matt Medium.  Using one of Eileen Hull's Word Stitchlit dies (Sizzix 661904), die cut the words 'Happy Birthday' and use wool and a back stitch to embroider the words.  I do this first so that when the book box is lined, the stitches will be hidden inside.
Prepare the lining by cutting a large piece of paper 11" x 6" and a smaller piece 6" x 5.1/4"
To make the frame for the inside, cut a 3/4" frame in the smaller piece.  I usually mark the inside of the smaller piece and use a sharp knife to cut the frame.
To line the book box I used Eileen Hull's new HeARTfelt paper pad (Sizzix 661946).
Before I glued the larger piece of paper to the inside of the book box I attached a piece of ribbon to act as a closure.  I glued the accordion part to the card and then attached the cut out frame to complete the inside.
Eileen's paper pad also includes some lovely little envelopes, mini note cards and sentiments.  I used one of the little envelopes to form a gift card holder.  I used some of the left over felt to create the rolled flowers.  The leaves on the inside and outside of the box were cut from Eileen Hull's Stitchy Flowers & Leaf die (Sizzix 661903).  
The flower on the front of the box was cut from the Stitchy flower die mentioned above.
Apologies for the long post, but I wanted to give as much detail as possible!  I do love making these book box cards, they really do make a statement and the Kunin felt was a dream to use.

I hope you have enjoyed my 'how to' and that it will encourage you to try making one too!

Thanks so much for your visit, I will be back later in the week!

Hugs, Anne xx

Related Posts Plugin for WordPress, Blogger...

Labels