
Hello Friends!
I hope you are not getting too tired of seeing journals, I think it is safe to say that Eileen Hull's Journal die is one of my all time favourites - and when I saw Seth Apter's new stamps and paints by Paper Artsy, I thought they would be a marriage made in heaven!

At the end of this post I have added a little tutorial to make a very simple Pocket insert for a Midori sized Journal. I will post a more complex insert when I post my next Journal. I will keep the steps for this journal to a minimum - don't want people getting bored!

I started by painting by the journal covers with Paper Artsy paints in Buff, Mahogany and Mud Splat. I added some Terracotta, along with a little Stone mixed with a tiny drop of White Fire, all applied with a brayer.

I stamped onto Kraft card which was lightly coloured with Buff paint. I used Ranger Black Archival ink to stamp the large image and the smaller frame piece. I mounted these onto black card and then Kraft card. I added some 'screw' brads, a key wrapped in rusty wire and a clear glass Cabochon over the image of the gentleman.

A quick overview of the three signatures I created for the inside, (they still need some stamping to finish them off) using several of Seth's wonderful dies. I 'rusted' all of the pieces using Imagination Crafts Texture Patina Paint in Rustique and a few dabs of Verdigris - these paints give a wonderful textured rusty surface.
To finish off I added one of Tim Holtz new Assemblage charms, a metal egg timer, (sent to me by my dear and lovely friend Darnell. It hangs from an Idea-ology hinge clip which I 'rusted' with embossing powder.
So there it is, I hope you enjoyed seeing my latest Journal, I have to admit, I love this one!
I am adding this project to Craft Stamper's Make it Take it Challenge - July - Anything Goes.
I am adding this project to Craft Stamper's Make it Take it Challenge - July - Anything Goes.
Thanks so much for looking, if you want to see the mini tutorial for a Pocket Insert, please keep reading, otherwise I will see you again soon.
Hugs, Anne xx
POCKET INSERT 1 (easy)
- Take an A4 (8.1/4" x 11.1/2" approx) sheet of strong card, plain or patterned. It needs to be able to hold up with the tension of the elastic holder
- Score on the long side at 4.1/4" and 8.1/2", fold and burnish well with a bone folder
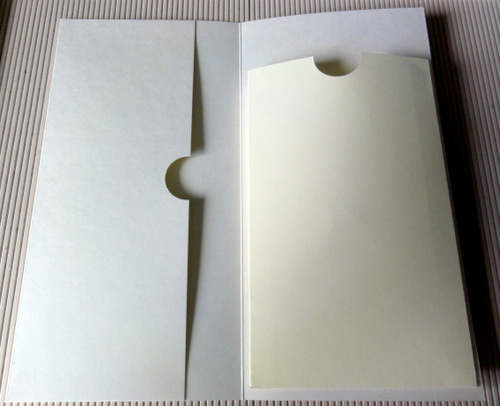
- On the short fold side, use a circle punch to punch out a finger hole in the middle (see left above)
- Glue both ends of the short fold to create a pocket (left above)
- Cut a piece of card 6" x 6.1/2" to create your second pocket
- Score on the short side at 1/2", 1", 5" and 5.1/2"
- Score at one end at 1/2"
- Cut across the corners on both sides at the bottom, see below. This reduces the bulk and makes the finished pocket look neater. Cut at an angle to neaten the top if you wish, as shown below

9. Fold on all score lines, the side needs to be accordion folded, the inside line is mountain folded and the outside line needs to be valley folded, see below

10. Add strong tape or wet glue to the three folded edges and attach to the inside from of the folder
11. Use a circle punch to create a finger hole
12. The finished pocket will be flush at the bottom, the top part will stand proud to give lots of storage room (see top picture) Add to your journal in your chosen way.
..........................................


