Pinterest

Showing posts with label Distress Paint. Show all posts

Monday, 8 October 2018

In Memory of.... the Undertaker

Hello Friends

Oh how I love Halloween!  When Tim Holtz came out with his new  Etcetera Tombstone Tag set I couldn't wait to get my hands on one (or two...).  I will say this, it was a complete nightmare to photograph but I think you will get the idea (I hope!).

I don't have many process pictures but I can show you how I started off!
After painting the elements in Black Soot Distress Paint, I applied a lighter colour with a brayer.
I then brayered a whole range of Distress Paints over the elements to create an aged 'stone' look.  I used a few of Tim's texture stamps to add some interest and then I flicked/splattered  a range of matching paints over the whole surface.

Next, I assembled the pieces, not with any plan in mind, although I was certain that I wanted the  Zombie hand to hold the light.... and the Trophy cup to hold some Halloween flowers....
I followed Tim's instructions for adding the 'hand' to a project by drilling a hole in the Tombstone.
At the bottom, I added a Trophy Cup, which I first covered in black Gesso and then stippled it with Hickory Smoke Distress Paint, to age it.  I created some flowers using Tim's Tiny Tattered Florals die.  I also used one of Tim's Garden Greens dies and also the new Tangled Twigs in the background.  The Raven was a last minute addition.
The 'Undertaker' was added to Tim's Ornate Frame and the words are from the new Halloween Quote Chips.
Finally, here is a view of the Tombstone unlit, and lit up, it looks really good in the dark!

If you are thinking of making a large piece of home decor for Halloween, the Tombstone is ideal, it is really quite large when completed and would be ideal lit up in a window on All Hallows Eve!

Edited:  I realised, (a bit late in the day) that I could enter That's Crafty's Spookalicious Challenge this month HERE....

Thanks so much for your visit, I hope to see you again soon.

Hugs, Anne xx

Thursday, 1 February 2018

Guest Designer at Frilly and Funkie!

Hello Friends

I am over the moon thrilled to be Guest Designer over at Frilly & Funkie Challenge Blog, after being chosen as Design Team Favourite for the Most Memorable Gift Challenge.

The current challenge is being hosted by the super talented Zoe who has chosen the theme of 'All You Need Is Love' .  Zoe says 'Create a vintage or shabby chic project with the word 'LOVE' somewhere on the project.  It can be the focus or just a tiny detail'.

Here is what I created for my guest piece:

I created a small 6" x 6" canvas.  I apologise that I did not do a step by step but I was busy preparing samples to take to Creativation (more of that another time) and I wanted to get this completed before I went and just ran out of time....  I will explain though, how I created the canvas.

1.  Paint the canvas with white acrylic paint (or you could use gesso)
2.  Apply a crackle medium - I used Weathered Wood Crackle Medium
3.  Once dry, apply Tim Holtz Broken China Distress Paint
4.  Gently scrape away small sections of the crackle and apply a covering of Viva Decor Rusty Paper, randomly, and wiping some off here and there (the corners are lighter) and leaving some heavier in places to give the appearance of natural rust.
5.  Die cut a heart from red card, apply two coats of clear Embossing Powder and then a final coat of red Embossing Powder.
6.  Whilst the third coat is still hot, ink up a patterned (red rubber) stamp with Black Archival ink and apply this to the embossed heart.  Leave a moment or two to cool and then remove the stamp.

7.  Cut a small red heart, give this three coats of clear Embossing Powder, ink up the 'love' word stamp with Black Archival ink and press this into the heart.
8.  Take a Tim Holtz Idea-ology pocket watch, line it with some music design paper, add the embossed small heart and some die cut flowers.
9.  Attach the watch to the canvas over some messy thread (a tip picked up from the lovely Tracy Evans).
10.  Stamp the 'love' sentiment onto tissue paper with Black Archival ink, and once dry attach this to the canvas with Distress Collage Medium.

I just love the sentiment, it is a Visible Image stamp, with quite distressed wording, and I think it works well with Zoe's love theme!

Thank you again to Linda Coughlin and the Frilly and Funkie team for having me as Guest Designer, it has been a real privilege!

Thanks too, for your visit, I hope to see you again soon, maybe even tomorrow!!

Hugs, Anne xx

Wednesday, 1 November 2017

Mini Album Makers - November Challenge

It is time for a new challenge at Mini Album Makers and, as always, it is any form of handmade mini album, scrapbook, journal and book arts.

I am still in 'mini album' mode and have created a little Christmas album, which tucks nicely into a small decorated gift box.
The finished album measures 2.1/4" x 2" and is 1.1/4" deep.
I used Eileen Hull's Box, Candy Drawer die to make my gift box.  It is cut from chipboard.
The box was painted with Black Soot Distress Paint, covered with paper from the Tim Holtz stack of paper.  All the raw edges were coloured with Black Soot Distress Oxide.
To create the album, cut a piece of board to 5.3/4" x 2.1/8" and score at
2.1/4" x 3.1/2".  Cover with your chosen paper and cut the corners as shown.  Fold the corners over and glue in place and place to one side to dry.
  To create the spine for your pages cut 4 pieces of lightweight card as follows:

1.  Cut a piece of card 1.3/4" x 2" and score at 3/8" and 1.5/8"
2.  Cut a piece of card 1.5/8" x 2" and score at 3/8" and 1.1/4"
3.  Cut a piece of card 1.1/2" x 2" and score at 3/8" and 1.1/8"
4.  Cut a piece of card 1.1/8" x 2" and score at 3/8" and 5/8"
Fold and layer up the spine pieces and glue together to form a 'fan' shape.  Glue a piece of card to the inside of the album.  I usually just glue the spine area and leave the cover pieces to be glued down later, this way you can trim the edges if necessary.
Next, cut your 'pages', you will need 8 of these, 4" x 1/7/8" and score and crease in the middle.
Glue the 'pages' in as shown and then glue to the base of the album.  Once fitted, glue the inside covers of the album, trimming if necessary.
Decorate your pages as you wish, I filled mine with lots of Christmas sentiments, Christmas trees, snowflakes and I added a little pocket to the front and back cover.  I added the number 25 to the front cover and also added an elastic closure.

To finish off the box I added a Tim Holtz Poinsettia in white card, some red jingle bells and some dyed seam binding.

So there you have it, I hope you like it!

Our wonderful sponsor at Mini Album Makers this month is Lindy's Stamp Gang.

Lindy's are offering a $25 voucher to one lucky winner!


We would love to see you join in this month at Mini Album Makers Challenge,

I would like to add my project to the Frilly and Funky Trick or Treat Challenge.  Not very Halloween-like but my frilly treat is that the mini album hides away in the little box....as a surprise.

Thanks for your visit, hope to see you again soon!

Hugs, Anne  xx

Monday, 24 April 2017

A Vintage Journey - Destination Inspiration

Hello Friends

It is my turn over at A Vintage Journey to show you what I made with the contents of the travel bag for April.  Here is a sneak peek...


If you would like to see more, I hope you will pop over HERE for a closer look.

Hugs, Anne xx

Friday, 3 March 2017

All Aboard at A Vintage Journey

Hello Friends

This month at A Vintage Journey it is our Third Birthday and the talented Brenda is our host!  We are celebrating with an 'All Aboard' Happy Birthday challenge, which essentially means Anything Goes.  Here is what Brenda had to say:

'Come join in our All Aboard challenge where you choose what you want to step on board with and although we still need to see you working in the styles and genres listed in the banner at the top of the page, you can choose whether you share a card, some altered art, a journal page, a painting, in fact, whatever you fancy, but with no theme to follow.  Let's have some fun, share your current creations and enjoy the informal feel of our birthday celebrations!'

I just got some of  new releases by Tim Holtz, including the large (very large) Ecetera tags - I used the smallest one, which is 5.1/2" x 10" - so it's big!
I only have a couple of step outs as I got a bit lost in the process....

I prepared the tag first, using several layers of Distress Paint, followed by Distress Collage Medium - Crazing, scraped a few bits off and then applied a layer of Distress Collage Medium - Vintage.

Next I decided on a few pieces of Tim's Ephemera, Letterpress and the smallest Vignette Box.
I felt that the base needed a little more and so I added some stencilling.  I like it better now!
This is the point I stopped taking photos, I added the Ephemera pieces and used a Distress Crayon to edge each of the pieces, to give them a lift.

'Celebrate' and the 3's represent our birthday at A Vintage Journey.  The collage is my homage to the hugely talented Brenda, the owner of AVJ, who does the most amazing collage creations!  I am so thrilled to be here three years down the line and to be a part of this fantastic team.
In my internet search for a 'vintage' lady to add to the collage, I found a photo Amy Johnson, a pioneering English aviator, the first to fly solo from Britain to Australia.  Can you see the little airplane Remnant Rub to the left of the photo?  There is yet another '3' at the bottom of the  Idea-ology photo strip....
Finally, at the bottom of the tag, I added a small Vignette Box, painted in Weathered Wood Distress Paint.  I coloured the Letterpress in the same way and then over-stamped both the letters and the Vignette Box.
A few more Remnant Rubs and some random splatters of paint finished the piece.  I hope you like it!

We hope that you will join in our birthday celebrations at A Vintage Journey, you can find all the details and see what my talented teamies have made HERE.

This month we are sponsored by Country View Crafts where there is a £20 gift voucher for one randomly selected person.

I would like to add this to Country View Crafts challenge - Inspired by Tim Holtz (except for the photo, the entire tag is made with Tim Holtz products)

Edited:  I have just noticed that Creative Carte Blanche's theme this month is Numbers, Numbers, Numbers - so I am joining in there too with all my number threes!

As always, thanks for looking, hope to see you again soon!

Friday, 7 October 2016

Make it Spooky at A Vintage Journey

Hello Friends

I am pleased to say it is my turn to host the challenge at A Vintage Journey this month and I have chosen the theme - 'Make it Spooky'

As we approach All Hallows Eve we want you to create a vintage, shabby, industrial, steampunk or mixed media project to celebrate the spookiness of Halloween!  Don't limit yourself to black, orange and purple - just 'Make it Spooky'!

Some of you may remember that I recently made a Haunted House for a dear friend - well I love this die by Tim Holtz so much I just had to make one for myself too!

I love Halloween and could not wait to use my new  Tim Holtz Village Manor and Lost Zombie dies to create a 3D scene to fit inside my beautiful glass dome (you can see that below).

I gathered together the dies for the Manor, along with Tim's Regions Beyond paper pad and the Halloween Deco Sheets which I used for the roof parts.
I started off making the base from foam board which I cut into an 8" diameter circle.  I used a stone texture embossing folder to create a stone look base and painted this with various Tim Holtz Distress Paints.
I cut several pieces of Tim's new Gothic Gate and pieced them together to go all around the base.
I put the Manor together following the instructions, I added the piece over the door which was an offcut and I decorated the door with offcuts too.
I wanted to add some lights and needed somewhere to hide the battery pack, so I added some steps up to the Manor, a tip I picked up from Annette Green's gorgeous creation here.  The lights are intended for a model railway but the scale was perfect for my Manor House.
I love this fabulous Lost Zombie!  He was out of scale for the Manor so I cut him from shrink plastic and coloured him in with alcohol markers.  The charm pumpkins he is holding are from Tim's Idea-ology range and these have been coloured with alcohol ink.  I added some tombstones from Tim's Graveyard On the Edge die and some of Tim's trees (a very early die), some autumn leaves and a couple of die cut pumpkins.
 To finish off I die cut some bats, (an old Memory Box die) added some twisted wire and secured them to the chimney pots.
And here is the finished Haunted Manor, which I have displayed in this beautiful glass dome.  I bought this dome after seeing Jan Hobbins use one for a Christmas scene last year.  Now my spooky manor is ready to go in my window on Halloween.  Not too scary but a little spooky I hope!  It does light up too but I could not get a decent photo of that - sorry!

I do hope you have the time to visit A Vintage Journey, my team mates have excelled themselves with the most fabulous spooky makes!  I also hope you will join us this month, we all love seeing what you create - and as always, there is a prize on offer for one randomly selected individual!

I so rarely get to join in challenges, I would like to enter into Simon Says Monday Challenge where the challenge theme is Halloween, I hope my spooky scene with the zombie and pumpkin counts!

I have been so busy with family visits I missed seeing the challenge at Country View Challenges where the theme is All Things Spooky, so I would like to join in the challenge.

Thanks so much for your visit, it really means a lot.  Hope to see you soon!  Anne xxx

Friday, 16 May 2014

All About Him - A Vintage Journey

I am delighted that it is my turn to host the next challenge at A Vintage Journey.  I have chosen 'All About Him' as my theme.  Men are usually difficult to make things for but with Tim Holtz's rang of stamps, dies and accessories it does make life so much easier! So with Father's Day coming up this is a great time to make something for a man.  This challenge is to make a card/tag/3D or any other type of project specifically for a man, using Tim's techniques or products wherever possible.

The other Creative Guides (DT) have made some wonderful pieces to inspire you and I hope you will pop over THERE for a look.  Do please take a few minutes to look at our Travelling Instructions  and also visit Tim's Blog for further inspiration.  Our sponsors, Country View Crafts are offering a £10 gift voucher to spend, to one winner who will be chosen by the team.

I have made a little memento for my DH who is mad about cycling and he has done his fair share both here and abroad (in his younger days).  This year we are very excited as the Tour de France (the biggest cycling event in the world) will be starting here in the UK.  It has only happened on two occasions before, in 1994 and 2007.  We will be travelling to London to see the final leg of the UK part of the Tour, in July.


I started out with two 8" square (20 cm) canvases and turned them around so that I could use the back as my base.


To cover up the staples and uneven back, I cut some thick card to fit the outer frame and insides.


Now there is a nice even base to work on.  I am not too worried if there are small gaps at this stage because it is going to be covered up.


I painted all sides of both of the frames and added two hinges to join the two together.  I did not like the hinges showing so I used some of Tim's French Industrial paper pad to cover the frames.


On the left hand side, I took one of the 6 inch pieces of paper from the French Industrial pad and placed it in the frame as my background.  I stamped the Beefeater Soldier and Big Ben from Tim's London Sights stamp set (the soldier has been stamped twice, once in black and once in red, the red part was overlaid  onto the black layer.  Both have been fussy cut and added to the background with sticky pads to raise them up.

The letters are from Tim's latest (and fabulous!) Letterpress, they have been sanded lightly and coloured with Festive Berries and Picket Fence Distress Paint.  I took Tim's Harlequin stencil and stencilled on the top and side of the frame with Vintage Photo Distress Ink. London has been stamped with Tim's Worn Text stamp set.


The right hand side of the frame also has one of the 6 inch pieces of paper from the French Industrial pad, I though it was appropriate to represent the Tour de France.  The Eiffel tower and Fleur de Lys were cut using Tim's die and then embossed using the Eiffel Tower Embossing Folder.  I touched them up with Treasure Silver to highlight the embossed areas.  Paris has been stamped with Tim's Worn Text stamp set, in Vintage Photo Distress Ink.  Finally, I added 2014 from Tim's Label Letters.


This is a view of the back, which has been covered in more of the French Industrial papers and stamped, again with the Worn Text stamp set.


Finally, I added a clasp to hold the canvases closed so that they can neatly be held on a bookshelf.

Thanks for looking, I do hope you will have fun creating something and join us at A Vintage Journey.  Please remember to read the rules.  We all look forward to seeing your Tim Holtz inspired makes!  Hugs, Anne xx

Friday, 2 May 2014

Fond Memories for A Vintage Journey

The latest challenge at A Vintage Journey  has been chosen by the lovely Terry and is 'Fond Memories'.  In Terry's own words - "Fond Memories, we all have them, whether they are of a special person, a pet, a period in time or a wonderful event. Let that "Fond Memory" be your guide and the focus of your creation, of course being inspired by Tim Holtz."  

Our wonderful sponsor is Country View Crafts who are offering a £10 voucher to one winner chosen by the Creative Guides (DT).

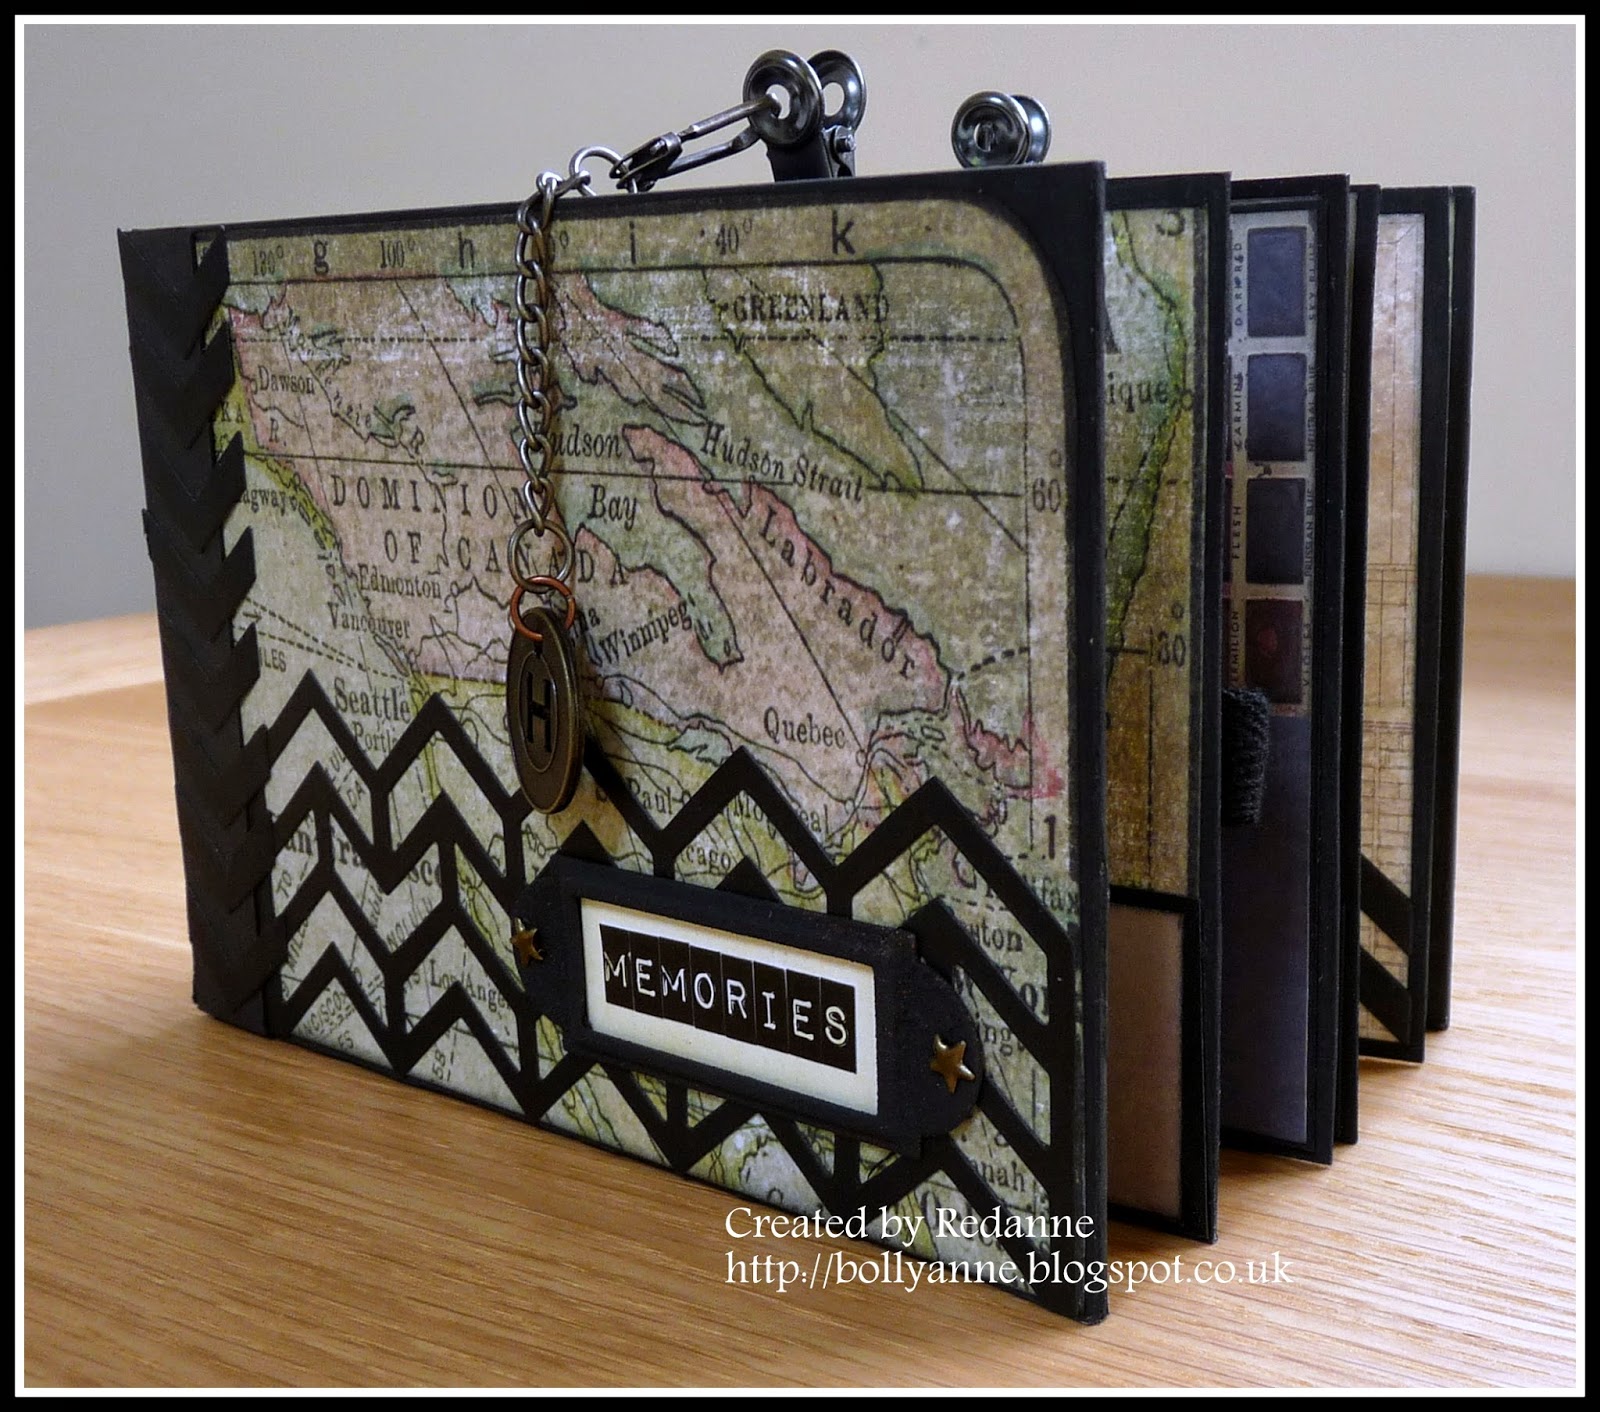
Choosing fond memories is not an easy task when you have lots of them but I decided to create a mini album in memory of my lovely Dad and his side of our family, who remained in Aberdeen, Scotland when my Dad emigrated to Canada shortly after the war.  There is only one photo in my album at the moment, I thought it might be more interesting to see the album rather than photos of my family!  My Dad did not do 'fancy' so I have kept the album fairly masculine looking. Click on the photos for a better view.


I have used Tim Holtz's Crowded Attic papers throughout the album, which measures 6" x 4" and is approx 2.1/2" thick.  The base and pages of the album are made from grey board, painted with Black Soot Distress Paint.  I kept the front and back free from larger embellishments as it will eventually go onto my bookcase.  I also used one of Tim's new framework dies to add some interest.  I thought it fitting to have the map of Canada on the front cover, from the Crowded Attic paper pad.  The word memories is made up from Tim's Idea-ology label letters and a small frame from my stash.


The first page has a photo of my lovely Grandparents and my cousin and her hubby. I created a couple of slim pockets for the first pages and again used pieces from the frameworks die to embellish.  Dad was a Sargent in the British Army and I thought the frameworks looked a little like the Sargent stripes.

On the left hand side I created a very wide pocket  using an accordion fold which allows the pocket to expand to approx 1" thick to hold lots of photos. I created a closure with some black twill and one of Tim's Idea-ology belt buckles which I sewed into place. The right side has a single pocket to keep negatives etc.


On the left side the flap opens and there are more pockets underneath to put some journaling.  I created a little mini book with the papers that were left over and I stamped all the pages with stamps from the Mini Blueprints 6 set.


Again, on the left hand side this opens out and there are three inner pockets to house several pictures or ephemera.  The fastener is a Tim Holtz Cash Key Idea-ology piece.  The right side is plain for some notes or journaling.  The stamp is again from Mini Blueprints 6 and the Calgary post mark is an embellishment from Wendy Vecchi's embellishment range.


This is the last page of the album, the '48' signifies the year my parents went to Canada.  The 4 and 8 are Prima buttons which I stitched on and used one of Tim's heart charms and some thread to form a closure.  Behind the 48 (the year Dad and Mum emigrated) are more hidden pockets to store pictures.


This is the back of the album, again embellished simply with a framework die and Crowded Attic papers.


And finally, a photo of my lovely Dad, with his beloved fishing ground, Loon Lake in the background, near where my parents lived in Haliburton, in the northern part of Ontario in Canada.   This is one of the many photos that will go into my little album.  I have had the most wonderful (and pretty emotional) trip down memory lane creating this mini album!

So what fond memories do you have?  We all hope that you will take that trip down memory lane and come and join us at A Vintage Journey with one of your 'Fond Memories'.  Do please remember to read the rules for joining in.

Thanks for looking and hope to see you again soon!  Hugs, Anne xx


Related Posts Plugin for WordPress, Blogger...

Labels