Pinterest

Showing posts with label Eileen Hull Notebook Journal. Show all posts

Monday, 22 July 2019

Red Leather Journal

Hello Friends

I do love making journals and this week I am sharing a red leather journal created with Eileen Hull's latest Notebook die (Sizzix 663635).  This die is a brilliant size and cuts all in one piece so it is perfect to use with leather.
I started with a beautiful piece of red leather, this is approx 1.5cm thick, I find that this is the best thickness to use without putting any strain on your machine.
When cutting with leather I like to cut with the wrong side facing down so that the score lines do not show on the outside of the journal.  Once cut I attach some co-ordinating card to the inside with a strong adhesive.  This does cover up the score lines inside but also adds some stability and because the leather is soft, it still bends nicely.

Note:  If your leather is thick, do not add any extra bulk by attaching card first and take care when running through your die cutting machine, ensuring you use the right combination of plates for your machine.  If it is too thick you could damage your machine.  When I get a new piece of leather I do a little test with a small piece of leather first and if I meet any resistance I stop.

I used a Tim Holtz embossing folder to emboss the leather, one half at a time, using a busy pattern means that it is not necessary to match the design fully (the join will appear on the spine).
The Notebook die does not come with holes punched in the spine, which is great because you can choose how many holes you would like.  I punched two holes at each end with my cropodile and added eyelets.  I wanted to have an elastic closure so I punched two holes in the back of the journal and added eyelets to allow the elastic to feed through.
I like to add pockets to my journal and I used the same co-ordinating card to make one closed and one open pocket.
To create the closed pocket, I did this in a single piece, following the above measurements.  I folded it and glued the two small edges to create an open topped 'envelope'.
Once glued together, I added a closure to the lid and front that could be fastened with some light string.  I punched a small circle to add to the tail of the string to prevent fraying.
I created an 'open' pocket using the above measurements.  I folded and glued this in place on the back cover.  The advantage of attaching this pocket is that it hides the elastic closure fixings.  To attach the elastic closure, I fed it through the eyelet holes and stitched (or you can staple it) it together before attaching the pocket.

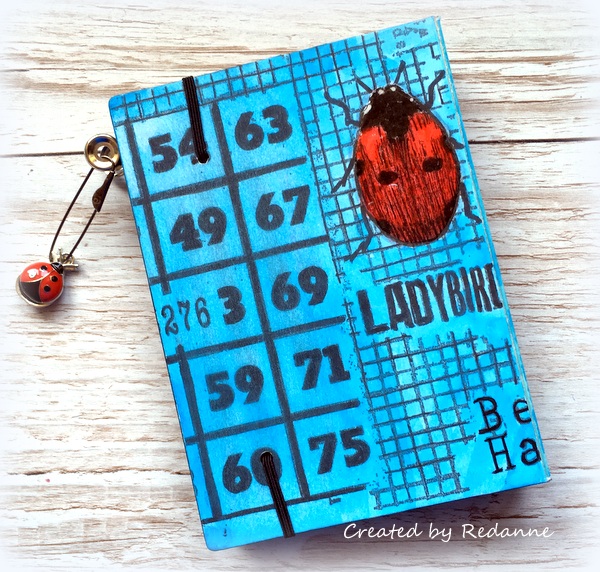
I fed elastic through the spine and tied it in a knot, leaving sufficient room to add a couple of signatures.

You can then create signatures to fit your journal and add these.  The size of the finished journal is 5" x 3.3/4", a nice handy size to fit in your handbag/purse.

I do get asked where I get my leather from, I purchase it in the UK from a company called Artisan Leather.  To make this size of journal I buy an A4 size, this will make two full journals in this size.

In the USA, Eileen Hull sells leather in her Etsy shop which you can find HERE.

Here is another look at the completed journal.  It has already gone to a good home!

If you have any questions please leave them in the comments and I will do my
best to answer them.

Thanks so much for your visit, it is much appreciated.

Hugs, Anne xx

Thursday, 25 April 2019

Ladybird Journal

Hello Friends

I have been wanting to create a journal with the beautiful Ladybird stamp by Tracy Evans for a while now and this week's project for AALL & Create gave me the perfect chance to do so.
The 'medium' sized Ladybird is the perfect size to fit Eileen Hull's latest (wonderful) journal die.
This is possibly the quickest and easiest journal I have ever made.  I simply die cut the journal from some mixed media art board (by Daler Rowney) and stamped the part of the image I wanted to show on the cover.  I stamped in two parts, masking off the back section to stamp the front and then masking off the front to stamp the back.

I used watercolour pencils to colour the ladybirds.
I carefully watercoloured around the bugs in a lovely sky blue watercolour paint.

I had a piece of alcohol ink coloured mica sheet left from a previous project.  It was not quite big enough to cover the whole bug but I quite like the effect and so attached it with some Glossy Accents.
I continued the blue colour on the inside of the journal and added a pocket to the left hand side in black card mat and layered with some co-ordinating blue card.

I created two signatures, the first of which you can see above.  The cover measures 3.1/2" x 4.7/8" folded.  I used a Tim Holtz die to add some interest to the cover and stamped, coloured and fussy cut one of the ladybirds for the cover.

The second signature was created in the same way as the first.
A view from the back.

The journal will fit two or three signatures comfortably and I used black elastic to hold the signatures in place and also as a closure for the journal.

To finish off I stamped and cut out some of the words and a heart from the same stamp set and then attached a couple of Ladybird charms to a bulldog clip as decoration.

You can find a full list of suppliers who sell AALL & Create stamps, including the beautiful Ladybird stamp HERE.  You can also purchase the stamps direct but we prefer, where possible, that you support your local suppliers.

Thanks so much for your visit, I hope to see you again soon.

Hugs, Anne xx


Related Posts Plugin for WordPress, Blogger...

Labels