Pinterest

Showing posts with label Ranger. Show all posts

Sunday, 12 October 2014

In Disguise at Inspiration Journal

This month at Inspiration Journal the challenge is 'In Disguise' - we would like you to use something in a way that is different from it's original intention.  This is a time to think outside the box....

The prize for one lucky winner is 50 Emporium Dollars to spend at Inspiration Emporium's on line store!  We would love to have you join us!  You don't have to make Halloween things, just use something in a way that is different...

I admit, it took me a little while to get the old grey cells thinking along the right lines but I have come up with two different projects to show you.

For my first project I took two plain dominoes from my stash and turned them into a little mini book:


Well, I just had to go with a Halloween theme, it is my favourite time of year after all!  The dominoes were coloured with Ranger alcohol inks in Sunset Orange and Rust.


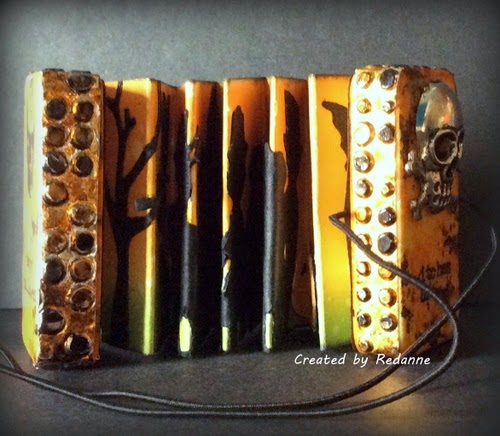
The sides are made from Ranger Foil Tape sheets, embossed with a Texture Fade (Dot Matrix) and coloured with the same Alcohol Inks.


The inside was created using Ranger Speciality Paper coloured with Shabby Shutters and Spiced Marmalade Distress Inks and decorated with the fabulous Tim Holtz Halloween Shadows Decorative Strip Die.  A few Remnant Rubs were used to finish off.


More Remnant Rubs and an elastic cord with beads from my stash finish off the piece.

My second project uses a technique that I first saw Wendy Vecchi demonstrate way back when and Tim Holtz also uses and loves the technique, it is great fun.  It is one of my all time favourites.  I took a glass tumbler and turned it into a night light holder (I would not recommend using a real candle if you try this - but a battery operated one works just fine).


I covered the glass with Ranger Multi Medium in Matte and let this dry.  Then I coated it generously with Tim's fabulous Clear Rock Candy Distress Crackle Paint and once dry I coated the whole of the outside with Sunset Orange Alcohol Ink with a Distress Tool and felt.  I dribbled more here and there and I love how it seeps into all those wonderful cracks.

To finish off I used Tim's On the Edge Graveyard die, the die cut was covered in black embossing powder and a few pinches of gold embossing powder.  The witch is another Tim Holtz die - she is simply balanced on the side and can be removed easily.

I have two more projects 'In Disguise' to share with you this month but in the meantime I hope I have inspired you to think of making something a little different and join in our challenge over at Inspiration Journal, where there is a fabulous prize of $50 to spend at Inspiration Emporium,
waiting for one lucky person!!  If you want more inspiration, check out Inspiration Journal throughout the month where you will see some fantastic projects from my DT Sisters.


Don't forget too, if you do buy anything from Inspiration Emporium please use my code Redanne for a 10% discount on your whole purchase.  Shipping costs are very reasonable at $5 for USA and $10 for the Europe.

As always, thanks for looking, I look forward to seeing you again soon.  Hugs, Anne xx


Products Used from Inspiration Emporium, with links

Ranger Speciality Stamping Paper
Ranger Foil Tape Sheets
Ranger Alcohol Inks
Tim Holtz Halloween Strip Die - Halloween Shadows
Tim Holtz Bigz Dies - Witch
Tim Holtz On the Edge Dies - Graveyard
Distress Inks
Ranger Multi Medium Matte
Ranger Clear Rock Candy Distress Crackle Paint


Friday, 30 May 2014

Get Some Texture - Challenge #7 at A Vintage Journey

Firstly I would like to say a huge thank you to my latest followers, it is lovely to have you along on my crafty journey.

My lovely and very talented friend Jenny (Buttons) has chosen the theme this fortnight at A Vintage Journey - Get Some Texture.

Unlike Jenny, who is an absolute master of texture, I do not automatically think of texture when I put a project together so there was a bit of head scratching going on here!  I created a tag......


I started off with a No. 8 Ranger Kraft tag.  I have had a pack of Tim's Kraft Glassine in my stash for ages so I took a piece of it and scrumpled it up several times to break up the fibres.  I wanted it to have a 'leather look' and tried several different stains.  The one that worked the best was Victorian Velvet which was quite a surprise, I can tell you!  I embossed it with Tim's Gear Set Texture Fade and then gave it another coat of Victorian Velvet DS. The feel of the Glassine is wonderful.

I did the same again using Ranger's Adhesive Backed Foil.  I coated the embossed foil with Black Soot Distress Paint, waited a few moments and then wiped it off.  I love the industrial look this gives.  I adhered this to the tag.  I ripped a piece of the Glassine and adhered this over the foil to create my base.  I wanted to create a warm soft feel moving across to a cool textured feel.


The number 6 has been base coated with Evergreen Bough and Gathered Twigs Distress Paint, dried and then coated with Clear Rock Candy Distress Crackle Paint which gives a lovely 'touchy feely' texture.

The metal frame has been embossed with Ranger Copper Embossing Powder, quite randomly.  Once it had cooled down I dabbed Black Soot Distress Paint and also Evergreen Bough Distress Paint.  I hope you can see some of the texture in the above photo, it is always difficult to photograph against the shine of the silver background.


I cut some Movers and Shapers cogs from some of the left over Adhesive Backed foil, I rubber over them with Black Soot Distress Paint and wiped it off with a dry cloth.

To finish off I stamped 'enjoy the journey' from Tim's Simple Sayings stamp set, added part of it to the side of the tag for some extra interest.  I mounted the whole tag onto black card.  I added some linen ribbon to the top, which I rubbed over with Tea dye DS.

I hope you will head over to A Vintage Journey to see the fabulous projects that my Creative Guide Sisters have made, you will not be disappointed.  I also hope you will feel inspired to join in this fortnight with your Tim inspired projects.

As always, our wonderful sponsors, Country View Crafts are offering a £10 voucher to spend in store, to one winner, chosen by the Creative Guides (DT).  Please do read the the rules (Travelling Instructions) to be sure that you will be considered for the prize.

Thanks so much for looking, I have another post tomorrow which has some VERY exciting news that I have had to sit on for a little while - I cannot wait to share it!!  Hugs, Anne xx


Saturday, 1 March 2014

Let's Get Scrappy for Our Creative Corner

Not sure where February went but as it is the 1st day of March it is time for a new challenge over at Our Creative Corner.

Our Sponsor this month is Tando and their products will be spotlighted throughout the month.


The wonderfully talented Linda (of the Funkie Junkie) is challenging us to 'Let's Get Scrappy' by using scraps and left-overs from previous projects, pieces of paper, scraps of ribbon, embellishments made and never used.  Sounds like such fun doesn't it?  Who does not keep their scraps and bits?

I am hanging my head in shame because when I was tidying my craft room at the end of last year, I threw away tons of scraps - literally.....  But, I did have to make lots of man cards during January and February so I had some bits left from that, enough to make this little 6 inch square canvas.  Click on any of the photos for a closer view.


Last year I had the pleasure of attending a Finnabair class and earlier this month I did a weekend class with Hels Sheridan and both of these hugely talented ladies used a very similar technique of paper blocking.

I had lots of bits of Prima Engraver papers left over and I cut them up and trimmed these to fit my canvas.  It was so easy because the papers were collage style and very easy to cut into blocks.  I went around each of the paper pieces with Pumice Stone Distress Ink. Once I glued these to my canvas with Ranger Glue and Seal, I went around each square with a charcoal pencil to give some definition between the shapes.  


Next I took some Wendy Vecchi Black Embossing Paste and a diamond stencil and added some to the top right of the canvas.  I dabbed some Picket Fence Distress Paint onto my craft sheet, watered it down slightly and then 'flicked' this over the whole of the canvas.  You might just be able to see the effect in the above photo.

I added some gauze, some metal leaves which had previously been painted with Distress Paint.  The flower is cut from some leftover card from Hels' class and I used Tim Holtz's Tattered Floral die.  I stamped the petals with an Indigo Blue script stamp and then made the flower up.


To finish off I added a Tim Holtz Idea-ology metal frame and the sentiment is one of my first ever stamps, a real favourite, by the wonderful Wendy Vecchi.

So there we have it, bits of papers from Prima, left over card from a class, a bit of gauze and some left over leaves from  previous projects and a stamped sentiment left over from another project.  I have to admit this was much more fun than I was expecting it to be!  

I hope you will get your crafty bits and pieces out and join in the fun over at Our Creative Corner.  Our sponsor this month is Tando Creative and there will be a prize for one randomly chosen individual.

Thanks for looking!  Big hugs,  Anne xx
Related Posts Plugin for WordPress, Blogger...

Labels