Pinterest

Showing posts with label Belinda Basson DT. Show all posts

Tuesday, 11 January 2022

Lady Vagabond Lifestyle - Time - for Belinda Basson DT

Hello Friends

Belated Happy New Year wishes to you all!  This is my first post for 2022!

Today I am sharing a project I made using Belinda Basson's, for Stamperia, wonderful recently released Lady Vagabond Lifestyle products to create a clock.  I have this vision of Lady V stepping into the clock to travel through time .... fanciful I know but hey, it was just how my brain was working when I made the clock!  Wouldn't it be lovely to be transported off somewhere magical, if only occasionally.....

I started with Belinda's Greyboard clock and  I assembled it, adding a one inch spacer to create a 3D clock.
 I then used a variety of the Lifestyle papers to decorate the clock.  I added some of the original Lady Vagabond papers to create the scene inside the clock, cutting out the windows in the houses so that I could add some mini lights.

I added a circle of acetate to the clock front so that I could add the clock face and the clock hands.
Once constructed I applied Cerantica wax to the clock bells and clock front and then gave the whole clock a coat of Stamperia Crackle Paste, adding a Lady Vagabond chipboard die cut to the outside of the clock.  I am really smitten by this image of Lady V, ordering more so that I can use her on lots of future projects!

Below is a view of the clock lit up.
Thanks very much for your visit.

Until next time.  Crafty hugs,

Anne xx


Stamperia Products Used:

Stamperia Lady Vagabond Lifestyle Greyboard Clock KLSPDA447

Stamperia Lady Vagabond Lifestyle Die Cuts DFLDC52

Stamperia Lady Vagabond  Lifestyle 8" x 8" papers SBBS49

Stamperia Lady Vagabond 8" x 8" papers SBBS27

Stamperia Mixed Media Glue DC28M

Stamperia Crackle Paste Transparent K3P50

Stamperia Cerantica Metallic Gold K3P15G


Tuesday, 16 November 2021

Belinda Basson DT - Lady Vagabond Christmas Baubles

 Hello Friends

My project for the Belinda Basson Design Team for Stamperia this month has Christmas in mind.  I created two large baubles using Stamperia products, all of which are listed at the end of this post.

The first step is to wash the baubles in soapy water, dry them thoroughly and then apply a coat of Stamperia Mixed Media glue to the base piece of the bauble only, and allow to dry. This will give the plastic a 'tooth' so that further products will stick and stay put.
Apply a coat of Glamour Paste in Turquoise and allow it to dry.  Add the paste up to the rim but not on the rim so that the bauble will close easily.
Time to apply the glitter!  Apply a coat of Mixed Media Glue and then generously sprinkle the Glamour Sparkles (Turquoise) whilst the glue is wet.  You need patience at this point (I don't have a lot), let it dry thoroughly and then tap off the excess Sparkles.  You can put these back in the jar for your next project.
For the right hand bauble (below) an area of 'snow' was created with White Glamour Paste, sprinkled with Glamour Sparkles in White.

Next, add two of the Lady Vagabond chipboard pieces, raising them up with hot glue, silicone glue or several layers of double sided sticky pads, whichever is your preference.  You want the chipboard pieces to be level with the top.

Add a small amount of glue around the edges of the baubles and attach the top, leaving them to dry thoroughly.
Finally, apply some velvet ribbon to the edges of the bauble, attaching a bow to the top.
Do the same with the second bauble.

At this point I regretted not trying harder to fit lights to the baubles, I just couldn't get the balance right and the wires kept showing.  But, I didn't give up as I hate to be defeated!  This bauble uses the new Lady Vagabond Lifestyle chipboard pieces and I did my best to disguise the lights by creating a 'window's edge of snow' using the White Glamour Paste and White Glamour Sparkles.  I added a small pocket at the back to hold the battery pack.  Whew, not perfect but I love it all the same!
If you have not seen Belinda's new Lifestyle range I hope you will soon, it is beautiful and compliments Belinda's original range perfectly.  I am really looking forward to creating projects with it and I hope you will enjoy seeing them.

Thanks so much for your visit, I really appreciate it.
Take care, keep safe and well.
Crafty Hugs,

Anne xxx


Products Used:

Stamperia Mixed Media Glue - DC28M

Stamperia Glamour Paste Turquoise - K3P61C

Stamperia Glamour Paste Sparkling White - K3P61A

Stamperia Glamour Sparkles Turquoise - K3GGS03

Stamperia Glamour Sparkles White - K3GGS01

Stamperia Lady Vagabond Die Cuts - DFLDC27

Stamperia Extra Strong Glue- DC007GN

Tuesday, 19 October 2021

Belinda Basson DT - Lady Vagabond Book Nook

 Hello Friends

It is time to share my monthly Belinda Basson Design Team for Stamperia project and I cannot begin to tell you how much fun I had creating it! 

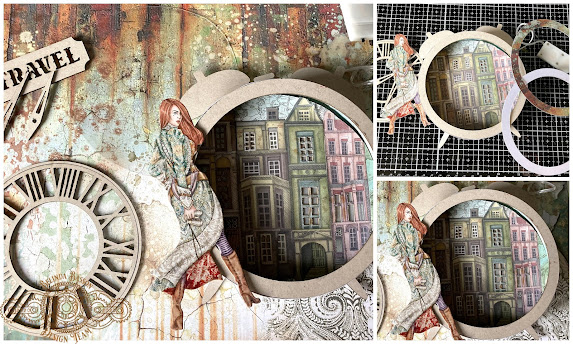
For many years now I have wanted to create a book nook but frankly did not know where to start!  So when I saw that CoolKatz have designed a kit, I knew I had to make one for Lady Vagabond.  The period style properties suited Lady V so well (in my mind anyway!).

A book nook is literally a miniature world that you tuck into a book shelf between your books.  If it lights up, it just makes it so much more interesting.  A strategically placed mirror at the back makes the 'street scene' look never ending...

The wonderful Stamperia products I used to decorate the book nook are listed at the end of this post.

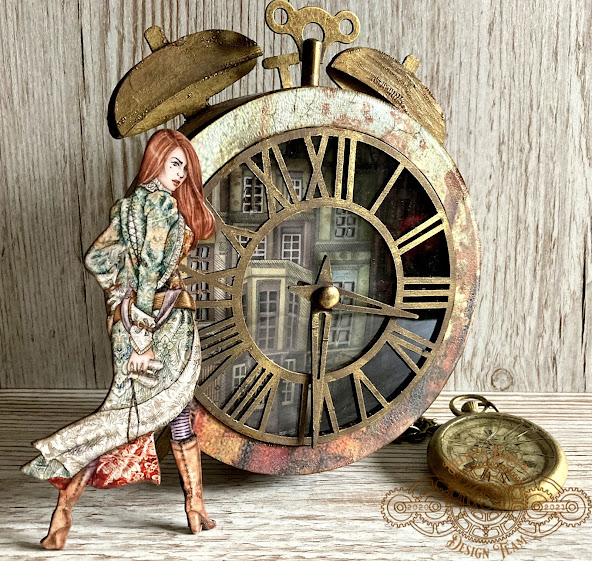
Here is Lady V outside the pub named after her, all packed up for a trip on her beautiful airship.
It was great fun building the kit, I used Stamperia Allegro paints and Stamperia Rice paper to decorate the house and pub.  To create the illusion of leaded windows I used a permanent black pen on acetate.
I used the Lady Vagabond 8" x 8" papers to create some mini books, that were then placed in the bookshop window.
For the window above the bookshop I added a doll's house sewing machine, just for the sake of authenticity, even though it is hard to see once the book nook is fully constructed.  I know it is there and it just made me happy!
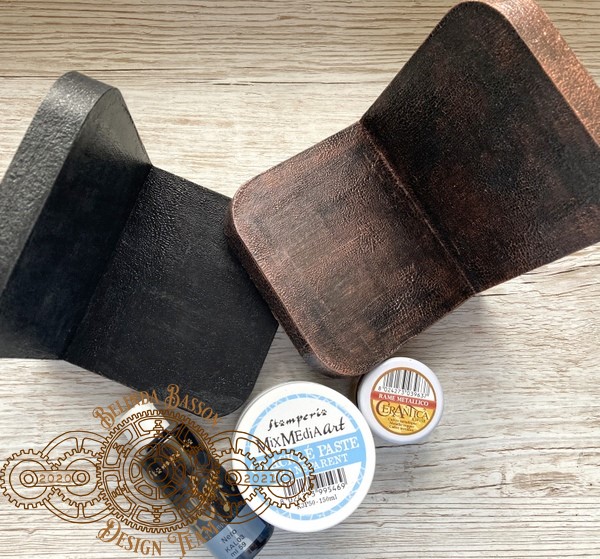
The floor of the book nook was created with Stamperia Cream Paste and I used the end of a knife blade to create the cobbled effect.  Once dry I applied Stamperia Allegro Paints to give it worn cobble colour.

The Lady V sign over the pub was created by hand from a piece of card.
Once the book nook is filed away in your bookcase you don't really see the outside but I wanted it to have a finished look and I used the Lady Vagabond 8" x 8" papers and they fitted perfectly.

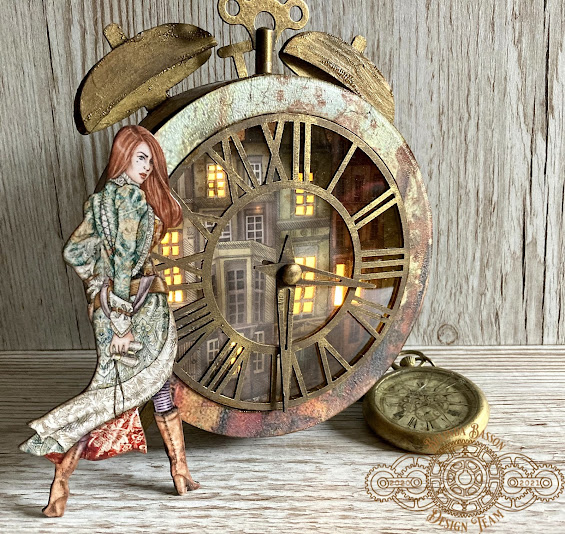
I placed Lady V (Stamperia die cuts) and her luggage in the opening to the street scene so that she would not get lost inside.  Lady V's cat was stamped onto Stamperia Shrink Plastic sheeting with archival ink.  Once shrunk she was the perfect size to sit alongside her mistress.

A final view of the book nook, I just love how it looks all lit up!  I really hope you might consider making one of these, they are so much fun and they would make a wonderful gift for any avid reader.

Thanks so much for your visit, I really appreciate you taking the time.  

Take care and keep safe and well.

Crafty hugs, Anne xxx


Stamperia Products Used:

Stamperia Lady Vagabond 8" x 8" Paper Pad SBBS27

Stamperia Lady Vagabond Rice Paper White Flowers DFSA3083

Stamperia Lady Vagabond Die Cuts DFLDC27

Stamperia Lady Vagabond Flying Ship Stamps WTKCC190

Stamperia Allegro Paints - Milk White KAL110, Brown KAL106, Grey KAL73, Black KAL03, Rame Metallic KAL117

Stamperia Cream Paste - K3P53

Stamperia Extra Forte Glue DC075

Stamperia Shrinky Bits (Shrink Plastic) - DFSBA4W

Tuesday, 17 August 2021

Belinda Basson DT - Lady Vagabond Airship

 Hello Friends

My project for Belinda Basson's Stamperia Design Team features Lady Vagabond's wonderful Airship which I have contained in a large frame.... and it lights up too!

I was inspired by my friend Jo who suggested a 3D airship and I took five sheets of the Lady V 12" x 12" paper pad, fussy cut each airship and layered them up to create some dimension.

I cut some of the windows out and added some rusty wire mesh behind to emulate the look of the original windows and this allowed me to add some tiny lights behind the windows.  I edged each of the pieces with Distress Ink to take away the whiteness.

To create the 'waves' I painted some white card with Stamperia Glamour Paste in Turquoise before cutting it into a wave shape.  I added two layers so that I could add the 'message in a bottle' that Sir Vagabond sends to Lady Vagabond....

I turned my attention to the frame, first covering the frame with Stamperia Allegro Turtle Dove paint, then applying a coat of Gold Glamour Paste and once dry I added a coat of Stamperia Crackle Paste which added some wonderful texture.

I added some texture paste to two of the corners using Belinda's Lady Vagabond stencil. I painted the flowers with Allegro paints in Turquoise, Nature Green and Corn. I added Stamperia metal gears to the bottom of the frame.

Next, I added Stamperia Cerantica Ancient Wax in Gold to the whole frame.  It did dull down the flowers on the corners but it was the look I wanted.

I used Belinda's Lady Vagabond stencil again, along with Stamperia Glamour Paste in Turquoise, to add the sentiment to the backing paper.
Finally, my favourite part, I added some tiny lights to the back of the airship before attaching all the pieces inside the frame.

A final look at Belinda's beautiful airship.

Thanks so much for your visit, I really appreciate it.

Crafty hugs, Anne xx


Stamperia Products Used:
Stamperia Lady Vagabond 12" x 12" paper pad - SBBL82
Stamperia Lady Vagabond Stencil - KSG454
Stamperia Glamour Paste Turquoise - K3P61C
Stamperia Glamour Paste Gold - K3P61B
Stamperia Crackle Paste Transparent - K3P50
Stamperia Allegro Paint - Turquoise KAL25
Stamperia Allegro Paint - Nature Green KAL30
Stamperia Allegro Paint - Corn KAL36
Stamperia Allegro Paint - Turtle Dove KAL22
Stamperia Cerantica Ancient Wax - Gold K3P15G
Stamperia Metal Gears Mixed - SBA406
Stamperia Metal Gears Large - SBA407


Tuesday, 15 June 2021

Belinda Basson DT - Stamperia - Cog Bookends

 Hello Friends

My Belinda Basson Design Team project for Stamperia this month is a set of steampunk cog book ends which are very grungy.  I think it shows the real versatility of Belinda's beautiful moulds in that they can be used to create 3D projects.  All of the Stamperia products I used are listed at the end of this post.

I started by creating the cogs, using quick setting white Resin and Belinda's large cog mould.  Once the cogs were released from the mould they were painted with black gesso.  I find the gesso works better if you do this stage as soon as possible after de-moulding.  I made four of the large cogs and glued them back to back to create the two large 3D cogs, this was not necessary for the smaller cogs as they were going to be layered up individually.

Next, I used a combination of paints to colour the various cogs before applying Stamperia's Mix Media Art Rust Effect paste and reagent.  The rust effect takes 24 hours to 'cure' but it comes out beautifully textured and rusty!  The rust covered up some of the paint colour and so I used the Stamperia Turquoise Paint (KAL25) to create a patina look in small random areas.

The final step was to layer the cogs up to create my dimensional piece.  I used my glue gun to attach the pieces to the finished bookend bases.
I purchased the bookends on line, they are very sturdy and came unfinished.  I started by applying Stamperia Black Paint to the bases and then I applied Stamperia's gorgeous Transparent Crackle Paste and left this overnight, just to ensure the crackle was completely dry.
Once the crackle was dry (left of photo), I applied Stamperia Cerantica Rame Metallico (Copper) using a soft brush and getting it into all the little nooks and crannies.  I left it to dry for a short time and then I wiped over the whole bookend to remove any extra wax.  There is such a lovely sheen....
I just love these cog chippies by Stamperia and I thought they would finish the bookends off beautifully.  I dabbed Black and Brick Red Stamperia paints over the chippies to give a rusty look (I did not use the grey paint in the end).  Once dry I added the chippies to the book ends.
The final step was to add the chippies to the book ends.  The picture below shows the lovely crackle on the bookends and the beautifully rusty cogs!

Stamperia Products Used:

Stamperia Mould - K3PTA482
Stamperia Mould - K3PTA488
Stamperia Paint - Black KAL03
       Stamperia Paint - Brick Red KAL20
Stamperia Paint - Earth Brown KAL40
Stamperia Paint - Turquoise KAL25
Stamperia Crackle Paste - Transparent K3P50
Stamperia Decorative Chips - SCB37
Stamperia Centrica Metallic Copper - K3P15R
Stamperia Rust Effect Kit - KE41M


I am so pleased with the way the bookends turned out and they are now happily sitting on a 
bookcase in my craft room.

Thanks so much for your visit, I really appreciate it and I look
forward to seeing you again soon.

Take care,  Anne xxx


Tuesday, 18 May 2021

Belinda Basson DT - Stamperia - Airship

 Hello Friends

My Design Team project for Belinda Basson this month features Lady Vagabond and her wonderful airship.  I used lots of Stamperia products and they are listed at the end of this post.

I began by a recycling an old picture frame.  The frame was covered in a sheet of Stamperia Rice Paper, attached with Stamperia Mix Media Glue.  I chose an image from the Lady Vagabond 12" x 12" paper pad to show behind the frame.  I thought the rooftops were appropriate for the airship to fly above.
The next step was to paint the covered frame with Stamperia Allegro Paints ( Turquoise and Mattone) dabbing the paint on randomly and leaving it to dry.  I love the way the image from the rice paper still shows through.
 I also applied a coat of Stamperia Crackle Paste (Transparent), thorough a Media Stencil and when dry I was left with some wonderful cracks and a slight sheen over the frame.  I think you can just about see the crackle in the above photograph.
Next, I used some quick setting Resin from my stash, Belinda's Lady Vagabond's airship mould along with the large set of wings mould and I painted these with black gesso before giving them a coat of Allegro Paint in various shades.
Once the paint had dried I applied Stamperia Cerantica waxes, in Metallic Turquoise and White to bring out the highlights in the airship.
The tops of the wings got a coat of Cerantica Argento Metallico (Silver) to bring out the beautiful detail of the wings.
I assembled the pieces for the airship, adding the large set of wings behind and attached these with silicone glue.

To create the scene at the bottom of the frame I used a selection of Belinda's die cut chipboard pieces.
On the left hand side I used a Stamperia bottle to house a 'map' constructed of Lady Vagabond Design Paper and I attached a chain from my stash to the bottle for added interest.
And here again is a final look at the completed project.

Stamperia Product List:

Lady Vagabond 12" x 12" paper pad
Lady Vagabond Wings MaxiMould - K3PTA482
Lady Vagabond Airship MaxiMould - K3PTA487
Stamperia Rice Paper - Train Mechanism DFSA3080
 Allegro Paints - Turquoise KAL25, Mattone KAL20, Nero KAL03, Avorio KAL12
Cerantica Waxes - Metallic Turquoise K3P15T, White K3P15L, Argento Metallico K3P15S
Mix Media Stencil KSTD049
Lady Vagabond Die Cuts
Stamperia Bottle
Stamperia Crackle Paste - Transparent
Mix Media Glue


Thanks so much for taking the time to visit, I really appreciate it and I hope to see you again soon.

Crafty Hugs,  Anne xxx


Tuesday, 13 April 2021

Belinda Basson DT - Stamperia - Piano Hinge Album

 Hello Friends

My Design Team project for Belinda Basson this month is a Piano Hinge Album using Belinda's gorgeous Lady Vagabond papers by Stamperia.  I have wanted to make this type of album for ages and it was surprisingly easy to do!  I found a really useful short YouTube video which explains the process very simply and gives measurements so that you can very easily have a go yourself. 

 I used my own measurements on my album to suit the size that I wanted.  The notches are cut at one inch intervals.
I created four 'signatures' for my album, from heavy Kraft cardstock as I wanted the front and back page to be heavy enough for my covers.
Once I added the design papers to the front and back cover they were a really good weight.  I used a combination of papers, die cuts, chipboard shapes and crackle paste to add some texture and age to the covers.
This is one of my favourite pages, using a mix of Lady Vagabond papers and chipboard elements.  In some of the pages I created secret pockets to store tags or ephemera in.
For the next set of pages I used papers which I decoupaged, along with some chipboard pieces.  I am in love with Belinda's fabulous airship!
Again, I used Lady Vagabond papers and chipboard.  I also created a deep pocket and added some Stamperia metal cogs, crackle paste and inks to add some texture.
The final pages were covered with more Lady Vagabond papers, chipboard and the luggage is decoupaged up.  I added a Kraft envelope to keep those little bits and pieces safe.
If you do watch the video you will see that the designer created a box to hold his album and I liked the idea, so I created one too.
I constructed the box from black card using the following template I created, it fits the size of album that I made.  I simply covered the box with Lady Vagabond papers, aged with inks and crackle paste and added a metal plate from my stash along with a chipboard piece.
To finish off the album I created a charm using bits and pieces from my stash, adding a little map element (Lady V papers) to the bottle.  
The album fits inside the box (allowing for some expansion) and showcases the piano hinging beautifully.  I finished the ends off with some colour coordinated string, knotting and gluing the edges.  You don't need to glue the ends, you may want to add some extra pages to the album.  My pages are quite thick and I didn't want to crowd the box.
I cannot stress enough just how easy it is to make a piano hinge album and it is just something a bit different.

Thanks so much for your visit and please excuse me if I do not get fully back to social media for a little while yet, I am taking each day as it comes at the moment.

Hugs, Anne xxx

The Stamperia products I used in this project are:

Stamperia Lady Vagabond 8 x 8 paper pad
Stamperia Wooden Shapes - Lady Vagabond
Stamperia Chipboard - Lady Vagabond
Stamperia Crackle Paste - Transparent
Stamperia Scrapbooking Accessories - Metal Cogs


Related Posts Plugin for WordPress, Blogger...

Labels