Pinterest

Sunday, 1 September 2019

Birthday Blog Hop for Mini Album Makers

Hello Friends!

We are back from a summer break at Mini Album Makers and since it is our 2nd Birthday, we are celebrating with a BLOG HOP and a prize of $25 from Lindy's Stamp Gang!

For your chance to win this prize, please become a follower of our challenge blog, then comment on this post AND the design team's posts (links below and on the challenge blog).  We will draw one winner from all of the comments and announce the winner along with our October challenge.
https://www.lindysgang.com/

For my project this month I am sharing a Pocket Notebook Holder.
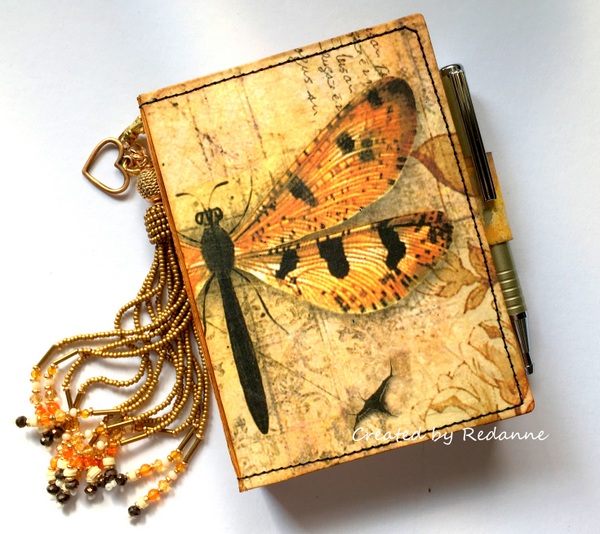
 I used Eileen Hull's Notebook die by Sizzix (663635), it is such a handy size to create a notebook holder.  The finished holder measures 5" x 3.3/4" approx., by 3/4" deep.
I knew I wanted to cover the notebook, inside and out with a gorgeous Stamperia rice paper so I wanted to create a toning piece to use on the inside pocket and notebook holder.  This piece was created using Tim Holtz Distress Oxides in Rusty Hinge, Weathered Wood and Ground Espresso.  I smooshed them onto my craft mat and dragged the card through the inks, drying at each stage.  I just love the rusty look!
This is how the inside looks at this stage.
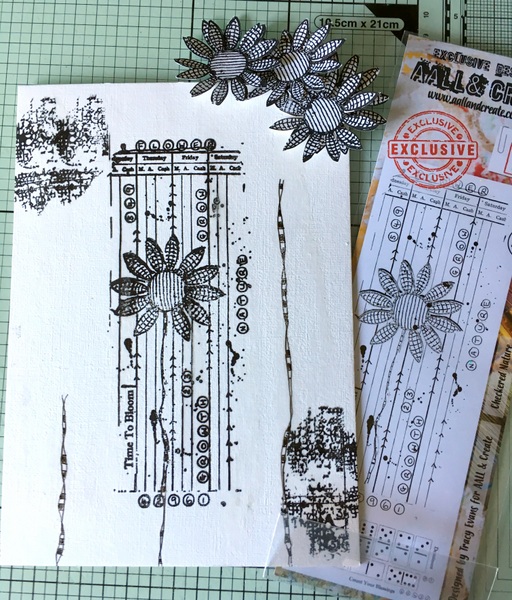
To create the pocket on the left hand side, I used the pattern below, I am sharing the pattern in cream card so that the measurements show up better.  The finished pocket measures 4.1/2" x 3.1/4".  I used an accordion fold on the sides to give the pocket a little depth.
For the right hand side I created a 'sleeve' which will hold a notepad, using the pattern below.
The finished 'sleeve' is just slightly larger than my notepad, this allows for a little 'wiggle room'.
Before attaching the 'sleeve' I used a piece of leftover card to make a pen holder.  To get the size, I wrapped the card around my pen and then added 2 inches.  I glued the holder in place (keep the pen in the holder so that you get the measurement right when gluing in.  Glue this piece before adding the sleeve and it will then be hidden.
 I stitched around the edge of the notebook, which also helps to keep the pen holder in place.  I added an eyelet to the top of the notebook so that could add a key chain.
Here is a view of the outside of the notebook which shows the full beauty of the gorgeous Stamperia Rice paper image.

Our generous prize sponsor this month is StencilGirl Products.  One lucky participant will win a Free Stencil Girl Studio Class ($49 value)!   

Website - http://www.stencilgirlproducts.com/
Blog - http://www.stencilgirltalk.com/
YouTube - https://www.youtube.com/user/StencilGirlProducts


We hope you will join us this months Mini Album Makers Challenge Blog.  You could be in with a chance of winning a $25 voucher from Lindy's Stamp Gang for visiting our  Mini Album Makers  Challenge Blog, together with a visit to my talented teamies, listed below.  If you participate in the challenge you have the chance of winning a class with Stencil Girl Studio!

My teamies are:

Tracey
Anne - you are here
Jennie
Inna
Autumn

Thanks so much for your visit, it is much appreciated.

Hugs, Anne xx


Thursday, 29 August 2019

The Earth Laughs in Flowers - AALL & Create

Hello Friends

I am not really enjoying the heat here at the moment but it is wonderful to see all the beautiful flowers in our garden, they inspired me to create a mixed media board featuring AALL & Create stamp set #149 by Tracy Evans and stencil #51 by Autour de Mwa
I started gessoing a media board measuring 6" x 8.1/2".
I stamped Tracy's Checkered Nature stamp in the middle and added a little random stamping to each side.  I drew in two further flower stems using a black marker pen.  I also stamped several more flowers and fussy cut them.
I applied a wash of watercolour ink over the board, in blue and green, let it dry and then applied texture paste through the Batik stencil.
I used watercolours again to colour the front and back of the flowers.
After layering up the flowers (two on each), I added some Glossy Accents to the flower centres.  Finally I used gesso to apply some splatters in white and black.

You can find a list of worldwide stockists for the stamp and stencil I used HERE.

Thanks so much for your visit, I really appreciate it!

Hugs, Anne xx

Thursday, 22 August 2019

Cogs and Gears Notebook for AALL & Create

Hello Friends

My GDT project for AALL & Create this week is a sticky note holder using Olga Heldwein's fabulous stamp set (Flowers & Gears #195 and Steam Cogs Stencil #71). Olga's beautiful stamp set appeals to both masculine and feminine tastes with gorgeous flowers and also cogs and gears.  
I started by creating a background, directly onto mixed media board, using several colours of Distress Oxides (I wanted rusty tones) before stamping the beautiful cogs and gears in brown Archival Ink.  I then die cut the Notebook using Eileen Hull's new Notebook die.
I stamped a few more cogs onto lightly gessoed Kraft card and coloured these with Quinacridone Gold acrylic paint before fussy cutting them.  The gessoed card gave a nice texture.
I added some metal cogs and gears from my stash to the fussy cut ones and glued these to the front
of the finished notebook.
I used AALL & Create stencil #71 on the inside cover of the notebook and then created two pockets to hold post it notes, again stamping cogs onto the pockets.
Finally, I added an elastic closure to the notebook and some charms from my stash.

You can find a list of worldwide stockists for the stamps and stencils I used along with the full range of stamps, stencils and new dies HERE.

Thanks so much for your visit, I hope to see you again soon.

Hugs, Anne xx


Thursday, 15 August 2019

Kinetic Twist and Pop Up Card for AALL & Create

Hello Friends

My GDT project this week for AALL & Create is a kinetic card using two beautiful stamp sets by Bipasha BK (AALL & Create Nos. 197 and 207).

I love cards that are a bit different and this one has a lovely surprise inside, a twist and pop up!

I started by brayering some piece of heavy card with acrylic paints.  I found an excellent video HERE which not only shows how to create the card, it also gives a set of free downloadable templates.  It is small, quite compact really, but great if you just want to try it out.
After printing off the template I applied this to my brayered pages and cut out my final pieces.

Next, I stamped the images from Bipasha's stamp sets, and then coloured in a few elements and assembled the card following the video instructions.
To finish off I made a 'belly band' for the card with some left over brayered card.
II hope you will give this type of card a go, it would be fun for children, in particular, to open up.


The stamp sets that I used are available from AALL & Create, where you will also find a full list of worldwide stockists.

Thanks so much for your visit, I hope to see you again soon.

Cheers,  Anne  xx

Thursday, 8 August 2019

Stacked ATC for AALL & Create

Hello Friends

My Guest Designer piece for AALL & Create this week is a stacked ATC, I really love creating these as they give a 'kind of'' 3D effect when they are constructed.

I used two sets of stamps by Tracy Evans, #70 (Quirky Blossoms) and #210 (Background Mash Up) along with Stencil #52 by Autour de Mwa (Quadrilaterals).  You can find a full list of worldwide stockists HERE.
If you have not seen a Stacked ATC before, they are literally three pieces of acetate with a chipboard back and once you have added your design, they can be screwed together and they make a nice sized free-standing ornament.
I stamped the flower onto one of the acrylic pieces, worked out where my sentiment would go and then stamped that onto a second acrylic piece.  I used black Stazon Ink to do the stamping.
I turned the stamped flower over and painted on the reverse side with acrylic paint (in this case Dina Wakley).  I also stamped some of the flower stems along the bottom of the ATC to give the impression of grass, and coloured these in the same way as the flower.
For the final base layer, I painted this with acrylic paint, stamped lightly with Tracy's background stamp before applying a little more paint through the stencil.  Once everything is dry, I simply put the layers together and attached the screws that come with the stack.

Here is a final view (apologies for the glare, it is difficult to photograph shiny acrylic!  Some of you may remember the seahorse one I did a few months back.

Just before I go I hope you might be able to catch the very talented Tracy Evans on Hochanda (Sky 673, Freesat 817, Freeview 85) (in the UK) on Friday 9 August at 6:00 pm and 8:00 pm and again on Saturday 10 August at 9:00 am, 1:00 pm and 5:00 pm.  If you are not in the UK you can watch all of the shows live (at the appropriate time for your country) on Rewind at www.hochanda.com.  The shows are usually available for a couple of weeks on Rewind.  You might even catch a little glimpse of this Stacked ATC, if I am lucky enough to have it shown.

Thanks so much for your visit, I hope to see you again soon!

Hugs, Anne xxx

Thursday, 25 July 2019

Birthday Card Organiser for AALL & Create

Hello Friends

I am back again this week with my Guest designer project for AALL & Create, it is a Birthday
Card Organiser which holds cards for 12 months of the year.  It was quite easy to make and is a great idea for organising cards for the whole year long.
The book itself is quite large, approximately 9 inches square by just over 2.1/2 deep (finished book) and I decorated it in my favourite theme!
 I cut some mountboard for the cover and spine.
I joined the spine to the covers with strong tape, leaving a gap so the cover was flexible. I also went around all the edges with the black tape (not shown) as I wanted a black border on the finished organiser. I set this aside to work on the inside folders.
I cut six pieces of card for the inside folders.
To create each folder, fold up from the bottom and fold back so that you have a pocket on each side.  You do not need to glue anything, folding back gives the pocket strength.  Using a standard hole punch, punch holes in the open side, through all the layers as shown above.
If desired, decorate the pages, I used some pretty papers from my stash.  I also decorated the pocket edges (not shown.  Adding paper gives the folders a lot of strength.
For the organiser cover I created two masterboards.  I brayered several layers of paint onto the card, applying a final layer of watered down gesso to tone down the colour.  I used AALL & Create stencil #39 to add some extra texture.

I cut a piece to fit the inside spine before attaching the ring binder mechanism (by Tim Holtz).  You need to do this before covering the spine on the outside of the organiser, otherwise the fixings will show on the outside of the organiser.
I cut the covers to size and added them to the organiser.  I used AALL & Create stamp #210 by Tracy Evans to add some further texture and then add some splatters of white gesso and black paint.
To decorate the cover I used stamp sets #137, #198 by Olga Heldwein and stamp set #196
 by Bipasha BK.
 I coloured these and fussy cut them out and applied these to the cover.
Here is a view of the inside, I added months to the folders and also added a card so I could list the birthday each month.

Finally, I added pockets to the inside front and back covers.  I am really pleased with the results of the organiser and it is very practical too!

You can find a list of worldwide stockists of all of the stamps and the stencil I used HERE.

As always, thanks for your visit, I really do appreciate it.

Hugs, Anne xx

Monday, 22 July 2019

Red Leather Journal

Hello Friends

I do love making journals and this week I am sharing a red leather journal created with Eileen Hull's latest Notebook die (Sizzix 663635).  This die is a brilliant size and cuts all in one piece so it is perfect to use with leather.
I started with a beautiful piece of red leather, this is approx 1.5cm thick, I find that this is the best thickness to use without putting any strain on your machine.
When cutting with leather I like to cut with the wrong side facing down so that the score lines do not show on the outside of the journal.  Once cut I attach some co-ordinating card to the inside with a strong adhesive.  This does cover up the score lines inside but also adds some stability and because the leather is soft, it still bends nicely.

Note:  If your leather is thick, do not add any extra bulk by attaching card first and take care when running through your die cutting machine, ensuring you use the right combination of plates for your machine.  If it is too thick you could damage your machine.  When I get a new piece of leather I do a little test with a small piece of leather first and if I meet any resistance I stop.

I used a Tim Holtz embossing folder to emboss the leather, one half at a time, using a busy pattern means that it is not necessary to match the design fully (the join will appear on the spine).
The Notebook die does not come with holes punched in the spine, which is great because you can choose how many holes you would like.  I punched two holes at each end with my cropodile and added eyelets.  I wanted to have an elastic closure so I punched two holes in the back of the journal and added eyelets to allow the elastic to feed through.
I like to add pockets to my journal and I used the same co-ordinating card to make one closed and one open pocket.
To create the closed pocket, I did this in a single piece, following the above measurements.  I folded it and glued the two small edges to create an open topped 'envelope'.
Once glued together, I added a closure to the lid and front that could be fastened with some light string.  I punched a small circle to add to the tail of the string to prevent fraying.
I created an 'open' pocket using the above measurements.  I folded and glued this in place on the back cover.  The advantage of attaching this pocket is that it hides the elastic closure fixings.  To attach the elastic closure, I fed it through the eyelet holes and stitched (or you can staple it) it together before attaching the pocket.

I fed elastic through the spine and tied it in a knot, leaving sufficient room to add a couple of signatures.

You can then create signatures to fit your journal and add these.  The size of the finished journal is 5" x 3.3/4", a nice handy size to fit in your handbag/purse.

I do get asked where I get my leather from, I purchase it in the UK from a company called Artisan Leather.  To make this size of journal I buy an A4 size, this will make two full journals in this size.

In the USA, Eileen Hull sells leather in her Etsy shop which you can find HERE.

Here is another look at the completed journal.  It has already gone to a good home!

If you have any questions please leave them in the comments and I will do my
best to answer them.

Thanks so much for your visit, it is much appreciated.

Hugs, Anne xx
Related Posts Plugin for WordPress, Blogger...

Labels