Pinterest

Monday, 10 August 2020

Simon Says Stamp Designer Spotlight - Week 2

Hello Friends

Thank you to all of you who visited last week, I truly appreciate it!  Week 2 has come around so quickly, I hope you are all staying safe and well.

The new challenge at Simon Says Monday Challenge this week is SUMMER MEMORIES.  



My project might look a bit odd for the theme but as a child my Brother and I spent the whole of our summers at the beach, only reluctantly going home for an evening meal.  So, I created a project to remind me of those wonderful days of swimming, canoeing, fishing and collecting treasures.... and of course I will take any opportunity to create a water themed project!
I started by creating the cover of the tin.

I used a Tim Holtz Idea-ology Trinket tin and I created a hole in the front using Tim's scissors to create my 'porthole'.  I then embossed some silver design foil using Tim's 3D Foundry Embossing folder, adding this to the outside front of the tin.  I distressed the foil with some Rusty Hinge Distress Paint.

I die cut the porthole frame using Tim's Steampunk Parts die and black cardstock, adding this to the porthole.  Again, I distressed the card with Rusty Hinge Distress Paint, first by dry brushing it and then adding some heavier areas of paint to give a rusted effect.  The die cut propeller was aged in the same way and added to the front.  The bird is a Tim Holtz charm from my stash, I added some Distress Paint to tone down the shine.

I turned my attention to the inside of the tin.  For the faux netting I used a beautiful stencil by Visible Image to create the fishnet look.  I used the wrinkle free technique to colour some white card and then applied Ground Espresso Distress paint to the stencil, spritzed it lightly with water and applied it to the card, dabbing it gently with a paper towel to get the fishnet look.

To complete the look I added some gauze from my stash, that was coloured with Mowed Lawn Distress Ink, and I added a couple of Idea-ology bottles, glued some real sand to the bottom to give an ocean floor look.  I added some aged book page to one bottle to give the look of a message in a bottle.
For the main part of the tin, I stamped and fussy cut the seahorse from Tim's Blueprint stamp set, coloured it with Distress Inks and applied a coat of Ranger Rock Candy Distress Paint.  I die cut some greenery to add behind the seahorse and also added some Tim Holtz Tiny Lights behind my scene but sadly they do not show up well in my daylight photo.  To finish off I added some Idea-ology pearl baubles to the sea floor.

 I created a simple pocket at the back of the tin to hold the battery pack.  I punched a small hole at the base of the tin for the light string to go through.  I added a Faucet Knob to the top of the tin and to finish the outside I attached some Idea-ology Design Tape around the outside (not shown).


I do hope you will join in the challenge this week.
One lucky winner will receive a ....
to spend at Simon Says Stamp.  You have got to be in it to win it!


Thanks so much for joining me this week, I hope you will visit again next week.

Take care, keep well and stay safe.  Hugs, Anne xxx


Simon Says Stamp Products Used:


Wednesday, 5 August 2020

The Crafter for AALL & Create

Hello Friends

Well, here I am, twice in one week, with something completely different to my last post!

My Guest designer project for AALL & Create this week is a mini album created with a wooden spool bobbin.
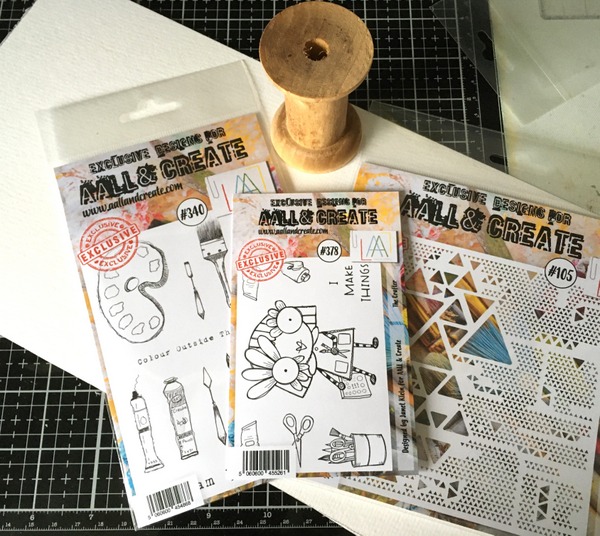
I used The Crafter stamp set by Janet Klein, together with the Paint Your Dreams stamp set by Tracy Evans, the newly released stencil - Lotza Trianglz by Autour de Mwa and an A3 size piece of watercolour card for the album element.
I cut a piece of the watercolour card to fit the spool.  I used Distress Inks to colour the strip of card and stamped the elements I wanted along the strip.  I used the Lotza Trianglz stencil and Texture Paste to add some detail and then coloured the elements with watercolours.  The Crafter was stamped, coloured with watercolours and fussy cut.  The spool was gessoed in white.
I added some stamping to the reverse side of the card and coloured with watercolours.  The spool was painted with Distress Paint in Picked Raspberry.  I made a little sign for the top, using a cocktail stick wrapped in thin wire, along with a scissors charm.
For my closure, I attached a small button and a piece of elastic.
Here is a view from the top. I added the sign, scissors and a paper clip to the top of the spool with some 3D glue.

You can find a list of worldwide stockists of the stamps and stencil I used HERE.

Thanks so much for your visit, I hope to see you again soon.

Keep safe and well.  Hugs, Anne xxx


Monday, 3 August 2020

Simon Says Stamp Designer Spotlight - Week 1

Hello Friends

I am hugely honoured and delighted to have been asked, again, to be in the designer spotlight for the month of August, for Simon Says Stamp Monday Challenge!

This week the theme is Happy Birthday!  It is a very special one, Simon Says Stamp Challenge Blog is 10 years old!  Happy Birthday!  The design team is also featuring Stampers Anonymous Products this week.


I have chosen to celebrate the birthday by using 10 different sets of my beloved Tim Holtz stamp sets, by Stampers Anonymous, to create my accordion book project.

I started by creating the covers, using mount board measuring 5.1/2" x 4.1/4".  I used Tim Holtz's  wrinkle free technique to colour the front and back, using Antique Linen, Speckled Egg and Gathered Twigs Distress Inks.  Once dried I stamped the beautiful Baroque stamp set by Tim Holtz, using a Ranger Distress Embossing Dabber and applying Rusty Hinge Embossing Glaze.  I heat set the covers and set them aside.

The accordion element is 24" x 5.3/8 and scored at 4" intervals along the long side.  I cut this from plain white card and used Gathered Twigs Distress Oxide to darken all of the edges.  I attached this to the front and back covers.  This gave me 10 separate surfaces to work on.  I then cut 10 pieces of Mixed Media card to 5.1/4" x 3.3/4" for my mats.  I used the Tim Holtz wrinkle free technique on all of the mats, using a variety of Distress Ink and Oxides, with the intention of creating a vintage look background.

I turned my attention to the images for the mats.  I stamped the script images from Tim's Faded Type stamp set, using Coffee Archival Ink.  The butterfly was stamped separately onto white card, again in Potting Soil and embossed with clear embossing powder.  The butterfly (stamp set Perspective) was coloured with Speckled Egg Distress Ink.  I fussy cut the butterfly, cut it in half and added it across the two pages.
For the next set of pages I stamped the insects from Tim's Entomology stamp set, coloured with Distress Ink, fussy cut and attached this to the mat.  Likewise, the camera from Tim's Inventor 8 stamp set was coloured, fussy cut and applied.  I added some Idea-ology filmstrip to the pages to add another layer of texture.
For the next two pages I stamped  images from Tim's Flower Shop stamp set, and simply coloured with Distress Ink.
The next two pages use stamps from Tim's Inventor 9 stamp set.  I stamped the images onto Mixed Media card, coloured them with Distress Ink, fussy cut them and added them to the pages.  I added a couple of Idea-ology arrows, for interest.
My last pages (but by no means least!) feature two stamp sets, Tim's Glitch 1 and my favourite Professor stamp set, (The Professor 2) again coloured with Distress Ink.  I added the Idea-ology Optical Lens to add some detail.
To complete my accordion book I used Rusty Hinge Distress Glaze to coat an Idea-ology Hinge Clip and attached an Idea-ology Swivel Clasp and Monocle with numbers from my stash, to represent the special birthday and also my use of 10 stamp sets.  To complete the look I dyed some ribbon with Rusty Hinge Distress Stain and wrapped the book as my closure.
Here is a view of the finished pages in situ.
A final view of the front and back.  I added a sentiment from Tim's Perspective stamp set, attaching it with an Idea-ology Label Frame.  I also added an Idea-ology Salvaged tag to the back, to hold the ribbon in place.
I hope you will join the challenge this - Happy Birthday is the theme.


To celebrate the special birthday, if you enter the challenge you will have the opportunity to win a $50 voucher to spend!


All of the products I have used that are listed below are available from:


I am looking forward to next week's project already.  I hope you will join me!  As always, thanks so much for your visit.

Keep safe and well.  Hugs, Anne xxx


List of products used:

Antique Linen,  Speckled Egg, Broken China, Tea Dye, Gathered Twigs, Rusty Hinge, 
Chipped Sapphire
Speckled Egg, Antique Linen, Rusty Hinge

Wednesday, 29 July 2020

Embroidery

Hello Friends

I am back with a project for AALL & Create.  I wanted to do something a little different with stamps other than stamping and colouring, and so I created some embroidered projects.  I have not embroidered for years and really enjoyed the process.
I used three stamp sets by Tracy Evans...
I don't have too many process shots to share with you because I just got lost in the process.
I cut some calico larger than the embroidery hoop, stamped the images with Archival ink and then stitched the images with embroidery thread, using the hoop to keep the calico taut.  Once completed I removed the calico from the hoop, added a running stitch around the calico and added it back to the hoop.  As I wanted to leave each project on the hoop, I gathered the calico to the back and added a piece of card to tidy the backing.  I painted each of the outer hoops and applied these to the inner hoops.

The bee is the first one I completed.  After stamping and stitching the honeycomb, I filled the honeycomb in with watercolour pencils.  I did the same with the bee wings and gave them a touch of glitter to give them a lighter appearance.

The hare body is quite open and I was able to use long stitches to fill him in.

The final hoop is a beetle.  It took a few colours to complete the beetle and I really enjoyed creating this one.  Well, in truth, I enjoyed creating each of them, I am not the greatest embroiderer but I found it quite a relaxing task in the evenings - it only took an evening to complete each one.

You can find a list of worldwide stockists for all of the stamps I used HERE.

That's all for now, thanks so much for your visit, I hope to see you again soon.  Actually, I am back earlier next week with a very special project.....

Hugs, Anne xx

Wednesday, 15 July 2020

Vintage Typewriter

Hello Friends

I hope you are all well, we are into our 19th week of lockdown here, strangely enough it just feels like the norm now and I am not anxious to go out anytime soon!

My Guest designer project this week for AALL & Create has a vintage vibe to it.
I used two of Bipasha's beautiful stamp sets - Time Out #325, Janet Klein's Background Noise #338 together with the Abundance Stencil #85 by Olga Heldwein.

I started by creating the background using Distress Oxide inks and the wrinkle free technique.  I covered the stencil with Seedless Preserves, spritzed it and applied it to the background.  This left a lovely delicate pattern.
I stamped the typewriter image onto white card and used an edging die to create the torn page look.
I stamped and fussy cut the typewriter again and also stamped the wording from stamp set #338, to use in the typewriter.
I gave the page and the note for the typewriter a vintage look with Distress Ink in Gathered Twigs.
I layered up the typewriter, added it to the page and then some corrugated card and fixed it to the background.  To finish off the card, I added the sentiment from my stash.

Worldwide stockists for the stamps and stencil I used are listed on the AALL & Create website HERE.

As always, thanks so much for your visit, I hope to see you again next week.

Hugs, Anne xxx

Wednesday, 1 July 2020

The Life of the Bee...

Hello Friends

I hope you are still staying safe and well in these crazy times.  I had a week off from doing projects as Guest designer for AALL & Create so I could concentrate on making samples for Tracy Evans' Hochanda shows..  

I am sharing the 'how to' for one of those projects today.  It has been shown on Facebook already but I have had several requests for more detail...  The idea originated from a tin I saw on Pinterest a while back. The beautiful bee is from Tracy's newly released Honeybee stamp set #330.
And here is the inside of the tin...
I condensed the photos so as not to make the post too long.  I used the products below, along with the AALL & Create Cells die by Bipasha BK.
1.  Take a piece of card 11" x 1.3/4" and score at 1/4" intervals, scoring on the 1.3/4" side.
2.  Glue along the long side to form a long honeycomb shape.
3.  Once the glue is dry, cut the shape into 1/4" pieces.
4.  Join the pieces together to form a honeycomb shape.
5.  Use black gesso on the inside of the tin.
6.  Stamp the honeycomb from Tracy's Honeybee stamp set onto tissue paper.
7.  Paint the top of the tin, and the reverse side of the stamped tissue with Fresco paint in Haystack. 
8.  Line the inside front of the tin and the sides of the bottom half of the tin with book pages.  I used pages from a vintage book (The Life of the Bee), paint with watered down Haystack paint and splatter with some Vintage Photo Distress Ink to add to the 'aged' look.
9.  Add the prepared 'honeycomb' to the base of the tin. Create faux honey by using Seth Apter's Vintage Beeswax along with some Tim Holtz Distress Glaze in Fossilized Amber, adding the powders in thin layers and heating each layer until the desired depth is achieved.
10.  Add the painted tissue to the top of the tin, using Matte Medium to attach it and then also seal the layer with Matte Medium.
11.  Use Washi Tape to decorate the lower part of the outside of the tin, sealing this with Matte Medium.
12.  Stamp and fussy cut two bees, colour them and emboss with two layers of clear embossing powder.
13.  Stamp and fussy cut the beehive for the inside lid of the tin (not shown).  I wrapped some thin wire around the beehive, added some charms for detail and used 3D glue to raise the beehive slightly.
14.  Die cut Bipasha's Cells die and trim to fit the top of the tin.  Use Vintage Photo Distress Ink to age the die cut, glue in place and add one of the bees.
15.  Finally, add the second bee to the honeycomb inside the tin. 
Here is final view of the finished tin

You can find a list of worldwide stockists for the AALL & Create stamp and die set I used HERE.

Thanks so much for your visit, I really appreciate it.

Take care and I hope to see you again soon.

Hugs, Anne xxx


Related Posts Plugin for WordPress, Blogger...

Labels