Pinterest

Monday 31 August 2020

Simon Says Stamp Designer Spotlight - Week 5

 Hello Friends

Since there are five Mondays in August I get one final chance to be in the Designer Spotlight for Simon Says Stamp Monday Challenge.  I would like to thank Simon Says Stamp for having me as their guest this month, I have really enjoyed the experience!

The challenge this week is 'Oodles of Doodles'.  I will admit, this was not an easy challenge for me and I spent many days over thinking it before I came up with my idea.  I promise you it does have lots of doodles in it, if you know where to look!

I have been itching to use Tim Holtz's Arthur die and have seen many wonderful examples on social media.  I chose to give him a rather sinister look for my Halloween themed project.

I started by using a Tim Holtz Vignette Shrine which I thought would make a perfect 'home' for Arthur.  I painted the whole box in black to give me a good base to work on.

For my background I used Distress Oxide in Spiced Marmalade, using the wrinkle free technique and then splattered liberal amounts of Pumice Stone and Black Soot over the background.  I die cut the doodly flowers from Tim's Media Marks die set, cut out a circle for the moon (applying a light coat of Distress Oxide in Spiced Marmalade and a couple of brushes of Pumice stone).  I then covered the whole of the outside of the Shrine with Collage Paper in Typeset/Composer, using Ranger matte medium both under and over the Collage Paper to give good adhesion.

I cut the background to size and glued this into the back of the Shrine and I used Tim's new Halloween Trim Tape to give a nice edge to the Shrine.  I would later add some doodles to the tape.

Next, I constructed Arthur, it took me a couple of attempts!  I die cut Arthur from Watercolour cardstock and then coloured the various parts with Distress Oxides in Pumice Stone and/or Hickory Smoke and assembled him.  His orange eyes and feet were coloured with alcohol markers from my stash.  I just love those eyes.  I attached him to the branch that comes with the Arthur die, it is painted with Gathered Twigs and Vintage Photo Distress Oxide.

You can see from the above picture that I 'doodled' between the numbers by adding some dots.  I die cut Tim's new Halloween Spider Web die with spider and attached it to the inside top of the box.  I also die cut the squiggly doodly flowers from Tim's Media Thinlits Die set and added these to the background.

The moon is raised up on a piece of foam tape and I added some of Tim's Tiny Lights, that I wrapped around the foam before attaching the moon.  I poked a small hole in the back of the Vignette to thread the lights through.

For the bottom of the Shrine I added some moss, Ideaology Wishbones (from Arthur's last meal), pumpkins from my stash and some Holiday Greens foliage.  I painted and added the base to the shrine, distressed the edges and added one of Tim's older Etcetera pieces to add some detail to the bottom.

I added one of Tim's Ideaology older quote tokens from my stash, filling the words with Picket Fence Distress Paint to make them stand out.

This is the view from the back showing the Tissue Wrap and also the holder I created for the battery pack - it is easily accessible when I want to turn on the lights.
Here is a view of the roof, I used Tim's Media Marks 2 stamp set to create the lines on the roof and then I just doodled between the lines to give the roof a bit of a lift.
And finally here is Arthur with the backlit moon.  I love that his eyes stay looking spooky, even in the darkness.  Perfect for Halloween.

I hope you will join in the challenge at:

One lucky person will have the chance to win a $25 Gift Voucher:

You can find a list of the products I used below, which are available from:


Once again, a huge thank you and shout out to Lols and the whole Simon Says Stamp Team for having me in the Designer Spotlight this month, I have enjoyed every minute!

Thanks so much for your visit too, it is much appreciated and I hope to see you again soon.  I am meant to be having a little break from crafting next week, but as my new Tim Holtz Halloween stamps have arrived, I may just have to have a play!

In the meantime, keep safe and well.  Hugs, Anne xxx


Products Used:

Tim Holtz Idea-ology Vignette Shrine

Tim Holtz  Colorize Thinlits Die Set  - Arthur

Tim Holtz Thinlits Spider Web die set

Tim Holtz Sizzix Media Marks Thinlit die set

Tim Holtz Ideaology Halloween Trim Tape

Tim Holtz Sizzix Holiday Greens die set

Tim Holtz Stampers Anonymous Media Marks 2 Stamp set

Tim Holtz Collage Paper - Typeset/Composer

Tim Holtz/Ranger Distress Oxide Inks

Tim Holtz Ideaology Tiny Lights

Tim Holtz Ideaology Wishbones

Tim Holtz Distress Paint

Ranger Multi Matte Medium

Monday 24 August 2020

Simon Says Stamp Designer Spotlight - Week 4

 Hello Friends

I hope you are all safe and well.  Time is marching on so quickly and I am here with my Week 4 Designer Spotlight project for Simon Says Stamp Monday Challenge.

The challenge this week is BEAUTIFUL BOTANICALS.

I have a few botanical books in my collection and one of my most favourite  botanical flowers is the Peony (Paeonia Officinalis L.) with its large blousy blooms, although I confess I have not had much luck in growing them.

As with many botanical plants, Peonies have many medicinal qualities and Peony petals can be used to flavour drinks and can be used in salads.  The Chinese use them to treat inflammatory conditions such as RA and Lupus, both of which I sadly have a great deal of experience in.

I chose to use the absolutely gorgeous stamp set by Olga Heldwein for AALL & Create called Blooming Field to create my tag.

I started by using an Etcetera tag by Tim Holtz and using Distress Watercolour paper for my background.  I used the wrinkle free technique with Distress Oxide Inks in Scattered Straw and Shabby Shutters, dipping the card in the inks until I was happy with the result.  Once dry I flicked some clean water over the tag to create some lighter areas.

Next, I took Tim Holtz's script stamp from the Entomology stamp set and stamped this in Distress Oxide Ink, Shabby Shutters as I wanted the background to be very subtle.  I really love this stamp for backgrounds and use it often.

I stamped the flowers, coloured them with Distress Inks in Scattered Straw, Picked Raspberry, Spun Sugar and Mowed Lawn and then fussy cut the flowers.  Yes, it took a while but I wanted the flowers to have some dimension and movement on my tag.  I went around each of the flowers with Distress Ink to get rid of the white edges.

To finish off I took some white ribbon from my stash, coloured it with Picked Raspberry Distress Ink for the top of my tag and I used a computer generated label for the bottom of the tag.

So, it would be lovely to see you join in the Beautiful Botanicals challenge here:

As always, there is a $25 Gift Voucher available for one lucky winner.

Listed below are the products I used to create my tag and are available from:

Thank you so much for your visit, I really appreciate it.  I hope you will join me again soon.

Stay safe and well.

Hugs, Anne xxx


Products Used:

AALL & Create Blooming Field Stamp Set #229

Tim Holtz Entomology Stamp Set CMS328

Tim Holtz Etcetera Tag Small

Tim Holtz Ranger Watercolour Card Stock

Tim Holtz Distress Oxide Ink

Tim Holtz Distress Re-inkers

Ranger Multi Medium Matte


Wednesday 19 August 2020

The Great Outdoors for AALL & Create

 Hello Friends

I hope you are all staying safe and well.

My Guest designer project for AALL & Create this week is a card.

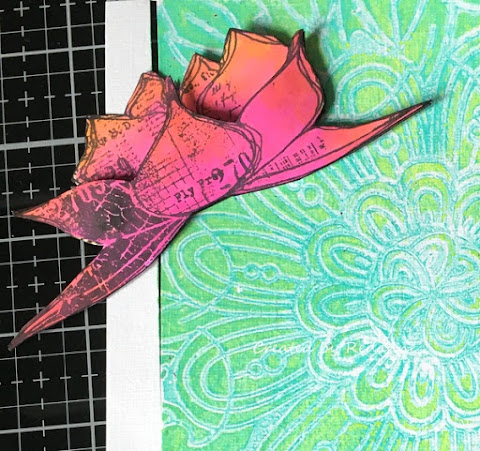
I started by creating the background, using the gorgeous Abundance stencil #85 by Olga Heldwein and PaperArtsy paints on my 5" x 7" Gelli plate layering up several times to achieve the background I wanted.

Next, I stamped the gorgeous flower (twice) from Tracy Evans' The Great Outdoors stamp set #370.  I love this flower, it reminds me of a waterlily.  I coloured the flowers with watercolours (Art by Marlene) and fussy cut the flowers before decoupaging them.

I die cut the vase (Tim Holtz die) from black card, stencilled using the same stencil as previously and PaperArtsy paint, and once dry I gave it three coats of clear embossing powder to give a lovely sheen.
To finish off, I added some washi tape to ground the vase and I used 3D gel to add the vase and the flower.

You can find a list of worldwide stockists for the stamp set and stencil is used on my project HERE.

Thanks so much for your visit, please stay safe and well and I hope to see
you again soon.

Hugs,  Anne xxx

Monday 17 August 2020

Simon Says Stamp Designer Spotlight - Week 3

 Hello Friends

I hope you are keeping safe and well.  I am back this week with another project in the Designer Spotlight at Simon Says Stamp Monday Challenge ....

The challenge this week is GRUNGE IT UP.

Having recently bought a vintage typewriter I was inspired to make my Grunge It Up project using Tim Holtz's Vintage Typewriter die along with his Idea-ology Vignette Divided Drawer set.

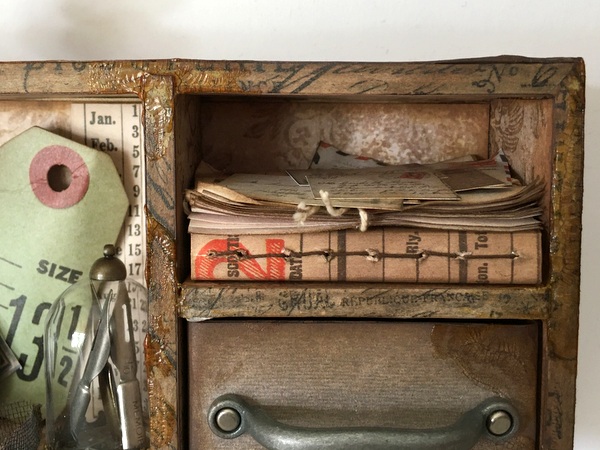
I started with a Tim Holtz Ideaology Vignette Divided Drawer, taking out one of the compartment sides.  I cut this down because I wanted to use it as a shelf later on.  I love this Vignette box with its flexible elements.
 I covered the inside and outside of the Vignette with Tim Holtz papers from my stash, including the piece I would use for my shelf.
The shelf was added and I created a drawer to fit.  I die cut and assembled the typewriter, painting parts with Brush Pewter Distress Paint, before adding it to the Vignette.
The drawer was covered in paper and I applied some Rock Candy Crackle Glaze to the edges of the drawer and the edges of the whole Vignette.  Once dry I used Distress Crayon to age the painted elements.
I then created a small book and some old papers and miniature envelopes to sit on the shelf.
Next came the fun part, gathering my Ideaology bits and bobs to add to the Vignette.  I created a small wire basket from some rusty wire in my stash, to hold tiny stamps and then attached the other elements, finally adding the word Curiosities to the front.
Finally, I added the Curio Knob to the top and the Mini Foundation feet to the base of the Vignette.

I fully intended to add some typed words to my little typewriter but sadly, I had to send my real vintage typewriter off to be serviced, to bring it up to useable condition....

Please do come and join in the fun Grunge It Up challenge this week here:

One lucky entrant will win a $25 Gift Voucher...

....to spend at Simon Says Stamp - you have got to be in it to win it!

Thanks so much for your visit, I really appreciate it.  I hope to see you again soon but in the meantime please stay safe and well.

Hugs, Anne xxx


Products Used:

Tim Holtz Ideaology Vignette Divided Drawers

Tim Holtz Retro Type Bigz die

Tim Holtz Ideaology Paper Stash 12 x 12

Tim Holtz Ideaology Curio Knobs

Tim Holtz Ideaology Pocket Watch

Tim Holtz Ideaology Decorative Domes Findings

Tim Holtz Ideaology Pen Nibs

Tim Holtz Ideaology Mini Foundations Findings

Tim Holtz Ideaology Mini Hardware Pulls

Tim Holtz Ranger Rock Candy Distress Crackle Paint

Tim Holtz Ideaology Ephemera Thrift Shop

Tim Holtz Ranger Brushed Pewter Distress Paint

Tim Holtz Distress Oxide Ink - Gathered Twigs

Tim Holtz Distress Crayon - Vintage Photo

Wednesday 12 August 2020

Butterfly Lady...

 Hello Friends

I am back with a mixed media project as Guest designer for AALL & Create.

I used Olga Heldwein's gorgeous new Flutterby stencil #98, Olga's Take Flight stamp set #367, Autour de Mwa's Bubble Block stamp set #310 along with his Totally Dotty stencil #87.

Starting with the Totally Dotty stencil I created a Gel Press background using PaperArtsy paints, adding several layers of paint to create a delicate stencilled look.

To create the butterfly, I applied Versafine Clair ink (Fallen Leaves) through the butterfly (Flutterby stencil) to white card, carefully going around the edges to create a border.  I then applied clear embossing powder before heat setting, and then cut out the butterfly.  I used Seth Apter's Izink Dye Spray in Sunflower to add colour to the butterfly.

I prepared my media board by inking around the edges with the same Versafine Clair.  I stamped and watercoloured the lady and then fussy cut her.  The sentiment is a Tim Holtz one.

I stamped a few elements from the Take Flight stamp set onto my background, stamped and cut out the circular element for the butterfly lady to sit on.

To finish off I added the lady, her wings and the sentiment to the background and then mounted the background to my board.

A list of worldwide stockists for the stamps and stencil I used can be found HERE.

As always, thanks so much for your visit, I hope to see you again soon.  Keep safe and well in the meantime.  Hugs,  Anne  xx


PS. A few people have asked me to share the artist's messy desk I created a while back for one of Tracy Evans' Hochanda shows, and here it is.  I used matchboxes to create the desk and Tracy's stamps to decorate it. 


Monday 10 August 2020

Simon Says Stamp Designer Spotlight - Week 2

Hello Friends

Thank you to all of you who visited last week, I truly appreciate it!  Week 2 has come around so quickly, I hope you are all staying safe and well.
The new challenge at Simon Says Monday Challenge this week is SUMMER MEMORIES.  


My project might look a bit odd for the theme but as a child my Brother and I spent the whole of our summers at the beach, only reluctantly going home for an evening meal.  So, I created a project to remind me of those wonderful days of swimming, canoeing, fishing and collecting treasures.... and of course I will take any opportunity to create a water themed project!
I started by creating the cover of the tin.

I used a Tim Holtz Idea-ology Trinket tin and I created a hole in the front using Tim's scissors to create my 'porthole'.  I then embossed some silver design foil using Tim's 3D Foundry Embossing folder, adding this to the outside front of the tin.  I distressed the foil with some Rusty Hinge Distress Paint.

I die cut the porthole frame using Tim's Steampunk Parts die and black cardstock, adding this to the porthole.  Again, I distressed the card with Rusty Hinge Distress Paint, first by dry brushing it and then adding some heavier areas of paint to give a rusted effect.  The die cut propeller was aged in the same way and added to the front.  The bird is a Tim Holtz charm from my stash, I added some Distress Paint to tone down the shine.

I turned my attention to the inside of the tin.  For the faux netting I used a beautiful stencil by Visible Image to create the fishnet look.  I used the wrinkle free technique to colour some white card and then applied Ground Espresso Distress paint to the stencil, spritzed it lightly with water and applied it to the card, dabbing it gently with a paper towel to get the fishnet look.

To complete the look I added some gauze from my stash, that was coloured with Mowed Lawn Distress Ink, and I added a couple of Idea-ology bottles, glued some real sand to the bottom to give an ocean floor look.  I added some aged book page to one bottle to give the look of a message in a bottle.
For the main part of the tin, I stamped and fussy cut the seahorse from Tim's Blueprint stamp set, coloured it with Distress Inks and applied a coat of Ranger Rock Candy Distress Paint.  I die cut some greenery to add behind the seahorse and also added some Tim Holtz Tiny Lights behind my scene but sadly they do not show up well in my daylight photo.  To finish off I added some Idea-ology pearl baubles to the sea floor.
 I created a simple pocket at the back of the tin to hold the battery pack.  I punched a small hole at the base of the tin for the light string to go through.  I added a Faucet Knob to the top of the tin and to finish the outside I attached some Idea-ology Design Tape around the outside (not shown).


I do hope you will join in the challenge this week.
One lucky winner will receive a ....
to spend at Simon Says Stamp.  You have got to be in it to win it!


Thanks so much for joining me this week, I hope you will visit again next week.

Take care, keep well and stay safe.  Hugs, Anne xxx


Simon Says Stamp Products Used:


Related Posts Plugin for WordPress, Blogger...

Labels