Pinterest

Wednesday 30 May 2018

A Winner and some 3D Embossing

Hello Friends

I posted a small Give-away a week ago HERE.  Thank you so much for all your comments!  Unfortunately, I can't do that Random Number thingy so I had to resort to pen and paper..... after carefully putting them in a box .....and picking one at random...

 the Winner is

Elaine 
who said:
That big flower looks amazing and I always love the combination of red and turquoise. I must have been checking out your blog for at least 4 years - some great projects over the years. Elaine xx

Congratulations Elaine, please send me your address to the email address in my Profile.

......................................................................

I thought I would share a new project with you today too.  I have been playing with the
new Tim Holtz 3D Embossing Folders, mainly just to see how they fare.  I have to say, they are  pretty impressive!

I do love working with leather so I just had to try this Botanical 3D folder out, it was a gift from a very dear friend.  My finished project is an embossed red leather handmade watercolour journal:

And the beautiful Embossing Folder is by Tim Holtz (3-D Texture Fades - Botanical (Sizzix 662716), I really could not believe how wonderfully it embossed the 2mm thick leather!  The pattern looks and feels so beautifully tactile!
I also tried it with a piece of my precious stash of Grunge Paper, some mount board and also some faux metal, with the same fabulous results, but that's for another post....

Thanks so much for your visit, hope to see you again soon.

Hugs, Anne xx

Tuesday 22 May 2018

Artist Trading Block for Eileen Hull + Giveaway

Hello Friends

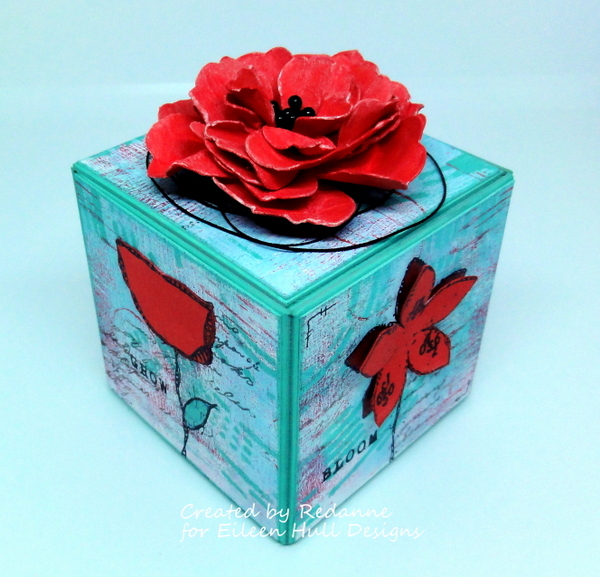
I wanted to celebrate the fact that it is my 4th Anniversary with Eileen Hull's Inspiration Team!  I started out on the Artist Trading Block (ATB) side of the team and  my lovely friend Tracy Evans was on Eileen's other Inspiration Team. I thought I would mix up the Spring Flower theme for this month by creating an ATB, using Eileen's ATB die and stamps designed by Tracy for AALLandCreate.
I have a few step out photos and some brief instructions for you.
I started by created the large flower first.  I die cut the petals using Eileen Hull's Pansy Flower die and coloured them with Eileen's ColorBox Blend Ink in 'Stop' (bright red).  After spritzing the petals with water, I scrunched them up, dried them with my heat tool and assembled the flower.

The background was created by adding some ColorBox Blend to my craft mat (in 'Stop' and 'Bay' - a beautiful turquoise) and brayering this over a piece of A4 card, quite randomly until I got the desired effect.  Once dry, I used a stencil, by AALLandCreate (Stencil #28 by Autour de Mwa) and also added some marks here and there with stamps and the lid to the paint top.
Once I had die cut the 3 inch ATB, I coloured the edges with ColorBox Blend in Bay and left this to dry.  Then I cut the brayed and stenciled piece into 2.7/8" squares and inked the edges with Bay.
I stamped four of the squares with an AALLandCreate stamp (Set #70) set by my talented friend Tracy, and stamped and coloured the flowers in 'Stop' ColorBox Blend on a separate piece of card, fussy cut them and added them to the stamped flowers on the squares.  I added words to each side, again using Tracy's stamp set.

To finish off I added some black threads to the top before mounting my big flower on top.

All this month my team mates have been creating Spring Flower projects which you can see on Eileen's Blog, HERE.


Giveaway!

My other project this month was this Passport Journal die that I made into a little rusty and patina storage box and using another of Tracy's stamps for the butterfly.  To celebrate my 4th Anniversary as part of Eileen's team I would like to offer this project as a Giveaway.

If you would like a chance to win the box, please leave a comment below and I will choose a winner  on 30th May here on my blog.  You do not need to follow me but it would be quite nice if you did!  I am happy to post this box to anywhere in the world, to the winner.

Thanks so much for your visit, hope to see you again soon!

Hugs, Anne  xx

Saturday 19 May 2018

Seahorses....

Hello Friends

Here in the UK we have a Royal wedding today!  I wish Prince Harry and Meghan Markle the happiest of days and hope they have a wonderful future together!

I wanted to share a very quick post, I have been playing with a brand new stamp - Cindy Seahorse by the talented Kassa Hayselden (Kassa - delight in the detail) for Stampotique - I can't seem to stop stamping and colouring them...

I don't have any step out photos (sorry), I just got a bit carried away making this!
I stamped a few, coloured them with different colours of watercolour pencils.  I 'reverse stamped' the end one, on the right, just to see how it would turn out.
Here is a close up of two of the little beauties.  I love how Kassa designed the seahorse, she is so adorable!

I used a Tim Holtz Etcetera tag, in the smallest size, painted it with a mix of Broken China, Tumbled Glass and Peacock Feathers Distress Paint and stencilled and stamped with the same colour of paints, finished with PaperArtsy Crackle Glaze.

The 'planks' behind the seahorses were die cut using my newest die - Tim Holtz Planks (Sizzix 662705) and embossed it with the latest 3D Embossing Folder, again by Tim Holtz (Sizzix 662718). The embossed effect with this folder is amazing, it really does look like wood!
  The greenery is from Tim's Thinlit set - Holiday Greens (Sizzix 658759).  The Sand Dollar and Starfish are from Tim's Sand & Sea (Sizzix 659576) Bigz die and Movers and Shapers Mini Sand & Sea (Sizzix 659582).

To finish I added some prills and some real seashells.  I also added some clear glass domes, some gauze behind the planks and some seam binding.The Starfish were given a coat of  Glossy Accents (Crackle).

If you love the seahorse too you can purchase it in the UK - HERE and in the USA - HERE. (I am not on any commission!).

Thanks for stopping by, I hope to see you again soon.

Hugs, Anne xx

Monday 14 May 2018

Flip Album tutorial for Mini Album Makers

Hello Friends!

Each month a member of the Mini Album Makers Design Team shares a tutorial and I would like to share with you my very first Flip Album, created after watching many tutorials on YouTube for inspiration.  I do hope you will find time to have a look at my tutorial over at Mini Album Makers!

Here is a sneak peek for you:

Thank you so much for taking the time to visit here (and hopefully there too), I appreciate any comments you may wish to make.  

All of us at Mini Album Makers hope that you will join in our challenge this month .

Regards,  Anne  xxx

Tuesday 8 May 2018

When is a Journal not a Journal.....?

Hello Friends

All this month Eileen Hull's Inspiration Team are sharing projects made with Eileen's flower dies.  My project includes the Pansy Flower die (Sizzix 661109).

I really do love using Eileen Hull's Passport Journal die, I have made many journals, but I wanted to see if there was another way of using it... so.... I have created a Book Box.  From the front and side it looks exactly like a journal....
A few steps on how I created the box... I was looking to create a 'rusty' box and a bright flower embellishment.
1)  To create the flower I coloured cream canvas fabric with ClearSnap Crafter's ink by Ann Butler for Color Box, in Aquamarine**.  I applied the ink to my craft mat, spritzed it with a little water and then painted it directly on the canvas.  This wonderful ink is permanent once heat set.

2)  I die cut the flower using Eileen's Pansy Flower die, cutting two sets of petals.  I wet each piece with lots of water, scrunched them up and left them to dry.  Once dry I assembled the flower and added a large pearl brad to the centre (embossed with Baked Texture Patina Oxide by Kim Evans/Seth Apter).

3)  The butterfly is from AALLandCreate *, designed by the talented Tracy Evans.  I coloured the butterfly with Ann Butler's Aquamarine and also DecoArt Quinacridone Gold and then fussy cut it.

4)  After die cutting the Passport die pieces (including the spine - not shown), I covered them with canvas.  The canvas was first painted with a wash of Paynes Grey by DecoArt.

5)  Next, I coated the pieces with Quinacridone Gold by DecoArt, this gives a beautiful rusty appearance.
6)  The covers were embossed with my favourite of Eileen's Embossing Folders - Sunburst (Sizzix 659879).
7)  I cut a strip of matboard to 11.1/4" x 7/8", painted it the same as the covers and embossed it, this was applied to three sides of the box bottom, with strong glue, to form the box element.
8)  I ran the ink pad over the embossing on both the covers and the box element, to give a slight 'patina' look.
9)  The spine element was not covered in canvas, I simply painted it in the same way as the covers.  I added the elastic to give the box the appearance of a journal.
10)  The front and back pieces were added to the spine before the box element was added, in the same way you would prepare a journal.  
11)  I also used Ann's ink to colour the vintage seam binding I used for the box closure.  I simply smooshed some onto my mat and dragged the seam binding through until coated.  I just love the versatility of these inks!  I dried the binding with my heat tool, to set the ink.
12)  I attached the seam binding to the top and bottom of the box. I die cut two further journal covers, painted them and added them to the inside of the covers for stability and also to hold the seam binding securely.
.A view of the inside of the assembled box.  I lined it with some turquoise felt and added another stamped image from Tracy's stamp set.

I really love the flower and butterfly on my box, but if you wanted to create a 'safe' box you could leave these off.

I hope you might be inspired to create a box yourself!  If you have any questions, please leave them in the comment section below.  

Stamps and Stencils challenge this month is 'Fake It' - I have created fake rust on my box and created a box to look like a journal..... and the butterfly and dragonfly are stamped (hope that is enough to qualify !).

I am also adding my rusty book box to Mixed Media Monthly Challenge #48 where the challenge is 'Rust'.

Image may contain: text
Thanks so much for looking.  You can see what my teammates are making this month by visiting Eileen Hull's blog HERE.

Hugs, Anne xx


Stockists for products I used:
** I was lucky enough to meet the very talented Ann Butler when I visited Creativation this year, she gave me a set of her beautiful inks to play with.  Sadly the inks are not available in the UK :( but other stockists can be found here.
*  A worldwide list of stockists for AALLandCreate stamps can be found here.
In the USA, Eileen stocks some of her dies in her Etsy Shop.

Tuesday 1 May 2018

Mini Album Makers - May Challenge

The first of the month means it is time for a new challenge at Mini Album Makers!

During a 'purge' of my craft room I found some chipboard ATC bases.  I used several Stencil Girl stencils and Lindy's Stamp Gang sprays to create my mini album.  
 
These are the products I used to create my mini album, three Lindy's Stamp Gang colours - Shabby Turbine Teal, Time Travel Teal and C'est la vie Cerise (which is a beautiful shade of blue).

All of the three stencils are by Seth Apter for Stencil Girl.
I started by dabbing Gesso over the ATC's to give them a little texture.  Once dry I used Ranger Crackle Paste and one of the stencils on two of the ATC's that would become the front and back covers of the album.  I used 8 ATCs in total.
Once the crackle was dry I opened up one of the sprays and dabbed the colour onto the crackle so that it would seep into the cracks.  For the other ATC's I sprayed both sides of them with the LSG sprays.

I sprayed Lindy's spray onto a length of vintage seam binding, scrunched it up whilst drying and added this to four of the ATC's, leaving a small gap between.  The four remaining ATCs were attached over the seam binding.
Turning to the front side of the album I added some script stamping and one of the stencils.
On the reverse side I added some script stamping and another stencil, all of the stencilling was done using DecoArt Media Paint in Cobalt Teal Hue.  The small circles have been stamped using a hand carved stamp by Kate Crane, it was a freebie in one of her classes.
To finish off the inside I stamped images from Chocolate Baroque and IndigoBlu onto tissue paper, coloured them with watercolour pencils and applied with Mat Medium.  The great advantage of using tissue paper is that you can make your seahorses face either way, so double duty from one stamp...
Here is a close-up to show you the sentiment, using Tim Holtz Small Talk tickets.
To finish off the album I attached a large seahorse charm which I coloured with Ranger Alcohol Ink.

Our Sponsor for this month is Lindy's Stamp Gang who are offering a $25 Gift Certificate to one lucky person!


Website - https://www.lindysgang.com/
Blog - https://lindysgang.blog/
YouTube - https://www.youtube.com/user/lindysgang/

  As always, our challenge is Any Handmade Book Goes.  Enter any form of handmade mini albums, scrapbooks, journals and book arts.  Our focus is on completed works, so no layouts or journal spreads that are not part of a complete handmade book project.  You do not have to provide a tutorial, but we wish you would.  Feel free to use one of the DT tutorials to make your project and give proper credit where due.

I hope you will have time to visit Mini Album Makers to see what my talented teamies have made, and hopefully join in this month!  Thanks so much for your visit, I truly appreciate any comments you may wish to leave!

Hugs, Anne xx
Related Posts Plugin for WordPress, Blogger...

Labels