Pinterest

Showing posts with label Tim Holtz Vignette Boxes. Show all posts

Monday, 31 August 2020

Simon Says Stamp Designer Spotlight - Week 5

 Hello Friends

Since there are five Mondays in August I get one final chance to be in the Designer Spotlight for Simon Says Stamp Monday Challenge.  I would like to thank Simon Says Stamp for having me as their guest this month, I have really enjoyed the experience!

The challenge this week is 'Oodles of Doodles'.  I will admit, this was not an easy challenge for me and I spent many days over thinking it before I came up with my idea.  I promise you it does have lots of doodles in it, if you know where to look!

I have been itching to use Tim Holtz's Arthur die and have seen many wonderful examples on social media.  I chose to give him a rather sinister look for my Halloween themed project.

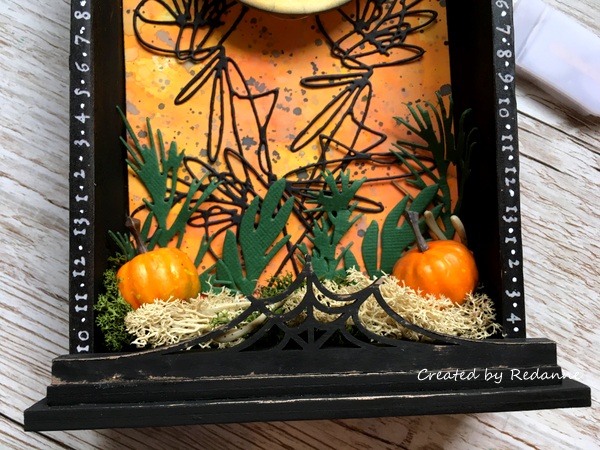
I started by using a Tim Holtz Vignette Shrine which I thought would make a perfect 'home' for Arthur.  I painted the whole box in black to give me a good base to work on.

For my background I used Distress Oxide in Spiced Marmalade, using the wrinkle free technique and then splattered liberal amounts of Pumice Stone and Black Soot over the background.  I die cut the doodly flowers from Tim's Media Marks die set, cut out a circle for the moon (applying a light coat of Distress Oxide in Spiced Marmalade and a couple of brushes of Pumice stone).  I then covered the whole of the outside of the Shrine with Collage Paper in Typeset/Composer, using Ranger matte medium both under and over the Collage Paper to give good adhesion.

I cut the background to size and glued this into the back of the Shrine and I used Tim's new Halloween Trim Tape to give a nice edge to the Shrine.  I would later add some doodles to the tape.

Next, I constructed Arthur, it took me a couple of attempts!  I die cut Arthur from Watercolour cardstock and then coloured the various parts with Distress Oxides in Pumice Stone and/or Hickory Smoke and assembled him.  His orange eyes and feet were coloured with alcohol markers from my stash.  I just love those eyes.  I attached him to the branch that comes with the Arthur die, it is painted with Gathered Twigs and Vintage Photo Distress Oxide.

You can see from the above picture that I 'doodled' between the numbers by adding some dots.  I die cut Tim's new Halloween Spider Web die with spider and attached it to the inside top of the box.  I also die cut the squiggly doodly flowers from Tim's Media Thinlits Die set and added these to the background.

The moon is raised up on a piece of foam tape and I added some of Tim's Tiny Lights, that I wrapped around the foam before attaching the moon.  I poked a small hole in the back of the Vignette to thread the lights through.

For the bottom of the Shrine I added some moss, Ideaology Wishbones (from Arthur's last meal), pumpkins from my stash and some Holiday Greens foliage.  I painted and added the base to the shrine, distressed the edges and added one of Tim's older Etcetera pieces to add some detail to the bottom.

I added one of Tim's Ideaology older quote tokens from my stash, filling the words with Picket Fence Distress Paint to make them stand out.

This is the view from the back showing the Tissue Wrap and also the holder I created for the battery pack - it is easily accessible when I want to turn on the lights.
Here is a view of the roof, I used Tim's Media Marks 2 stamp set to create the lines on the roof and then I just doodled between the lines to give the roof a bit of a lift.
And finally here is Arthur with the backlit moon.  I love that his eyes stay looking spooky, even in the darkness.  Perfect for Halloween.

I hope you will join in the challenge at:

One lucky person will have the chance to win a $25 Gift Voucher:

You can find a list of the products I used below, which are available from:


Once again, a huge thank you and shout out to Lols and the whole Simon Says Stamp Team for having me in the Designer Spotlight this month, I have enjoyed every minute!

Thanks so much for your visit too, it is much appreciated and I hope to see you again soon.  I am meant to be having a little break from crafting next week, but as my new Tim Holtz Halloween stamps have arrived, I may just have to have a play!

In the meantime, keep safe and well.  Hugs, Anne xxx


Products Used:

Tim Holtz Idea-ology Vignette Shrine

Tim Holtz  Colorize Thinlits Die Set  - Arthur

Tim Holtz Thinlits Spider Web die set

Tim Holtz Sizzix Media Marks Thinlit die set

Tim Holtz Ideaology Halloween Trim Tape

Tim Holtz Sizzix Holiday Greens die set

Tim Holtz Stampers Anonymous Media Marks 2 Stamp set

Tim Holtz Collage Paper - Typeset/Composer

Tim Holtz/Ranger Distress Oxide Inks

Tim Holtz Ideaology Tiny Lights

Tim Holtz Ideaology Wishbones

Tim Holtz Distress Paint

Ranger Multi Matte Medium

Thursday, 13 October 2016

Witchy Woman

The October Creative Adventure at Creative Carte Blanche is Witchy Woman.  Since we are near to Halloween I decided to create a witchy cabinet.

For the base of the cabinet I used Eileen Hull's Candy Drawer Box (Sizzix 657726).  The top of the cabinet is a Tim Holtz Vignette Box and I used Tim Holtz's Regions Beyond paper stack to cover the cabinet.  The finished cabinet measures 10" x 5.1/2".

The drawers were covered with Regions Beyond papers and the drawer knobs are Idea-ology Hitch Fasteners.  The broom is also Idea-ology, as is the spooky charm and the spider.

On the bottom shelf I added some Idea-ology bottles, pumpkins, bones and a witches hat (die cut and painted with Evergreen Bough Distress Paint).
The witch lady is mounted onto an Idea-ology frame and the skull and crossbones are mounted within an Idea-ology dome.  The books are handmade from cardstock and the spiders on this part are from my stash.
The flowers are made from Tim Holtz's Tiny Tattered Floral Thinlits die, the bottle has been coloured black with Alcohol Ink.
I used my newest die, Tim's Twisted Edge for the top of the cupboard, mounting this onto Tim's Plaque die.
The back and sides of the cupboard were covered with Regions Beyond papers. The Idea-ology '31' was added to the front of the cabinet to finish it off.
Another view of the finished cabinet.
I am entering this into the Creative Carte Blanche October Adventure. - Witchy Woman.

As always, thanks so much for looking, I appreciate your visit.

Anne  xx

Tuesday, 5 July 2016

Summertime Fun at Anything But Cute

Hello Friends!

It is my turn to host the challenge theme at Anything But Cute and I have chosen 'Summertime Fun' !  What does Summertime fun mean to you?  Spending time by the seaside, foreign travel,
camping in the great outdoors or simply enjoying time in your garden.  Create a MIXED
MEDIA project focusing on how you like to spend your Summertime.  Don't forget
to tell us how your project relates to the theme!

Here is my project....


Those who know me, know how much I love the seaside and anything to do with the sea.  My
dream has always been to own a beach hut, so it seemed natural to create my ideal beach scene....


I gathered together the items I wanted to use.
I used:  Tim Holtz Vignette Box - Medium
DecoArt Media Crackle Paint
DecoArt Media Texture Paste
PaperArtsy Beach Hut stamp
DecoArt Media Fluid Paint (Pyrole Red, Phthalo Blue, Primary Cyan, Cobalt Teal Hue,
and Titanium White)
Tim Holtz Letterpress letters
Extras:  card, chit chat stickers, Embossing Powder, wire mesh, kebab sticks,
hand drawn seagulls

I painted the box with a mix of Cobalt Teal Hue and Titanium White.  I did not apply
any base coat.
Once dry I applied a coat of Crackle Paint to the outside of the box and when
dry, a thin coat to three of the sides on the inner part.
DecoArt Crackle Paint dries quickly, this was the outside of the box before I even 
started on the inside.

The beach hut was cut out several times and layered up to give it some dimension.  It was painted  with a mix of Primary Cyan,Titanium White and Distress Markers.  The lifebuoy ring
 was cut with two hole punches and painted in Pyrole Red, as was the heart for the door.
The bunting was painted with Phthalo Blue and Pyrole Red.

The 'net' is a piece of wire jewellery net which I coated with Gesso.
The letterpress was coloured in a mix of Phthalo Blue and Titanium White.  I splattered some white paint on the inside of the box.

The box was a little unsteady on the letterpress alone so I added some bingo chips
to the back to steady it all.
The 'sand' was made with a mix of light coloured embossing powders, set into a base
of Texture Paste.   The surf board was hand, painted and coated with Crackle Accents.  

The board walk is made from kebab sticks and glued in place with Glossy Accents.  The words 
are Tim's Chitchat stickers.

I added a couple of hand drawn seagulls, painted with Distress Markers.

So, what do you like to do in the summer?  I hope you will join us this month at
Anything But Cute with a mixed media project.  In the meantime I hope you can find the
time to pop over there to see what my talented team mates have made.

I would like to enter my project into the following challenges:
Simon Says Monday Challenge - Red White and/or Blue
Craft Stamper - Anything Goes
Southern Ridge Trading Co - Anything Summer

As always, thanks so much for looking and even bigger thanks if you leave me
a comment, I do love to read them!

Take care.  Hugs,  Anne xxx
Related Posts Plugin for WordPress, Blogger...

Labels