Pinterest

Friday 30 September 2016

Tag Friday at A Vintage Journey

Hello Friends

As there are five Fridays in September, it is time for Tag Friday over at A Vintage Journey.
Since Halloween is one of my favourite times of the year and I have got some new
Tim Holtz goodies to play with, I made a Halloween tag.

I coloured the base tag using a variety of Distress Spray Stains.  Using the new Mixed Media Halloween Thinlit dies I cut the bats from the top right hand side of the tag and then mounted the tag onto some black card so that the bats were highlighted.
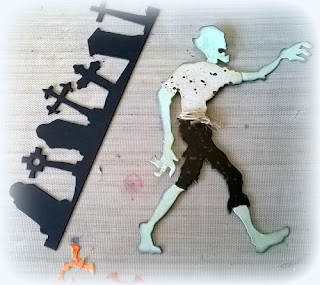
I used the Graveyard On the Edge die to cut my gravestones and the Lost Zombie was cut and coloured using Distress Markers.
I used an Idea-ology pumpkin charm, coloured with Alcohol Ink, some Remnant Rubs, a stamped 'trick or treat' and finished the tag top off with some black voile and Halloween Jute String.
If you have not been already, I hope you will visit A Vintage Journey to see what my talented teamies have made, you won't be disappointed!

Our current challenge (Create Within A Frame) at A Vintage Journey is closing soon, we have a wonderful prize on offer, you can check it out here.

It is October tomorrow, so I am on countdown to Halloween now - can't wait!  Thanks so much for your visit, I hope to see you again soon.

Anne  xx

Tuesday 27 September 2016

Video Inspiration - God Only Knows

Hello Friends

I don't often try my hand at shabby chic but I was inspired by the Video Inspiration
this month, chosen by Linda Ledbetter at Creative Carte Blanche.  The video was made by the BBC a couple of years ago, you can see the video HERE.  If you have never seen the video I do encourage you to look, it is very uplifting!

The wonderful video features the song - God Only Knows by the Beach Boys  and there are quite a few of my favourite artists singing in the video.

I was inspired by two elements of the video - firstly the angel wings on Lorde's shoulders and secondly, by the bird cage (and wings) in the part featuring Alison Balsom, the Classical trumpeter.
Since I changed my mind several times I only have a couple of process steps.
I distressed and layered up some gorgeous Maja Design papers from the Vintage Summer Basics collection and used DecoArt Media Crackle Paste through a Tim Holtz Gothic stencil.  The birdcage was painted with IndigoBlu English Cottage Acrylic Paint in Pantry White.
The wings were cut from the Tim Holtz Heart Wings die set, I cut two and layered them and then painted them with the Pantry White paint.  Once dry I applied a layer of Ranger Glue 'n' Seal and dusted the wings with Distress Clear Rock Candy Dry Glitter.
The bird was painted with IndigoBlu Grandma's Teacup paint.  The birdcage and the 'Use your Wings' are by Scrapiniec and I painted them with the Pantry White paint.  I tucked some gauze under the birdcage and added some vintage ribbon dyed with Broken China Distress Ink.

I am entering this into Creative Carte Blanche's September Adventure - God Only Knows.

Thanks, as always, for looking, hope to see you again soon!

Anne xx

Wednesday 21 September 2016

Tim Tag September 2016

Hello Friends!

It is hard to believe that it is September already, not sure where this year has gone.... but it is my favourite time of the month - Tim Tag Time!  You can see Tim's original here.

This month the technique Re-mix is Paint Patina/Alcohol Ink Resist.  I feel very lucky to have
met Tim at the NEC this year and he showed me the Alcohol Ink Resist on Yupo technique in real life - it really is a fabulous technique and he is such a wonderful teacher...
 I love the images on this one - I used the Dapper stamp set (CMS 267) for this tag.  I pretty much followed Tim's instructions and just used different images.

I enjoyed the techniques so much that I made another one.
I really love the background Paint Patina on this tag, the colours are a little more vibrant.  I used the Sideshow set of stamps (CMS 263) for this tag.
And here they are side by side.

As always, thanks for looking, hope to see you again soon, I am gearing up for all things Halloween at the moment!  Take care.  Anne xx

Tuesday 13 September 2016

Eileen Hull's Holiday Jumpstart

Hello Friends

Another scheduled post, I hope to resume normal visiting soon!

Eileen Hull's Inspiration Team are creating projects all this month celebrating Holiday
 Jumpstart, we are kick starting the holiday season with projects relating to Autumn,
 Halloween and Christmas.

I have created two quite different projects, I wanted to show different ways to use Eileen Hull's
 latest release - the Twist and Style Tool (for Sizzix).  I am finding lots of way to use the tool.

First up is Halloween, my favourite time of year!  
I used Eileen's Cookie Box die (659874) and Tim Holtz Regions Beyond papers and Tim's latest Idea-ology pieces for decoration.
I die cut all of the pieces in thick card and also in the Regions Beyond paper.  I find it easier to die cut separately, build the box and then add the papers.  In this way I can cut off the tabs that would normally be glued - I'll show you how I used one of the cut off pieces.
I used the Twist & Style Tool and some black and orange twine to create a Halloween twisted bow.
I used the Tool to and some thin wire which I twisted and then 'coiled' with the aid of a pokey tool, you could also use a pencil.
I used the left over cut off piece of Regions Beyond paper to create this flower.  I also added some black tulle which I fashioned into a bow.

I glued the bow, along with the twisted twine, the bow and the flower to the top and added the 
Tim Holtz Idea-ology pieces to the front of the box.  Quick and easy!

I used the Twist & Style Tool to create a Christmas tree ornament, although it would also
be lovely to attach to a Christmas card or gift.
A few of the steps are shown below.
I used the Tool to twist some heavy wire (doubled) and then fashioned it into a heart shape with the help of my jewelry pliers. 
I used another piece of wire to string on some pearls and crystals.
I added the wired pearls and crystals to the heart, making sure I kept the the pearls and gems to the top.  Continue all the way around and secure the ends of the wire with some pliers.
I didn't want to waist the bit that I had left over so I made a middle piece and then I finished it off with some sparkly ribbon.

Two quick and easy makes for the holiday season!  I hope you will have the time to go over HERE and see what my talented Teamies have made.

As always, thanks for looking!  Anne xx

Saturday 10 September 2016

Guest Designer at Craft Stamper

Hello Friends

This is a scheduled post, I am out of action for a few days so I apologise if I do not
get around to visit you in that time.

I was delighted to be asked to be a Guest Designer over on the Craft Stamper blog during their
latest Challenge which is Take A Stamp - Anything Goes, you can find the details of the
Challenge HERE.  Thank you Craft Stamper for this opportunity.

I decided to use two of my new stamp sets from Tim Holtz - Dapper and also Halftone & Rings for my creation.


It was quite a simple card to create, simply inking the background with Peacock Feathers and Gathered Twigs Distress Ink, spritz and flicking water and stamping.  The bow tie is decoupaged to make it stand out a little more and I added Idea-ology cogs.  A great card for a man I think.

Thanks again to Craft Stamper and thanks to those of you who visit, hope to 
catch up with you again soon.

Anne xx


Monday 5 September 2016

Firendship at Anything But Cute

Hello Friends!

At Anything But Cute this month our Challenge #17 is hosted by the fabulous Branka who has chosen Friendship as her theme. Here is what Branka had to say...

'Friendship is a relationship of mutual affection between two or more people.  We want you to show us a mixed media creation that's inspired by friendship.  You can create anything, from tags to art journal pages but make sure it's a mixed media piece.  Let's celebrate friendship together!'

Hmm, what has this project got to do with friendship?  
My lovely friend Sandy (of Simply Sandy) in the USA and I have been blog friends for a few years now and we love to send cards/projects/gifts to each other.  Sandy very kindly sent me the new Tim Holtz Village Manor die (how lucky am I!) and since we share a love of all things Halloween, I have made this little scene to send back to her, as a special thank you for sending me this wonderful die... I do hope she likes it!
I got a bit carried away making the haunted Village Manor but I do have a few step by steps to share with you.
I used three dies to complete the Manor, the Village Dwelling (660992), Village Rooftops (661197) and the Village Manor (661591).
I die cut all the pieces I needed, from heavy black cardstock (480 gsm) and applied Tim Holtz Grit Paste, (through a brick stencil) to the bottom part of the house only and left this to dry.
After applying the Grit Paste to the lower part of the Manor I decided I would like to 'render' the top half and I wanted it to have a grey, aged appearance so I added some Distress Paint and Distress Re-Inker in grey tones.
The coloured Grit Paste was dabbed on with a sponge to give an uneven appearance.  This is where I got a bit carried away and forgot to take photos but here you can see that I built the little 'attic' part, added the windows, front door and roof to the bottom part and also constructed the two chimneys (adding some Industrious Stickers to finish them off).  The attic part was painted with IndigoBlu Raven Black Metallic Paint, which gives a lovely sheen.

The roof was cut from Tim Holtz patterned paper, using the Rooftop die.  Once constructed I roughed up the edges and wiped over them with Hickory Smoke Distress Ink.
To create the base for the house to stand on I used a piece of thick foam board that I embossed with a stone wall type embossing folder.  This was painted in various tones of Distress Paint  to give the appearance of 'aged stone'.
To create the front 'path' I used pieces that were left over from the fence and glued these to a piece of white card.  Once dry I applied a watered down coat of Hickory Smoke Distress Paint.
To finish off I used Tim's Ghosts die, cut with Shrink Plastic and shrunk down to go in the chimney and in the graveyard.  The graveyard was filled with tombstones cut from Tim's On the Edge Graveyard die.  The tree is Tim's Scary Tree die and the pumpkin, bats, cat and children are from Tim's Halloween Shadows strip die.  The greenery is florist moss.
 I added some Fantasy Film to the windows and used some offcuts from the fence to decorate the front door.  The door knobs are seed beads. The piece at the front of the roof over the porch is an offcut from the Manor die, I thought it looked good over the porch and it fitted perfectly - a happy accident!
A close-up of the finished house.  To give you a sense of the scale, it measures 6" tall and 3" across at the widest point, so it is quite dinky!  
One final overhead shot.
It is very easy to construct and I can already imagine many different ways to use the dies - I am already constructing more, which you will no doubt see in due course!  This one is winging its way to Florida to my lovely friend Sandy!

It would be lovely to see you join in with us at Anything But Cute, we would love to see how you interpret and celebrate Friendship!  You can see what my talented teamies have made HERE.

I am adding this to my dear friend Darnell's NBUS challenge HERE.  My NBUS is my Manor House die and also the stone embossing folder.

As always, thanks so much for your visit!  Anne xx

Friday 2 September 2016

Create Inside a Frame - A Vintage Journey

Hello Friends!

This month at A Vintage Journey, the talented Julia has chosen 'Create Inside a Frame' for our September challenge.

Julia says 'we would like you to create something inside a frame.  Whatever you use, show us how you have incorporated a frame on your vintage, shabby, mixed media, art journalling, industrial or steampunk project!'
This started off as an experiment using the new Distress Grit Paste by Tim Holtz and comparing it to Ranger's Texture Paste. I wanted to see how they took colour.

I am not going to show the steps for the frame, it is so easy to do and there are lots of YouTube videos to show how, the one I used is HERE, it creates a wonderful sturdy finished 5" x 5" box frame, from a single sheet of 12" x 12" paper.
Using a brick stencil, I used Tim Holtz Distress Texture Paste on the left hand side and Grit Paste on the right side hand and left these to dry. 
Both pieces were spritzed with Tim Holtz Distress Spray Stain in a combination of Fired Brick and Rusty Hinge. The Texture Paste (left) soaks up the colour beautifully and the two colour tones showed up clearly. The Grit Paste did not soak up the colour of the stain as easily and took quite some time to dry.  I repeated the step but the colour remained pale.

 To give some light and shade to both sets of the bricks I painted some of bricks with various Distress Paints, watered down a little. I think the bricks look a little more realistic now and the Grit Paste takes the colour of the paint much easier than the stain.

I applied the Grit Paste bricks to the inside of my frame and added the Texture Paste bricks to the front of my frame.
Finally, I coloured one of the dogs from Tim's Crazy Dog set of stamps, with Distress Markers, cut him out and mounted him with some foam pads to give him some dimension.  The words are from Tim's Idea-ology Label Letters, mounted onto some white card.

I hope you will join in with our Create a Frame Challenge over at A Vintage Journey.  There is always a wonderful prize on offer from DecoArt.  If you have time, do please go over and see what my talented teamies have made for your inspiration too!

As always, thanks so much for your visit!
Related Posts Plugin for WordPress, Blogger...

Labels