Pinterest

Showing posts with label distress ink. Show all posts

Wednesday, 15 July 2020

Vintage Typewriter

Hello Friends

I hope you are all well, we are into our 19th week of lockdown here, strangely enough it just feels like the norm now and I am not anxious to go out anytime soon!

My Guest designer project this week for AALL & Create has a vintage vibe to it.
I used two of Bipasha's beautiful stamp sets - Time Out #325, Janet Klein's Background Noise #338 together with the Abundance Stencil #85 by Olga Heldwein.

I started by creating the background using Distress Oxide inks and the wrinkle free technique.  I covered the stencil with Seedless Preserves, spritzed it and applied it to the background.  This left a lovely delicate pattern.
I stamped the typewriter image onto white card and used an edging die to create the torn page look.
I stamped and fussy cut the typewriter again and also stamped the wording from stamp set #338, to use in the typewriter.
I gave the page and the note for the typewriter a vintage look with Distress Ink in Gathered Twigs.
I layered up the typewriter, added it to the page and then some corrugated card and fixed it to the background.  To finish off the card, I added the sentiment from my stash.

Worldwide stockists for the stamps and stencil I used are listed on the AALL & Create website HERE.

As always, thanks so much for your visit, I hope to see you again next week.

Hugs, Anne xxx

Tuesday, 8 October 2019

Eclectic Stems for AALL & Create

Hello Friends

Just a quick post from me today to share my GDT post for AALL & Create.  I needed to
create a birthday card for a friend,
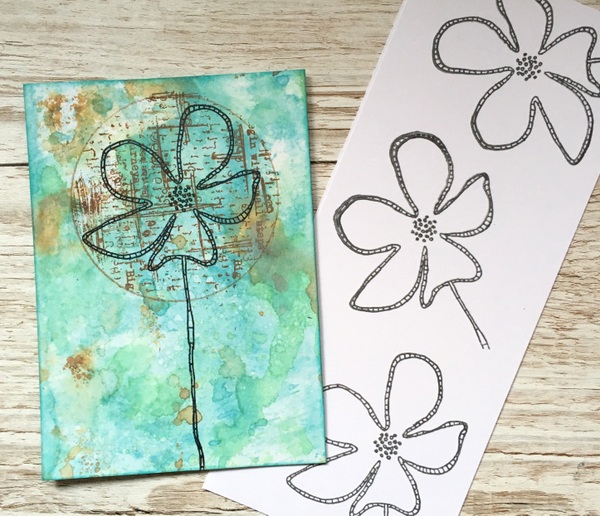
I used AALL & Create stamp sets #199 and #210, both by Tracy Evans.
I created a background using Distress Oxide inks in Peacock Feathers and Gathered Twigs.
Next I cut a circle from card, placed the outer part on the background and stamped through the hole using stamp set #210 (Background Mash Up) using Gathered Twigs Distress Ink.

I stamped out the flower again, coloured two with Distress Ink and cut these out to use as
 extra layers.
I went around the finished circle with a wet paintbrush to drag some of the colour out.  To finish off I layered the flower up and added some glitter to the centre of the flower.
The sentiment on the finished card is also from stamp set #199.

Thanks so much for your visit, as always, I appreciate it very much.

Hugs, Anne xxx


Monday, 15 April 2019

Wendy Vecchi by Stampers Anonymous

Hello Friends

I have been extremely lucky to have received some new stamps from Wendy Vecchi (and Stampers Anonymous) along with her co-ordinating Mat Minis, one for each set of stamps. I created a chunky 'wall' measuring 9" x 4.1/2".

These are the stamps and Mat Minis I received from Wendy - thanks so much Wendy, the quality of the Stampers Anonymous stamps is excellent, as always, I don't think you can beat red rubber for ease and quality of stamping.   The Mat Minis are new to me, I found them to be very substantial, easy to use and they took inks beautifully.  The Mat Minis are set WVMM32 and WVMM31.

I began by building the 'wall' using one of That's Crafty's MDF Chunkies.


Once built I gave the block a good coat of Gesso.  I then mixed some Ranger Texture Paste with some Distress Oxide Re-inker in Fired Brick and applied this to the front and all sides of the block, through one of Wendy's older stencils - Basically Bricks.

When the paste was dry I covered the whole piece with a spray of Fired Brick Distress Spray and gave a few of the bricks a touch of Gathered Twigs Distress Spray to give a more natural look.

I used each of the stamp sets: Art in a Pot SCS 168 and Window Art SCS 169 and stamped onto the Mat Minis, coloured all of the elements with Distress inks and assembled the pieces.
Here is a view of the finished plant pot together with a sentiment from the Art in a Pot stamp set.
To finish off the window I added some 'wallpaper', faux curtains and added some shrink plastic flowers to the window box.
Here is a final view of the 'wall', it comes with a hanger on the back so that it can be hung up or placed on a shelf.

Thanks so much for your visit, I hope to see you again soon.

Hugs, Anne xx

Thursday, 14 March 2019

Happiness Blooms From Within

Hello Everyone

This week I have created a couple of fairly clean and simple cards for
AALL & Create using the Bouquet Border (#162) stamp by Fiona Paltridge.


For this first card I brayered two colours of Dina Wakley Media Heavy Body Acrylic Paint (Turquoise and Lime) onto white card.  Whilst the paint was still wet I overlaid AALL Stencil #54 by Olga Heldwein and rubbed gently with a damp cloth to remove some of the paint.  After stamping the bouquet I coloured it with Inktense pencils.   I stamped and coloured a second set of flowers, fussy cut them and overlaid these before covering them with Glossy Accents.


For the second card I followed the same process but used Distress Ink (Broken China) instead of paint.  Again I overlaid the stencil and wiped over with a damp cloth.  I coloured the flowers with Inktense Pencils, this time leaving them as a single layer.

I stamped the sentiment from the same stamp set on each card and finally, I mounted the images onto white card bases.

You can purchase the stamps and stencils I used from AALL & Create here, where you will also find a list of worldwide stockists.

Thanks so much for your visit, I hope to see you again soon.

Hugs, Anne xx

Thursday, 7 March 2019

Ladybird, Ladybird, fly away home....

Hello Friends

I was so thrilled when Tracy Evans brought out a Ladybird stamps set for AALL & Create (Stamp #161).  I was immediately reminded of the rhyme I learned in childhood, there are many versions of the rhyme but my favourite was:

Ladybird, Ladybird fly away home,
Your house is on fire and
Your children are gone
All except one and her name is Anne
And she hid under the baking pan

I know, not the best rhyme but anyway, thank you Tracy for designing such a beautiful stamp!
I made two projects but this one was my favourite.
 I stamped onto watercolour cardstock with Ranger Black Archival Ink.
I stamped two more Ladybirds, coloured them in with watercolour pencils, and then split the wings on the larger one and mounted them with silicone glue to make her look like she is about to fly.

Each Ladybird was coated with Glossy Accents to give them a lovely sheen.
Next, I coloured the stamped base with Distress Inks in Mermaid Lagoon and Gathered Twigs, dropping a little water on top to create some watermarks.
I used some Ranger Texture Paste, mixed with some Gathered Twigs Distress Reinker and added some stencilling to the right hand side, using AALL & Create Stencil #51 by Autour de Mwa.

To finish off the top of the tag I added some Vintage Seam Binding coloured with Gathered Twigs Distress Ink and some rusty wire.
I thought the bottom needed a little something and so I added a Tim Holtz Bingo marker.

The stamp and stencil I used can be purchased from AALL & Create Boutique here, where you will also find a list of worldwide stockists.

Thanks so much for your visit, I hope to see you again soon.

Hugs, Anne xx

Thursday, 31 January 2019

I Love 'EWE'

Hello Friends

I am back today with my Guest designer project for AALL & Create.  I was challenged to use Olga Heldwein's Spooks stamp (AALL & Create #136) and do something completely different with it.

After much head scratching I had a light bulb moment and saw a sheep ... in the pumpkin... so I made a Valentine card.
To create the card I used the following:
Stencil #49 (Olga), Stamp #33 (Tracy Evans) and Stamp #136 (Olga)
I stamped the pumpkin twice, made hand drawn heads (and later some curly top knots), added some hand drawn legs and simply doodled some 'wool' onto the bodies.
The sky was created using Distress Ink in Tumbled Glass.  I put the stencil over the sky and used a baby wipe to wipe away some of the colour.  The heart was stamped using Stamp #33 and the heart was coloured in with a red marker.  The small hearts were hand drawn and also coloured with the red marker.  The letters are by Tim Holtz.
The sheep were grounded using Peeled Paint Distress Ink and a stamp from set #33.

I may not look at all my stamps in a different way in future but it was an interesting challenge and one I really enjoyed and, on the plus side, I have DH's Valentine card made early!

Thanks so much for your visit, I hope to see you again soon.

Hugs, Anne xx

Thursday, 24 January 2019

Ring Binder - Edison themed

Hello Friends

My AALL & Create project this week uses one large stamp and one stencil to create a handmade ring binder to store design ideas.

This is a view of the full ring binder so you can get a view of the whole design.


I began by stamping the image (AALL & Create #142 - Edison Game by Olga Heldwein) in Archival ink onto a piece of heavy white cardstock and used Distress Inks in Antique Linen, Gathered Twigs and Blueprint Sketch to colour the cardstock.  I coloured the light bulbs in with Distress Markers in Scattered Straw and Spiced Marmalade Distress Inks.


I cut two covers and a spine in chipboard, added a Tim Holtz ring binder mechanism.  I coloured the cardstock with Blueprint Sketch Distress ink and then dampened a stencil (AALL & Create #50 by Aurtour de Mwa), placed it on the covers, pressed them with a cloth, lifted them and left the covers to dry. This is the inside of the ring binder.


I used a stencil (AALL & Create #2 by Olga) and some Ranger Texture Paste on the front cover only, it adds some lovely texture.


I cut the stamped and coloured cardstock to fit the back, front and spine of my ring binder.  The eagle eyed amongst you will notice that I have the front and back the wrong way round in this photo! I inked around the edges of each piece and glued the three pieces together with strong wet glue.


I cut some plain cardstock to fit the binder and used a regular sized hole punch to create the holes.I created a pocket on the inside front of the binder and used a stencil (AALL & Create #50 by Autour de Mwa) along with Blueprint Sketch Distress ink.

Stamps and stencils can be purchased from AALL & Create at www.aallandcreate.com/boutique where you will also find a list of stockists worldwide.

Thanks so much for your visit, I hope to see you again soon.

Hugs, Anne xx

Friday, 5 May 2017

Use a Quote - A Vintage Journey

At A Vintage Journey this month the talented Jenny has chosen 'Use A Quote' as her
theme.  Here is what Jenny has to say:

'Take a quote!  Any quote!  Whether it be on a stamp, a sticker, handwritten or sources from the internet and make it the focal point of your vintage; shabby; mixed media; art journalling; industrial; timeworn or steampunk project'

Each member of the team received a 'surface' to work on from 'That's Crafty', mine is a 9" x 4.1/2" piece of MDF.  MDF is an amazing surface to work on!

I gave the MDF board a coat of Gesso to give it some 'tooth'.
I brayered with four different colours of Distress Paint.
Next, I stencilled with Distress Oxide in Faded Jeans using a Tim Holtz chevron stencil.
I added some splatters with Distress Paint.
I gave the Tim Holtz frame a coat of Gesso and added colour with Distress Oxide.
The Tim Holtz butterflies were coloured with Distress Oxide and then given a coat of Clear Rock Candy Distress Crackle Paint.
I gathered together the pieces together to complete the project.
You will notice some extra stencilling, I added some Distress Oxide to Ranger Embossing Paste and then stencilled the top and bottom and then added the rest of the embellishments.  Lastly I stamped the sentiment in Cornflower Archival Ink and added clear embossing powder.
We hope you will join in our 'Use a Quote' challenge at  A Vintage Journey.  This month we are being sponsored by


who are offering a £20 voucher to one randomly selected individual to spend in their bricks and mortar or on-line shop.

Thanks so much for your visit, I hope you will have a look at what my Creative Guide team-mates have made HERE.

Keep on crafting!  Hugs, Anne xx

Monday, 24 April 2017

A Vintage Journey - Destination Inspiration

Hello Friends

It is my turn over at A Vintage Journey to show you what I made with the contents of the travel bag for April.  Here is a sneak peek...


If you would like to see more, I hope you will pop over HERE for a closer look.

Hugs, Anne xx

Friday, 16 May 2014

All About Him - A Vintage Journey

I am delighted that it is my turn to host the next challenge at A Vintage Journey.  I have chosen 'All About Him' as my theme.  Men are usually difficult to make things for but with Tim Holtz's rang of stamps, dies and accessories it does make life so much easier! So with Father's Day coming up this is a great time to make something for a man.  This challenge is to make a card/tag/3D or any other type of project specifically for a man, using Tim's techniques or products wherever possible.

The other Creative Guides (DT) have made some wonderful pieces to inspire you and I hope you will pop over THERE for a look.  Do please take a few minutes to look at our Travelling Instructions  and also visit Tim's Blog for further inspiration.  Our sponsors, Country View Crafts are offering a £10 gift voucher to spend, to one winner who will be chosen by the team.

I have made a little memento for my DH who is mad about cycling and he has done his fair share both here and abroad (in his younger days).  This year we are very excited as the Tour de France (the biggest cycling event in the world) will be starting here in the UK.  It has only happened on two occasions before, in 1994 and 2007.  We will be travelling to London to see the final leg of the UK part of the Tour, in July.


I started out with two 8" square (20 cm) canvases and turned them around so that I could use the back as my base.


To cover up the staples and uneven back, I cut some thick card to fit the outer frame and insides.


Now there is a nice even base to work on.  I am not too worried if there are small gaps at this stage because it is going to be covered up.


I painted all sides of both of the frames and added two hinges to join the two together.  I did not like the hinges showing so I used some of Tim's French Industrial paper pad to cover the frames.


On the left hand side, I took one of the 6 inch pieces of paper from the French Industrial pad and placed it in the frame as my background.  I stamped the Beefeater Soldier and Big Ben from Tim's London Sights stamp set (the soldier has been stamped twice, once in black and once in red, the red part was overlaid  onto the black layer.  Both have been fussy cut and added to the background with sticky pads to raise them up.

The letters are from Tim's latest (and fabulous!) Letterpress, they have been sanded lightly and coloured with Festive Berries and Picket Fence Distress Paint.  I took Tim's Harlequin stencil and stencilled on the top and side of the frame with Vintage Photo Distress Ink. London has been stamped with Tim's Worn Text stamp set.


The right hand side of the frame also has one of the 6 inch pieces of paper from the French Industrial pad, I though it was appropriate to represent the Tour de France.  The Eiffel tower and Fleur de Lys were cut using Tim's die and then embossed using the Eiffel Tower Embossing Folder.  I touched them up with Treasure Silver to highlight the embossed areas.  Paris has been stamped with Tim's Worn Text stamp set, in Vintage Photo Distress Ink.  Finally, I added 2014 from Tim's Label Letters.


This is a view of the back, which has been covered in more of the French Industrial papers and stamped, again with the Worn Text stamp set.


Finally, I added a clasp to hold the canvases closed so that they can neatly be held on a bookshelf.

Thanks for looking, I do hope you will have fun creating something and join us at A Vintage Journey.  Please remember to read the rules.  We all look forward to seeing your Tim Holtz inspired makes!  Hugs, Anne xx
Related Posts Plugin for WordPress, Blogger...

Labels