Pinterest

Monday 26 November 2012

Sunday Stampers Week 233 - All Those Years Ago

Hello Everyone

A special welcome to my latest followers, I love the fact that you are interested in my little blog and thank you to all of you who visit regularly or when you can, I really do appreciate your support.

This week our Hostess, Hels Sheridan over at http://pinkleart.blogspot.co.uk has set our Sunday Stampers Challenge as 'All Those Years Ago' - and we are to create something Vintage.  Yikes, I don't really know much about vintage and never seem to be able to create anything that looks old or vintagey. 

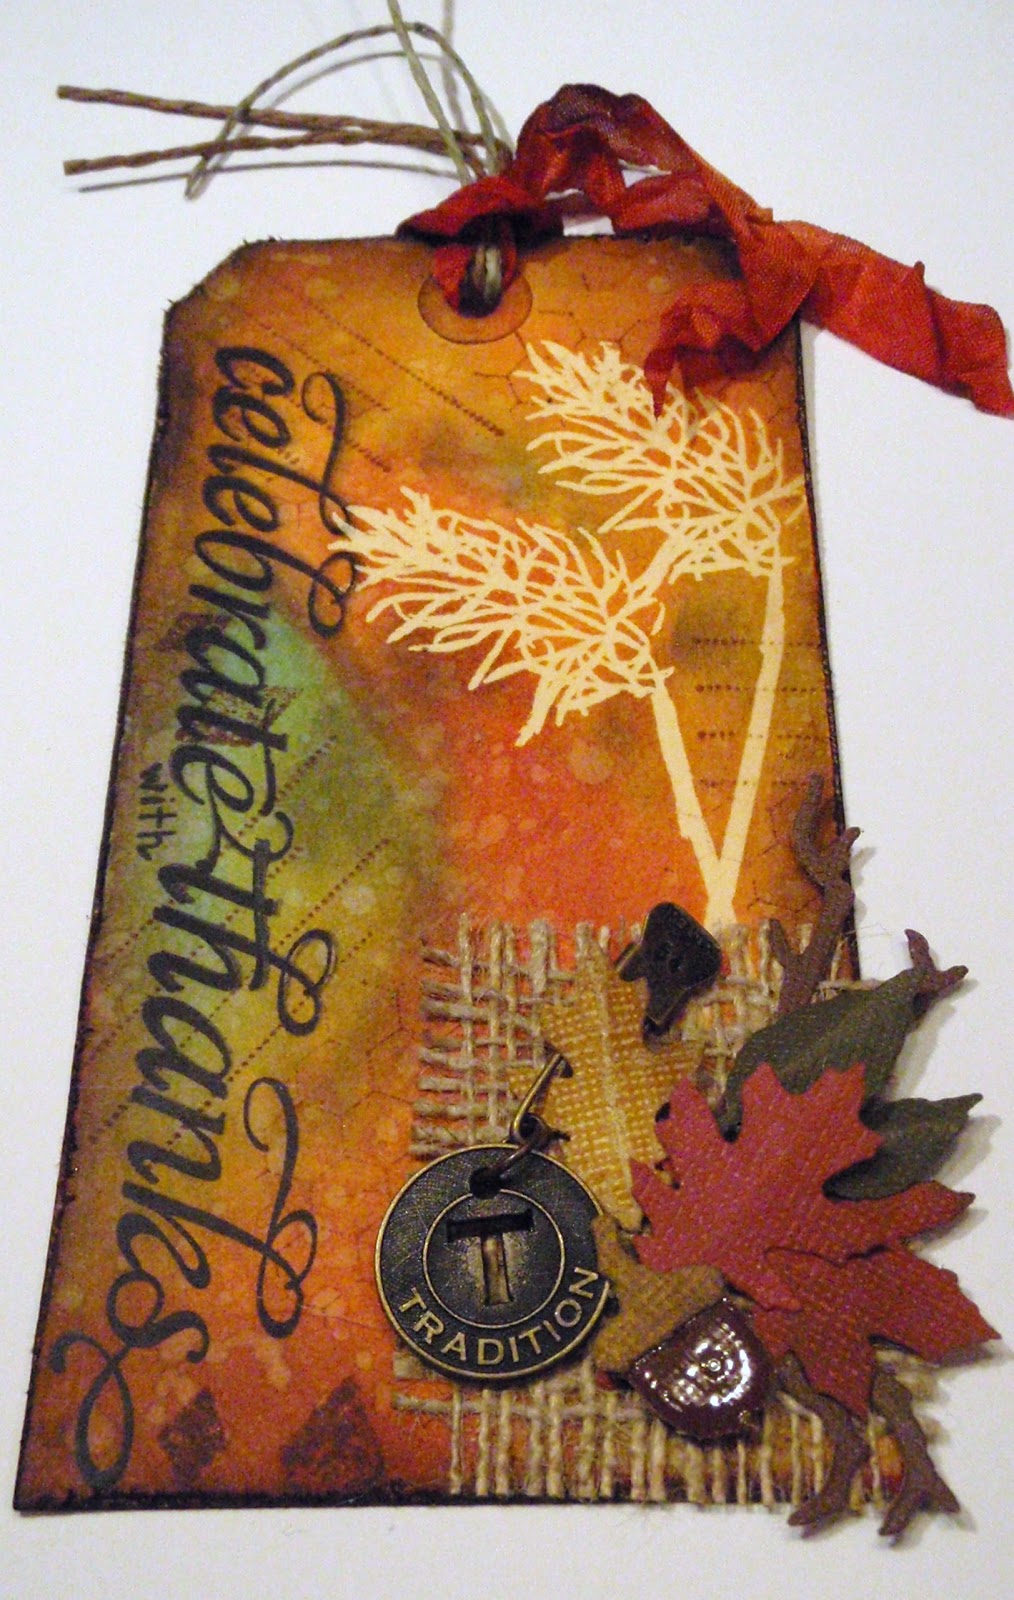
But, it has been a week since I did anything crafty (terrible I know and I have no real excuse other than tiredness) so I thought I would have a go.  I still had lots of Christmas things on my desk so I set about creating this:


I used my faithful Tim Holtz Christmas Blueprint stamp of the toy soldier in the main image, coloured with Distress Inks, the edges of the piece were grunged up and inked with Vintage Photo DI. 

The base tag was embossed using a Darice embossing folder together with a Tim Holtz  Embossing  Diffuser to create an area at the top for stamping my Merry Christmas.  Again, I grunged up (and ripped in places) the edges of the tag and then went over the whole tag with Gathered Twigs DI and then finished the edges with Vintage Photo DI.

The pine cones and leaves are cut from the TH Tattered Pinecone die set and I added a little Rock Candy glitter and some twisted rusty wire (if you have not used this stuff yet, please do, it is amazing).  The edge of the tag, at the bottom is cut from a TH Alterations On the Edge die (Brackets). 

The tag was finished off with some burgundy silk ribbon and a rusted bell.  I hope it is Vintage enough Hels!!

My lovely blog friend Buttons, who is the Queen of Vintage, has been adding tags to her Christmas cards and I may just do that with this one rather than stick it in a drawer.

If you do visit, I hope you will leave me a comment, I love to read them and will always do my best to return the compliment (so long as I can find you).  Thank you so much for looking.   Hugs, Anne x

Sunday 18 November 2012

Sunday Stampers Week 232 - FACES

Hello Everyone

This week our lovely hostess Hels Sheridan at http://pinkleart.blogspot.co.uk has chosen FACES as our theme for this week's challenge and here is my entry.


The lovely face stamp is by Inkylicious and I stamped this onto white card.  I matted it onto an ATC which I had overstamped with a Hero Arts Harlequin background stamp and coloured with Tim Holtz Distress Inks in Peacock Feathers and Festive Berries (the same colours were used on the main tag also).  Apologies for the glare on the left hand side, it was dark when I took the photo.

At the bottom of the tag I stamped with my latest Tim set of stamps Classic Favourites No. 3 (I love this set!).  The ribbon is vintage seam binding again coloured with Festive Berries DI, scrunched, dried and added with a double bow.  The lady's eye was coloured with Peacock Feathers DI and the lips with Festive Berries and then coated with Glossy Accents.

The words are TH chit chat and say 'embrace friendship'.  It is that time of year - Thanksgiving / Harvest Festival time and I want to give thanks, amongst other things,  for all the lovely blog friends I have made since I started blogging a few short months ago.  I am truly thankful for your friendship and hope it will continue for a long time to come.  So many of you are a true inspiration to me.

I hope that you will leave me a comment, I do love to read them all and I always try to return the compliment.  Crafty hugs to you all,  Anne xx

Tim's Tag November 2012

Hello Everyone

Thought it was about time I got Tim's tag done for November, can't believe how fast this month is going.  The only reason I didn't start it sooner was because I knew that I did not have the stamps he used, so I have been wracking my brain trying to come up with alternatives.

I do enjoy doing these tags because it challenges me and I unashamedly keep to his recipe as much as possible and then go off and use the techniques on other projects, but in my own style.  It is just the way I learn best.  Anyway, here is what I created this month:


As I say, I did everything according to Tim's recipe, except the wheat stamp of Tims was replaced by a stamp from my stash (which I cannot identify) but I thought it looked a bit like wheat.  The words (celebrate with thanks) are by WaltzingMouse stamps (Say it Loud set).  We don't traditionally celebrate Thanksgiving here in the UK but we do have Harvest Festival, which some do celebrate and give thanks, hence my wording.

I did have a moment of panic when my little travel iron started smoking as I was doing the resist technique but I was brave and just carried on!  I love the end result and the way it still resists inks even when the embossing has been removed.  Definitely going to do this technique again.  The burlap was gifted to me by a lovely blog friend May, some time ago, I am using it sparingly because I don't want it to run out!

If you do visit I hope you will leave me a comment, I do love to read them all and I will do my best to return the compliment (if I can find you).  Crafty hugs, Anne xx

Thursday 15 November 2012

Brown Paper Bags and Tim Holtz Christmas Blueprint

Hi Everyone

This is a scheduled post as we are away visiting our family's latest addition, Evie, just for a day or so.  I hope the scheduling works!

I have been making brown paper bag albums for 6 or 7 years now, always at Christmas because I think it is the one time of year where family memories are important.  I have been pondering for a while now what to do with my new Tim Holtz Blueprint Christmas stamps other than just making cards or tags and this is what I came up with.  I hope you like it and will have a go at one yourself, they are such fun to make.


To start off you need some brown paper bags, American lunch bag ones are best as the ones in the UK are not such good quality but I have added some Kraft card to the front and back cover to make it a little more sturdy and that seems to work quite well and the album holds it shape better.

This is how it starts off.  My bags are approx 13.75 inches long and just under 7 inches wide so when folded in half it is nearly square.  You need to fold it so that the top opening of the bag is facing to the right hand side as you can use this opening to store things in. You will see this later on.


This is the folded bag.  You can add as many bags as you want, for my album I only used two.  At this point I punch holes (five in this case) evenly along the non opening side.  This gives you an idea of where to put your layers up to and not obscure the holes which will later hold the album together.
 
The next step is to start and decorate your album.  You can matt and layer as I have or leave the pages quite simple, it is your choice.  I have chosen the Blueprint Christmas stamps and various die cuts.
 
These are the inside pages.  I have added pockets to the left hand side as this is where I will be storing all my tags that I have made for Christmas presents for the family and where, after Christmas it is where I will store tags from presents that I receive (hopefully).


The  picture below shows one of the pockets created by the top opening of the bag,  This is useful for storing photos taken over Christmas - and I don't mean the ones we leave on our PC/Laptop/IPad/Phones - but real ones to remind us of the event.  Using two bags creates two big pockets like this, three bags will give you three pockets and so on.  In the past I have used up to five bags which makes a really thick album.


To finish off I tied two lots of ribbon and a piece of Tim's Sparkly Tinsel Twine through each hole to bind the album together.  You can use a bind-it-all machine but I could not be bothered to get mine out and I quite like the ribbon!

The cover is decorated with Tim's Bigz pinecone die, the 25 is from the Mini Reindeer Movers and Shapers die and a stamped word 'Christmas'.  The inside is decorated with various dies and each of the Blueprint stamps has been stamped onto white card, coloured with Distress Inks and then decoupaged onto Kraft card, stamped with the same design.

I hope it all makes sense.  I had the devil's own job doing this post with so many photos and trying to juggle the words!  Here is a final picture of the album standing up.  It really is quite sturdy.


Thanks for taking the time to look, assuming you have got this far!  If you do visit I hope you will leave me a comment, I love to read them all and they do inspire me to carry on.  I always do my best to return the compliment, as long as I can find you.  Crafty hugs, and will visit you when I get back.  Anne x

Wednesday 14 November 2012

WOYWW - Week 180 - Glad to be Back

Hi Everyone

I have been missing for the last couple of weeks, not for pleasure I am sorry to say, but I have missed you all and I am so glad to be back!

My desk this week looks like a complete wreck, I am doing Christmas cards again using my Tim Holtz Christmas Blueprint stamps.  I am also making something special but will blog that on Thursday, as it is not quite finished - it is really different so I hope you will come back and have a look.

So why am I showing my messy desk?  Well if you want to know more then pop over and see Julia, our Hostess with the Mostest at http://stamping-ground.blogspot.co.uk for details on how to join in on the fun.

Here is my desk - yikes!


Apart from the stamps you will see a die cut snowflake border (Memory Box), some Distress Inks, some white acrylic paint, some Tim Holtz idea-ology Tissue Wrap (Melange) - still on my desk from my last project.  Also, a Merry Christmas stamp, some Distress stain, a sanding block, some Pinflair glue gel, some pinecones that I made up last night, some rusted jingle bells, glue, corrugated card, pokey tool and some stamped images, ready for colouring.

Well, Julia likes us to keep it short and sweet so I am off now to see what some of you have on your desks today.  If you do visit, I hope you will leave a comment, I love to read them and will always do my best to return the compliment.  Happy WOYWW everyone!   Crafty hugs, Anne x

Sunday 11 November 2012

Sunday Stampers Week 231 and a New Baby

Hello Everyone

Strange title, I know, but all will become clear.  This week at Sunday Stampers our fabulous hostess, Hels Sheridan has taken inspiration from the Beatles song 'And Your bird Can Sing' and set our challenge as BIRDS.

I thought I would take a break from making Christmas Cards to make this tag for the challenge.  I cannot remember the last time I actually made my entry on the Sunday itself.....


I used Tim Holtz Distress Inks in various shades of blue, smooshed on my craft mat and swiped the tag through, drying off each time.  I then smooshed some Brushed Pewter Distress Stain onto my craft mat and dabbed this over the tag to give a slight sheen.  The edge of the tag was distressed and then covered with Black Soot DI.  The birdcage and bird are cut from TH Caged Bird Bigz die.  The cage was 'rusted' with acrylic paint and a variegated embossing powder.  The bird was covered in Tissue Wrap (Melange) and coloured with Distress Ink. 

The flower and stamped words ('the bluebird carries the sky on his back') and edging are from a Paper Artsy stamp set.  The ribbon is vintage ribbon dyed with Distress Inks in Broken China and Brushed Pewter and to finish off I added a pearl and a couple of blue beads.  At the bottom of the cage I added jump rings threaded with electric blue sequins (sorry they don't show up very well).

                                                      *************************

Now for the Baby bit - Daughter No. 1 and husband had a beautiful baby girl on Saturday, making this Grandchild No. 4 (2 for them)!!  We can't wait to go and see them all.  The baby has been named as Evie Olivia Rose.  We are just a little bit excited about the news...... 

                                                    **************************

I hope you will leave me a comment, I do love to read them all and I thank all those who do take the time to leave one, they are much appreciated.  I always do my best to return the compliment.  Have a great week everyone.  Crafty hugs, Anne xx

Tuesday 6 November 2012

Sunday Stampers Week 230 - Blue Velvet

Hello to my blog friends old and new.  Thank you so much for your kind and lovely comments recently, they have cheered me up no end! 

Sadly I am not doing WOYWW again this week as I have appointments on Thursday and Friday which will prevent me from commenting on many blogs until the weekend, so apologies for that.  I will hopefully catch up with you all next week.

This week our Hostess at Sunday Stampers, Hels Sheridan's theme is BLUE VELVET with the requirement that we use blue in our creation.  I have not done much crafting lately, other than Sunday Stampers entries and also a few Christmas cards so I thought I would combine the two.  My very talented and good blog friend Buttons is making tags to put on her Christmas cards this year so I thought I would 'borrow' the idea and put this tag on a Christmas card too.

My tag uses the Tim Holtz Blueprint Christmas stamps and I have used the snowflake as you can see here:


For some unknown reason I have had a devil of a job photographing this tag and getting the beautiful colours to show through, but I can assure you it is very blue.

I took a plain tag and backed it with some fine corrugated card to give it some substance.  I stamped the snowflakes in Versamark and embossed them with white detail embossing powder.  Broken China and Tumbled Glass distress inks were squigged onto my craft mat, spritzed with Glimmer Mist (Abominable Snowman) and a little water and the tag was smooshed through several times, drying after each smoosh. 

I then spritz and flicked water over the tag to give some random water marks. I then went around the edge of the tag with Salty Ocean DI.  Whilst the DI was still wet I covered around the edges of the tag with Frantage Shabby Blue Embossing Enamel (oh I love this stuff) and dried slowly from a great height and once it started to melt I moved closer.  This method allows some of the Frantage to stay raised.  I have tried to take a close-up to show the effect a little better.


I think you can see where some of the Frantage in the gold and white has remained raised.  It also gives a lovely texture which you can feel. 

To finish off I did go a bit mad.  I coloured some vintage seam binding with Salty Ocean, Tumbled Glass and Glimmer Mist, scrunched it up and dried it with my heat tool.  I took some of Tim Holtz's gorgeous tinsel in blue and I tied a double bow at the top.  I added some little jingle bells and pearls to finish off.  I don't usually like anything I make but I quite like this tag and after some initial misgivings I think this is one of my favourite sets of Christmas stamps ever!!

I hope you will leave me a comment, I love to read them all and will always do my best to return the compliment, if I can find you.  Have a lovely rest of the week.  Crafty hugs, Anne x

Friday 2 November 2012

Missing Temporarily and Sunday Stampers Week 229

Hello Blog Friends Old and New

My apologies blog friends and to my latest followers for going missing for such a long time.  The truth is that we had a weekend break planned which turned into a nightmare.  My lovely DH was very ill so we came home again and then I caught the dreadful Gastro-enteritis bug too.  We have been laid low for five days now and I have not been able to visit many of you other than an odd moment here and there when I could muster up the energy.  Feeling a little better today so I was able to make a tag.

The theme at Sunday Stampers this week is Autumn/Fall and the challenge is run by our wonderful hostess Hels Sheridan.  I admit I didn't feel up to making lots of leaves and I have posted a few Autumnal leaf offerings recently so I decided to use my new stamps, purchased whilst Hels was on TV a few weeks ago and use Autumnal colours instead.


The base is a No. 8 Manila tag by Ranger which I have coloured using Rusty Hinge, Scattered Straw, Wild Honey, Fired Brick and Spiced Marmalade Distress Inks.  I smooshed them onto my craft sheet, spritzed with Perfect Pearls and dragged the tag through, drying off and repeating until I got the colour I wanted. 

The stamped background was made using Tim Holtz Classic Favourites #3 set (really love this one).  I stamped onto a separate piece of card, coloured this randomly with DI's, cut some pieces out and decoupaged them.  I then stamped the tag and pieced the decoupaged strip over the top.  The words are taken from Tim's Good Thoughts set of stamps. 

I edged the word strip and the bottom of the tag with Spellbinders Fancy Lattice Expandable die, trimmed to fit.  The edges of the tag and word strip were distressed with Black Soot and the vintage ribbon has been coloured with Rusty Hinge and Festive Berries DIs.  The leaf set is Tim's Idealology coloured with Sunset Orange and Red Pepper Alcohol inks.

Last week's Sunday Stampers turned out to be a bit of a lovely surprise for me as Wendy Vecchi herself commented on my blog and also pinned my tag on Pinterest too!!    I was not well enough to do a full happy dance but it really cheered me up no end........

I will do my best to get round and visit as many of you as I can over the weekend and try and catch up on things I have missed - like your wonderful creations.  Thank you for your visit.  Crafty hugs, Anne x
Related Posts Plugin for WordPress, Blogger...

Labels