Pinterest

Showing posts with label Olga Heldwein. Show all posts

Wednesday, 19 August 2020

The Great Outdoors for AALL & Create

 Hello Friends

I hope you are all staying safe and well.

My Guest designer project for AALL & Create this week is a card.

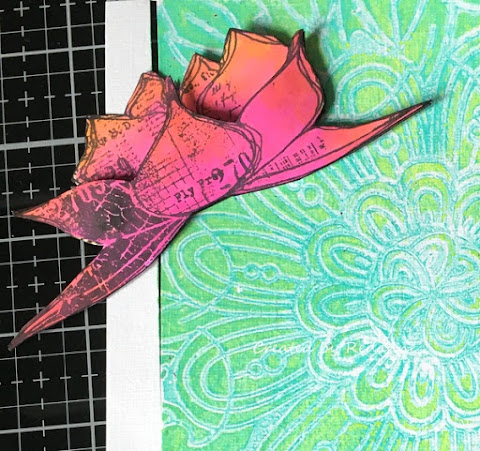
I started by creating the background, using the gorgeous Abundance stencil #85 by Olga Heldwein and PaperArtsy paints on my 5" x 7" Gelli plate layering up several times to achieve the background I wanted.

Next, I stamped the gorgeous flower (twice) from Tracy Evans' The Great Outdoors stamp set #370.  I love this flower, it reminds me of a waterlily.  I coloured the flowers with watercolours (Art by Marlene) and fussy cut the flowers before decoupaging them.

I die cut the vase (Tim Holtz die) from black card, stencilled using the same stencil as previously and PaperArtsy paint, and once dry I gave it three coats of clear embossing powder to give a lovely sheen.
To finish off, I added some washi tape to ground the vase and I used 3D gel to add the vase and the flower.

You can find a list of worldwide stockists for the stamp set and stencil is used on my project HERE.

Thanks so much for your visit, please stay safe and well and I hope to see
you again soon.

Hugs,  Anne xxx

Wednesday, 12 August 2020

Butterfly Lady...

 Hello Friends

I am back with a mixed media project as Guest designer for AALL & Create.

I used Olga Heldwein's gorgeous new Flutterby stencil #98, Olga's Take Flight stamp set #367, Autour de Mwa's Bubble Block stamp set #310 along with his Totally Dotty stencil #87.

Starting with the Totally Dotty stencil I created a Gel Press background using PaperArtsy paints, adding several layers of paint to create a delicate stencilled look.

To create the butterfly, I applied Versafine Clair ink (Fallen Leaves) through the butterfly (Flutterby stencil) to white card, carefully going around the edges to create a border.  I then applied clear embossing powder before heat setting, and then cut out the butterfly.  I used Seth Apter's Izink Dye Spray in Sunflower to add colour to the butterfly.

I prepared my media board by inking around the edges with the same Versafine Clair.  I stamped and watercoloured the lady and then fussy cut her.  The sentiment is a Tim Holtz one.

I stamped a few elements from the Take Flight stamp set onto my background, stamped and cut out the circular element for the butterfly lady to sit on.

To finish off I added the lady, her wings and the sentiment to the background and then mounted the background to my board.

A list of worldwide stockists for the stamps and stencil I used can be found HERE.

As always, thanks so much for your visit, I hope to see you again soon.  Keep safe and well in the meantime.  Hugs,  Anne  xx


PS. A few people have asked me to share the artist's messy desk I created a while back for one of Tracy Evans' Hochanda shows, and here it is.  I used matchboxes to create the desk and Tracy's stamps to decorate it. 


Wednesday, 15 July 2020

Vintage Typewriter

Hello Friends

I hope you are all well, we are into our 19th week of lockdown here, strangely enough it just feels like the norm now and I am not anxious to go out anytime soon!

My Guest designer project this week for AALL & Create has a vintage vibe to it.
I used two of Bipasha's beautiful stamp sets - Time Out #325, Janet Klein's Background Noise #338 together with the Abundance Stencil #85 by Olga Heldwein.

I started by creating the background using Distress Oxide inks and the wrinkle free technique.  I covered the stencil with Seedless Preserves, spritzed it and applied it to the background.  This left a lovely delicate pattern.
I stamped the typewriter image onto white card and used an edging die to create the torn page look.
I stamped and fussy cut the typewriter again and also stamped the wording from stamp set #338, to use in the typewriter.
I gave the page and the note for the typewriter a vintage look with Distress Ink in Gathered Twigs.
I layered up the typewriter, added it to the page and then some corrugated card and fixed it to the background.  To finish off the card, I added the sentiment from my stash.

Worldwide stockists for the stamps and stencil I used are listed on the AALL & Create website HERE.

As always, thanks so much for your visit, I hope to see you again next week.

Hugs, Anne xxx

Wednesday, 11 March 2020

Fritillaria for AALL & Create

Hello Friends

My Guest designer post this week for AALL & Create is a mixed media card using Tracy Evans's fabulous newly released Fritillaria stamp set  (#274) along with Olga Heldwein's beautiful Abundance stencil (#85)
This stamp by Tracy is wonderful, you can make a very quick card by simply stamping and colouring the flower.
I used my Gelli plate and Dina Wakley Acrylic paint (turquoise), along with the stencil to create a backbround for my flower.
Once dry, I stamped and embossed the Fritallaria.
I did a bit of paint splattering, stamped, coloured and cut out the flower.  The flower was mounted with some 3D glue and the whole card was mat and layered.
The stamp set and stencil I used are available HERE where you will also find a list of worldwide stockists.

Thanks so much for your visit, I hope to see you again soon!

Hugs, Anne xxx

Wednesday, 4 March 2020

Passion Flower by Tracy Evans

Hello Friends

My Guest designer project for AALL & Create this week is a Mixed Media tag using Tracy Evans' newly released Passion Flower stamp set #278 along with Tracy's Mesh stamp set #262 and Cracked Walls 2 Stencil by Olga Heldwein,
I don't have too many step out photos this time because this was not the original tag I created.  I had created two simple Distress Ink backgrounds using the wrinkle free technique, this one uses Peacock Feathers in the background onto watercolour card, cut into a tag shape.
I inked up Olga's stencil (yes I know, I really need to give it a good clean) with Wilted Violet Distress Ink, Spritzed it and tapped it onto the tag at the top and bottom. I love the way the bricks don't look too defined, probably because of the texture of the watercolour card.
I stamped the Passion Flowers onto the card and then again onto a separate piece of watercolour card.  The flowers are coloured with Wilted Violet Distress Ink with a touch of Picked Raspberry onto the stamens.  The leaves are coloured with Mowed Lawn Distress Ink, with a touch of Wilted Violet to add contrast.
I attached the watercolour card to a Tim Holtz chipboard tag, trimmed it and painted the edges and the tag holder with purple paint.  I stamped the mesh stamp  randomly in Peacock Feathers Distress Ink across the tag.  

Finally I stamped and cut the sentiment from some of the left over card, edged the sentiments with Wilted Violet Distress Ink before attaching.

I did finished the second tag and here it is, just in case you wondered how it turned out!
The stamps and stencil I used along with worldwide stockists can be found at AALL & Create HERE.

Thanks so much for your visit, I hope to see you soon.

Hugs, Anne xx


Wednesday, 15 January 2020

Journal for AALL & Create

Hello Friends

My first project of the year as Guest Designer for AALL & Create is a journal, one of my favourite things to create!  AALL & Create has a new release of dies and stencils and I used
a beautiful new stencil - Abundance by Olga Heldwein.

The beauty of these new stencils is that they are large enough to cover nearly the whole of Eileen Hull's Notebook die (Sizzix  663635).

I was a little short on time so I literally cut the base from black mount board, took the stencil, some white paste and applied it to the journal cover.
I felt that the paste needed to look more blended to the background so I used crackle paste over the whole of the cover to tie the two together.  It is a very fine crackle (see below) and gives a lovely sheen to the journal.
To create a closure I applied some more paste to the central part of the stencil and when dry I cut out a circle, crackled it, punched two holes in and threaded my elastic through.

  I thought it looked like a fancy button so I made a few more for future use.
Here is a view of the back of the journal.
I did create a pocket and some inserts for the inside but I have shown the construction of those many times before, so I have not repeated them here.

You can find a list of worldwide stockists for AALL & Create products HERE.

Thanks so much for your visit, I hope to see you again soon.

Hugs, Anne xxx

Wednesday, 13 November 2019

Blooming Field New Release by AALL & Create

Hello Friends

I am back this week with a Guest Designer piece for AALL & Create, using Olga Heldwein's newly released (and gorgeous) stamp set #229 - Blooming Field.
I created a simple notebook/journal.  I had intended to create a small hard back journal but I could not bring myself to cut into the image, I wanted to show the whole stamp.
Here is the stamp set - isn't it beautiful, along with the stencil I used lightly in the background, #64 by Autour de Mwa.
The image was stamped onto mixed media card, with Black Versafine Clair ink.
I coloured the image with Derwent Inktense Watercolour pencils.  Olga provides the shading in her stamps so the images are so easy to colour!
I masked off the image and used Distress Oxide Ink in Broken China to colour in my background area.  Once coloured I applied the stencil and coloured again using the same Oxide ink and it left a 'ghosted' image in the background.  I applied the image to my 6" x 8.1/4" notebook, trimmed around the edges and then added more Oxide ink to the edges.

To finish off I added an elastic closure in a toning blue.  This notebook/journal will sit on my desk to jot ideas and techniques down.

You can find a list of worldwide stockists of AALL & Create stamps and stencils  HERE.

Thanks so much for your visit, it is always appreciated!

Hugs, Anne xxx


Thursday, 22 August 2019

Cogs and Gears Notebook for AALL & Create

Hello Friends

My GDT project for AALL & Create this week is a sticky note holder using Olga Heldwein's fabulous stamp set (Flowers & Gears #195 and Steam Cogs Stencil #71). Olga's beautiful stamp set appeals to both masculine and feminine tastes with gorgeous flowers and also cogs and gears.  
I started by creating a background, directly onto mixed media board, using several colours of Distress Oxides (I wanted rusty tones) before stamping the beautiful cogs and gears in brown Archival Ink.  I then die cut the Notebook using Eileen Hull's new Notebook die.
I stamped a few more cogs onto lightly gessoed Kraft card and coloured these with Quinacridone Gold acrylic paint before fussy cutting them.  The gessoed card gave a nice texture.
I added some metal cogs and gears from my stash to the fussy cut ones and glued these to the front
of the finished notebook.
I used AALL & Create stencil #71 on the inside cover of the notebook and then created two pockets to hold post it notes, again stamping cogs onto the pockets.
Finally, I added an elastic closure to the notebook and some charms from my stash.

You can find a list of worldwide stockists for the stamps and stencils I used along with the full range of stamps, stencils and new dies HERE.

Thanks so much for your visit, I hope to see you again soon.

Hugs, Anne xx


Thursday, 25 July 2019

Birthday Card Organiser for AALL & Create

Hello Friends

I am back again this week with my Guest designer project for AALL & Create, it is a Birthday
Card Organiser which holds cards for 12 months of the year.  It was quite easy to make and is a great idea for organising cards for the whole year long.
The book itself is quite large, approximately 9 inches square by just over 2.1/2 deep (finished book) and I decorated it in my favourite theme!
 I cut some mountboard for the cover and spine.
I joined the spine to the covers with strong tape, leaving a gap so the cover was flexible. I also went around all the edges with the black tape (not shown) as I wanted a black border on the finished organiser. I set this aside to work on the inside folders.
I cut six pieces of card for the inside folders.
To create each folder, fold up from the bottom and fold back so that you have a pocket on each side.  You do not need to glue anything, folding back gives the pocket strength.  Using a standard hole punch, punch holes in the open side, through all the layers as shown above.
If desired, decorate the pages, I used some pretty papers from my stash.  I also decorated the pocket edges (not shown.  Adding paper gives the folders a lot of strength.
For the organiser cover I created two masterboards.  I brayered several layers of paint onto the card, applying a final layer of watered down gesso to tone down the colour.  I used AALL & Create stencil #39 to add some extra texture.

I cut a piece to fit the inside spine before attaching the ring binder mechanism (by Tim Holtz).  You need to do this before covering the spine on the outside of the organiser, otherwise the fixings will show on the outside of the organiser.
I cut the covers to size and added them to the organiser.  I used AALL & Create stamp #210 by Tracy Evans to add some further texture and then add some splatters of white gesso and black paint.
To decorate the cover I used stamp sets #137, #198 by Olga Heldwein and stamp set #196
 by Bipasha BK.
 I coloured these and fussy cut them out and applied these to the cover.
Here is a view of the inside, I added months to the folders and also added a card so I could list the birthday each month.

Finally, I added pockets to the inside front and back covers.  I am really pleased with the results of the organiser and it is very practical too!

You can find a list of worldwide stockists of all of the stamps and the stencil I used HERE.

As always, thanks for your visit, I really do appreciate it.

Hugs, Anne xx
Related Posts Plugin for WordPress, Blogger...

Labels