Pinterest

Monday 27 October 2014

Inspiration Journal - Project #4

This is my fourth project for October at Inspiration Journal and I decided to make something a little less spooky - well except for spiders and cobwebs perhaps!

There is still time to enter the In Disguise Challenge at Inspiration Journal and we would all love to see you join in.  There is a huge prize of 50 Inspiration Emporium Dollars for one lucky winner! Inspiration Emporium also have exceptionally reasonable postage rates to both the USA and Europe.

I don't actually have the amazing Luminary die by Tim Holtz but my lovely and extremely talented friend Jenny (Buttons) cut me a few and they only come out occasionally as I don't want to use them all up!  It takes a little bit of time and patience, but the end result is always worth the effort:
My 'In Disguise' element is the pillar at the bottom that is made using the cardboard tube from a roll of gift wrap.  I did not take step by step photos as I completed this project over a number of days and I just forgot....

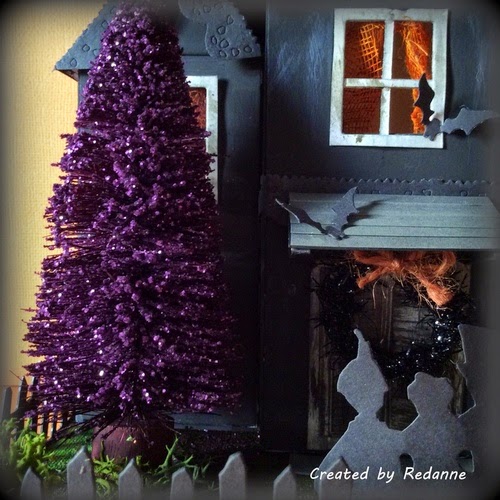
The pillar and the luminary have been treated the same, coated with Ripe Persimmon Distress Paint, a crackle glaze applied on top, followed by Black Soot Distress Paint.  I love the way the vibrant Ripe Persimmon shows through.
The pinecones at the bottom are from Tim's Pinecone die.  I have just got the new larger pinecone die,  they are quite large and for those of you who like to make flowers, this will be the perfect die to make lovely large roses.
The 'glass' is made from left over packaging material and I used Tim's Cobweb strip die to add some detail to the glass.  The orange blog on the front is actually a spider which has had his body covered with Distress Glitter (Spiced Marmalade).  The beautiful little leaves are from Tim's Autumn Gatherings Strip Die and they have been coloured with various Distress Stains.
The top has been decorated with Tim's original size pinecones and crinkle ribbon coloured with Spiced Marmalade Distress Stain.
I'll leave you with a slightly better view of the spider........ just perfect for Halloween.....

Like I said earlier, I hope you will join us in the challenge.  Every Monday the Inspiration Team showcase their projects at Inspiration Journal, so there is always plenty to inspire you! 

Also, if you purchase items from Inspiration Emporium you can use my code Redanne to receive 10% off your whole order!

As always, thanks so much for looking and it is always a pleasure to read any comments you leave!

Hugs, Anne xxx


Wednesday 22 October 2014

Compendium of Curiosities - Challenge 13

The challenge at Linda Ledbetter's Compendium of Curiosities III Challenge is to use one of Tim's worn covers as seen on Page 35 of Tim's latest Compendium.  As always, if you wish to join in the challenge, you must work from your own copy of the book and you should not divulge any of the techniques in the book, in your post.  You can obtain a copy of the book from Tim, HERE and it will be signed by Tim himself!

As well as a fabulous parcel of goodies from Tim and Mario to be won by someone chosen by the Curiosity Crew, there is also a an amazing $50 voucher from one of the wonderful Sponsors, Inspiration Emporium to be won by a randomly selected individual.

So, on to my entry...... I did not have a lot of time this month and so I went at my worn cover project a bit like a bull in a china shop and was not happy with the result.  However, as I have entered all of the challenges so far I did not want to miss this opportunity, so I put it away for a day and then came back to it and ended up with this:
I am hoping Tim will continue with his tags next year and I am ahead now with my storage for the 12 tags!  I used Tim Holtz Idea-ology Resist paper pad which has both white and Kraft resist pages.   I used stars for the outside and a dot fade resist for the inside.  This is my first time of using these papers, I chose the Kraft resist and sprayed both pages with Broken China and Picked Raspberry Distress Spray Stains, two gorgeous colours.  I love that 'sprayed' look and the fact that the Kraft still shows through and the resist elements do not take the colour.

I added a Picture Wheel, a Chevron On the Edge, a Pointed Finger (Mini Movers and Shapers) - the finger actually moves and can be rotated around the number of months.  The 2015 is from the WordPlay die.
Countdown Charms were added to the side, hung from some Idea-ology fasteners, together with a Remnant Rub and waste from the Chevron die.
The back is simple,, just a few Remnant Rubs and more Chevron.  I think this paper pad is my new favourite, it takes colour really well.
Here is a close-up of the charms I added, I used 'embrace imperfection' as that is what I did with this challenge!  The arrow has had a hole punched in it.  I did this by using Tim's mini Drill Punch - it is a fantastic and easy to use gadget.
Inside I created two pockets to hold spare tags, added a dozen of the Pocket Pages and put a plain tag into each, all ready for next year.

I have not shown you my disastrous original cover but, needless to say, I am much happier now that I have covered up my mistakes - embrace the imperfection, as Tim would say.  Simple, understated and using my favourite colours, I am happy with the result now!

Thanks for looking, thanks for your comments and I look forward to seeing you again soon.

Hugs, Anne xx

Monday 20 October 2014

Inspiration Journal - In Disguise - Project #3

Hello Everyone

Here I am back today with Project #3 for Inspiration Journal's 'In Disguise' Challenge which you can find HERE.  There is a fabulous $50 voucher for one lucky winner to spend at Inspiration Emporium.  I decided to keep away from Halloween for my third project and to make something practical.

I took a simple bamboo place mat, some beautiful Tim Holtz Eclectic Elements fabric, some elastic, glue and seam binding or ribbon...


And created this:


And opened out it looks like this:


A paint brush holder!  This could easily be used for knitting needles, pens, scissors or anything else that might fit in the holders.  You simply make the holders any size you wish.

This is so simple to make, you just need glue.  I suppose you could sew it if you have a sewing machine that takes quite thick fabric (the bamboo makes it quite thick) but my little craft sewing machine would not take it, so if you do want to make one, test it out on your sewing machine first!

The first thing to do is to thread the elastic through the bamboo at regular intervals.  You can put something in to test how big the loop on the top side should be.  You just need to make sure you use the same slats top and bottom on the bamboo mat, as you can see in the photo below.


Once you have threaded the elastic, just secure them at each end with some hand stitching.  This will be covered up later.


I did not take a photo of the next step because I was 'in the zone' but all you need to do is lay the mat on top of your fabric and cut around the fabric leaving approx 1" - 1.1/2" border of fabric all round.

Turn the bamboo mat over and apply glue (I used Ranger Glue N Seal) to the whole of the wrong side of the mat.  Lay the fabric onto the glued mat (pattern side up) and press firmly all over and then set it aside to dry.  This is important!  I did not heed my own advice and have a few ripples in mine...


Once dry, turn over and then fold the edges over to the inside.  I did this by gluing the fabric again with Ranger Glue N Seal, folding it over half way to hide the raw edge, gluing again and then folding it over to the inside as you can see in the photo above.  This gives a lovely neat and tidy edge and gives strength to the piece.  Do this on all four sides, cutting some bulk from the corners if you wish.

To finish off I sewed a piece of ribbon (or you could use some seam binding folded over and machine stitched) to one end (as you can see in image 2 above) so that the the piece can be rolled up and tied closed.


To finish off, because the corners are quite thick and I did not want them to come apart, I added some of Tim's Idea-ology corners, they keep the corners nice and snug.

So there you have it, a bamboo place mat disguised as a brush holder.  Thanks for looking and I hope you feel inspired to join in the challenge at Inspiration Journal where one lucky winner will receive a $50 voucher to spend at Inspiration Emporium.  You have got to be in it to win it!

If you make a purchase from Inspiration Emporium, don't forget to use my code Redanne to receive a 10% discount off your whole order.  Postage and Packing is very reasonable - $5 in the USA and $10 to Europe.

Hugs, Anne xx

P.S.  I have typed up some very basic instructions, if anyone wants them, just email me (address on my sidebar) and I will send them to you....

Items Used from Inspiration Emporium

Tim Holtz Eclectic Elements (Documentation)
Ranger Glue N Seal
Idea-ology Mini Corners

Friday 17 October 2014

A Vintage Journey - Halloween - To Die For

It is my turn to be host at A Vintage Journey and I have (not surprisingly) chosen Halloween - To Die For as my Challenge, where you are asked to use at least one die to create a Halloween piece in the style of Tim Holtz.

My Creative Guide Team-mates have made some fabulous pieces and I hope you will go over, have a look and also join in the challenge.

Our wonderful Sponsors, Country View Crafts are offering a £10 Voucher to spend in their on-line store for one winner chosen by the team.  In addition we will be choosing three Pinworthies who will have their pieces added to our Pinterest page and they will receive a badge to display on their blog.

For my project I wanted to use as many dies as possible and I made a shadow box from a picture frame I picked up very cheaply from the supermarket.


I covered the frame with black Gesso, a crackle glaze and then a mix of Weathered Wood and Antique Linen Distress Paints.  I cut several cobwebs from Tim's Cobwebs Decorative Strip die and attached these over the whole of the frame.  Here is a view of the side...


The background was created using Ranger Speciality Paper and Tim's fabulous new Distress Spray Stains in Spiced Marmalade, Walnut Stain and Antiqued Bronze.

The other dies used are the Halloween Shadows, Autumn Gatherings and the On the Edge Graveyard.  I do not have the tree die but I have the Embossing Folder so I embossed some black card with the folder and fussy cut the tree.  The house was a gift from a lovely blog friend last Halloween.

To finish off I added some Florist moss for grass.  I also cut some holes in the back of the frame and pushed through some battery operated tea lights to light up the house.  The lights flicker and look quite spooky in real life.


I really hope you can pop over to A Vintage Journey, to see some amazing inspiration from my Team-mates and hopefully join in the Halloween - To Die For Challenge!

I am linking up to the Sizzix Challenge - Halloween HERE as I used a number of Sizzix dies in my creation - Tim Holtz Autumn Gatherings, Halloween Shadows, Rickety House and the fabulous Cobweb die.  The fabulous prize is a selection of Tim's new releases!

As always, thanks for looking, I will be back on Monday with something a little different, hope you can join me then.  Hugs, Anne xx

Wednesday 15 October 2014

Tim Tag October 2014

I would firstly like to say a huge thank you for all your lovely comments on my Haunted House, each one is most appreciated - thank you again.

I love all things Halloween so Tim's tag this month had me in my element.  To see Tim's original please see HERE.  I have more or less stuck to his colours and design, with a few tweaks where I did not have the required products.


I am not going to go into a lot of detail as Tim has a full Tutorial on his blog but I will just show a couple of the steps.  The first step is stamping and embossing the spider (I do not have Tim's).  Tim's new texture paste is a dream to use....


I did not think I needed the new Distress Stain Sprays but since using them, I just know I will NEED more...... it is so easy to get good coverage.


I do not have the pumpkin stamp but I love the witches hat from the new Halloween Blueprints 3 set, I stamped them onto Ranger Watercolour paper and coloured them with Distress Stain.


All of the additional elements are similar to ones used by Tim.  I did not have the mini attachers that Tim used so I just made dots with a black Fude Ball pen onto the words Boo and Eek.

I always make a second tag for my lovely friend Ali and have just made a couple of tweaks.


Thanks for looking and I hope you will check back on Friday when a new challenge starts over at A Vintage Journey.  Take care.  Hugs, Anne xx

Tuesday 14 October 2014

A Haunted House....!

Before I show you the house I just wanted to say that as well as being on the DT for The Artists on the Block, I have now also joined Eileen Hull's Inspiration Team - I am so thrilled !!  Eileen is the fantastic designer behind Artist Trading Blocks which so many of have come to love.  It is awe inspiring to see the wonderful way people use these little blocks and create some astonishing little works of art!

My Haunted House was made for both The Artists on the Block and also Eileen's Art with Heart Inspiration Team.

Eileen is offering a fantastic prize for her latest Art with Heart Challenge - Tricks and Treats which you can find HERE.  The prize is one of Eileen's Scoreboard Artist Trading Block Dies!  That's one challenge not to be missed!!

On to the house now........ here it is finished.


Those who know me, know how much I adore Halloween in spite of the fact that it is not widely celebrated here in the UK, so having some of Tim Holtz's dies is a must for me.  I gathered all my elements together first.

Two of Eileen's large blocks and four of the medium size all cut from mat board and heavy card.  I cut some windows from an old Spellbinders die and cut the rest of my embellishments from Tim Holtz dies - the fence, the little people, and the border trim to cover up the joins.


before constructing the boxes I cut a few windows and doors and used some cut up blocks to create the roof line.  One of the larger blocks opens at the back of the house so that a tea light (battery operated) can sit inside to provide some spooky light.


At this point I got a little carried away with the construction and did not take photos.....  The house was painted with my new favourite - IndigoBlu's black Gesso (Gee-Sso Good), it gives the most wonderful matte finish and it has chalkboard like qualities.  I dipped my fingers into Picket Fence Distress Paint to give the black walls a distressed look.

The roof tiles were simply strips of grey pearlised card which again was distressed with Picket Fence DP.  The curtains are made from white gauze stained with Spiced Marmalade Spray Distress Stain,  If you have not tried the spray stains yet - please do, they are fabulous to use.


I made a wreath for the front door using Tim's tinsel and some string which was coloured with stain.  The tree was sprayed with Black Soot Spray Distress Stain, lightly coated with Ranger Multi Medium Matte and then dipped in Dusty Concord Distress Glitter, it has just the right amount of sparkle without being too 'in your face'.  Some florist moss was added in the garden.


The tree was created using one of Tim's embossing folders (I don't have the tree die yet), I embossed black card and fussy cut the tree out and added some Autumn Leaves from one of Tim's foliage strip dies.  I added a tombstone and a jolly pumpkin for added interest.


This is the best picture I could get to show how the house looks lit up!  I love the owl's eyes - very creepy!

I hope you like my Haunted House and feel inspired to create something for Eileen's Challenge - don't forget that great prize that is on offer!

This is my main Halloween piece for this year but I will also be bringing out my box from last year - for those who may have missed it..........


Can you see the same shaped house and also the tree?  I did this as part of a tutorial that the fabulous Richele Christensen did last year.

I would like to enter my Haunted House into Simon Says Stamp blog Monday Challenge where the challenge is 'O'.  My 'O' is October and owl for the owl in the tree...  there is a fabulous prize of $50 on offer for one lucky winner.

I am also linking up to the Sizzix Challenge - Halloween HERE as I used a number of Sizzix dies in my creation - Eileen Hull's Artist Trading Block dies, Tim Holtz Autumn Gatherings, Halloween Shadows, Vintage Lace and also the On the Fence On the Edge Die.  The fabulous prize is a selection of Tim's new releases!

Thanks for looking and I hope to see you again soon.  Take care.  Hugs, Anne xx

Sunday 12 October 2014

In Disguise at Inspiration Journal

This month at Inspiration Journal the challenge is 'In Disguise' - we would like you to use something in a way that is different from it's original intention.  This is a time to think outside the box....

The prize for one lucky winner is 50 Emporium Dollars to spend at Inspiration Emporium's on line store!  We would love to have you join us!  You don't have to make Halloween things, just use something in a way that is different...

I admit, it took me a little while to get the old grey cells thinking along the right lines but I have come up with two different projects to show you.

For my first project I took two plain dominoes from my stash and turned them into a little mini book:


Well, I just had to go with a Halloween theme, it is my favourite time of year after all!  The dominoes were coloured with Ranger alcohol inks in Sunset Orange and Rust.


The sides are made from Ranger Foil Tape sheets, embossed with a Texture Fade (Dot Matrix) and coloured with the same Alcohol Inks.


The inside was created using Ranger Speciality Paper coloured with Shabby Shutters and Spiced Marmalade Distress Inks and decorated with the fabulous Tim Holtz Halloween Shadows Decorative Strip Die.  A few Remnant Rubs were used to finish off.


More Remnant Rubs and an elastic cord with beads from my stash finish off the piece.

My second project uses a technique that I first saw Wendy Vecchi demonstrate way back when and Tim Holtz also uses and loves the technique, it is great fun.  It is one of my all time favourites.  I took a glass tumbler and turned it into a night light holder (I would not recommend using a real candle if you try this - but a battery operated one works just fine).


I covered the glass with Ranger Multi Medium in Matte and let this dry.  Then I coated it generously with Tim's fabulous Clear Rock Candy Distress Crackle Paint and once dry I coated the whole of the outside with Sunset Orange Alcohol Ink with a Distress Tool and felt.  I dribbled more here and there and I love how it seeps into all those wonderful cracks.

To finish off I used Tim's On the Edge Graveyard die, the die cut was covered in black embossing powder and a few pinches of gold embossing powder.  The witch is another Tim Holtz die - she is simply balanced on the side and can be removed easily.

I have two more projects 'In Disguise' to share with you this month but in the meantime I hope I have inspired you to think of making something a little different and join in our challenge over at Inspiration Journal, where there is a fabulous prize of $50 to spend at Inspiration Emporium,
waiting for one lucky person!!  If you want more inspiration, check out Inspiration Journal throughout the month where you will see some fantastic projects from my DT Sisters.


Don't forget too, if you do buy anything from Inspiration Emporium please use my code Redanne for a 10% discount on your whole purchase.  Shipping costs are very reasonable at $5 for USA and $10 for the Europe.

As always, thanks for looking, I look forward to seeing you again soon.  Hugs, Anne xx


Products Used from Inspiration Emporium, with links

Ranger Speciality Stamping Paper
Ranger Foil Tape Sheets
Ranger Alcohol Inks
Tim Holtz Halloween Strip Die - Halloween Shadows
Tim Holtz Bigz Dies - Witch
Tim Holtz On the Edge Dies - Graveyard
Distress Inks
Ranger Multi Medium Matte
Ranger Clear Rock Candy Distress Crackle Paint


Friday 10 October 2014

CC3C #12 - Distress Photo Tinting

A quick post - I am getting this in by the seat of my pants!  The Compendium of Curiosities 3 Challenge this time is to use the Tim Holtz Distress Photo Tinting Technique which can be found on Page 41 of Tim's CC3 book.  If you do not have your copy yet, you can get a signed copy from Tim HERE.  Linda Ledbetter and her Curiosity Crew have come up with some fantastic inspiration on the theme.

This is an even numbered challenge and that means the Sponsor this time is the lovely Linda Coughlin of the Funkie Junkie and Linda is offering one lucky winner a $25 voucher to spend in her on line store.

Tim and Mario have also generously donated a large prize of Tim goodies for one person chosen by the Curiosity Crew, as their favourite.

My lovely paternal Grandparents lived their whole lives in Aberdeen, Scotland and apart from wartime they had never travelled outside of Scotland.  In 1960 they won a large sum of money on the Pools, which allowed them to visit their youngest Son who lived in England (shown in the photo with is beautiful wife) and their eldest Son, my Dad who lived in Canada.  I decided use my favourite photo of them on their travels.....


....to make this scrapbook page, using Tim's Distress Photo Tinting Technique.  Grandad always worn a dark brown cloth cap, no matter what he wore - and yes, he always had a cigarette stuck to his bottom lip too...  The stamping on the photo below says ' it's all perspective '


A close up of the tinted photo, I cannot give you details of how I achieved this, as it would not be fair on Tim.


The page relates to their trip from Scotland to Canada, you may just be able to see the map of the UK and North America.


This image shows ephemera that they might have collected along the way.


To create the page I used Kraft cardstock, burlap, lots of Tim's Ephemera, a die cut postage stamp frame coated with Clear Rock Candy Distress Paint), die cut leaves to represent early Autumn in Canada, an Idea-ology metal word frame (capture life's moments) and lots of Remnant Rubs.  The map backing page is from Tim's Collage paper pad.

Thanks for looking, my apologies if I have not got round to visiting you this last week or so, I have just been a little under the weather.  Take care and I hope to see you soon.  Hugs, Anne xx


Related Posts Plugin for WordPress, Blogger...

Labels