Pinterest

Tuesday, 24 October 2017

Something Wicked Comes Your Way .....

Hello Friends

In between DT work and a few commissions I found a little time to create another Halloween project.  I was totally inspired by Jan Hobbins Owl lightbox HERE - it is amazing!

I got a bit wrapped up in the making that I didn't take many process photos.
I used the smallest of Tim Holtz Etcetera tags for my base,  I added a 1" edge to create a 'box' shape.  The inside 'base' was covered with one of Tim's self adhesive glitter sheets in orange.
Tim's new Owl die was die cut from a large sheet of heavy white card.  The owl was then coloured with Black Soot Distress Ink and then I applied Emerald Creek Midnight Black Embossing Powder and heat set it.
The leftover white card (which now has an owl shaped aperture) was coloured with Wilted Violet and Spiced Marmalade Distress Oxide.  I wanted the background behind the owl to appear as though the moon was shining behind him.  Once coloured, the owl was glued back into the aperture.
The word 'Wicked' was cut once from a black self adhesive sheet and backed with orange card.  The Idea-ology spider was coloured with Distress Embossing Powder in Spiced Marmalade.  The words are chit chat stickers and the cobwebs were cut from Tim's new cobweb die. I added some die cut leaves to the branch to add some autumn colour.
I added some lights into the 1" recess and here they are lit up - this was before I added the extra words, stars and the spider.

Thanks so much for your visit, I will see you again soon I hope!

Hugs, Anne xx

Wednesday, 18 October 2017

Fall-i-days with Eileen Hull

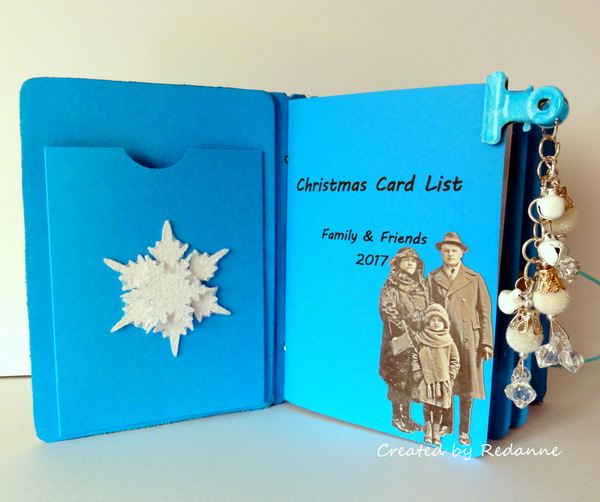
This month Eileen Hull's Inspiration Team are celebrating Fall-i-days or any other holiday we like!  I chose to make a Christmas Planner, or as I have called it - Christmas Lists!
I have been enjoying making real leather journals and this turquoise is my favourite  colour.  
These journals are such a handy size to fit in a handbag/purse and I will be able to change the inserts year after year.
I used Eileen Hull's Passport Journal die (Sizzix 660331) and cut my leather pieces.
I used a strong leather glue to put the pieces of the journal together.
I cut further pieces from card to line the inside of the journal and glued these in place.
I made a small envelope to fit the inside back cover of the journal.  It is similar to the one I created here, I just changed the dimensions to fit the smaller journal.
I used the die to cut my insert covers.
I printed off some 'lists' paper from Ray Blake's website HERE.  I did have to cut them to size to fit my covers.
I used minimal decoration, a Tim Holtz snowflake and some paper dolls.
More paper dolls.  The clip at the side was made from bits and bobs from my stash.
I added a third list booklet, isn't that little boy just adorable!
To finish off I added a Tim Holtz metal frame, coloured with white embossing powder.  The handwritten label was coated with Glossy Accents.

All month long my teamies will be making and sharing their Fall-i-day makes over on Eileen's blog, if you do have time please do visit, you will not be disappointed!

Thanks so much for your visit, I hope to see you again soon.

Hugs, Anne xx

Saturday, 14 October 2017

Mini Album Makers - Handbag Charm Album

It is my turn over at Mini Album Makers to do a little tutorial on how to create an album.  I have chosen to share a mini Handbag Charm Album.

Each year my good friend Margie and I meet up for one crafty day, to share ideas and techniques.  This year Margie kindly showed me how to create one  these little albums and I have been somewhat hooked ever since.  They do make great little stocking fillers for Christmas and they are really fun and easy to create!

Here is a little peek at some of the mini Albums that I have made.  If you would like to see how, please visit Mini Album Makers HERE.

Thanks so much!  Hugs, Anne xxx

Monday, 9 October 2017

Destination Inspiration at A Vintage journey

It is my turn to share a Destination Inspiration Post at A Vintage Journey this month.

Here is a little sneak peek of part of my project:


If you have time I do hope you will visit  A Vintage Journey  to see the whole project!

Thanks for your visit, hope to see you again soon.

Hugs, Anne xx

Friday, 6 October 2017

Crazy for Autumn Colour at A Vintage Journey


This month at A Vintage Journey, the talented Jennie is our host and her choice of topic is 
Crazy for Autumn Colour!

Here is what Jennie had to say:  'Choose a bold, colourful, autumn palette this month for your vintage, shabby, mixed media, art journalling, industrial, timeworn or steampunk project.  Let's see those autumn colours in all their glory.'

Autumn is my favourite time of year, with all the glorious autumn colours and since we just had the Harvest moon, I chose to make a harvest inspired project.
I used an 8" x 8" canvas, my Tim Holtz large pumpkin die along with Tim's Fall Foliage Thinlits die set for the leaves.  The acorns are from Tim's Mini Acorn and Pumpkins die set.
To create the faux wood background I used a tutorial by Jenny Marples which you can find HERE.  I omitted the alcohol ink layer that Jenny used and substituted a little Distress Glaze.  I used a sheet of 12" x 12" white card as my base.
The canvas was covered with the faux wood and given a coat of Indigo Blu Slap it On which acts as a sealer.  The word thankful was cut using a Tim Holtz Thinlits set of dies.
I die cut two pumpkins. cut one down and layered it on top of the first one to give some dimension.  The pumpkin itself was coloured with Carved Pumpkin Distress Paint, given a good coat of Distress Crackle Paint in Clear Rock Candy.  Once dry I rubbed over a watered down layer of Walnut Stain Distress Paint and used undiluted paint around the edges.
The acorns were die cut 8 times, the caps cut off 4 of the acorns and these were coloured with Distress Paint and overstamped.  The acorns were given a coat of Glossy Accents and when dry I layered up the extra caps to give them a little dimension.
Finally, I die cut lots of leaves and coloured them with a mix of Distress Oxide Inks and Distress Inks in lovely autumnal colours.  The pumpkin and leaves were layered up onto a rough piece of corrugated cardstock.

To finish off I added some tendrils made from paper covered wire.

Our wonderful sponsor this month is Calico Craft Parts who are providing an autumnal bundle of Wood and MDF products to one randomly chosen winner!


 I do hope you have the time to hope over to A Vintage Journey to see the beautiful creations that my Teamies have made.  It would be lovely too, if you would join in Jennie's lovely autumnal challenge.

Thanks so much for your visit, I will be back on Monday with the first Destination Inspiration Post of the month of October... hope you have a great weekend and find some crafty time!

Hugs, Anne xx

Sunday, 1 October 2017

Mini Album Makers October Challenge

Hello Friends

It is time for a new challenge at Mini Album Makers, we had such a fantastic response to our very first challenge, it was a joy to see so many beautiful entries - thanks so much!

This month at Mini Album Makers and as always, the challenge is to create any form of (completed) handmade book, including mini albums, scrapbooks, journals and other book arts.

Recently, I  got my hands on some of the new Halloween range by Tim Holtz and could not wait to create a spooky mini album (using Eileen Hull's Passport die - Sizzix 660331).

I have lots of photos to share with you so I have condensed some into collage form.
1. Die cut the Journal, use Distress Oxide to colour the front and inside of the covers.
2. Die cut the signatures using Tim Holtz Halloween Paper (cut 2 for each signature).
3. Stamp the Journal covers with Tim Holtz Webs & Damask stamp set.
4.  Die cut all the elements you want to use on the cover and insides.
Join the front and back to the spine and set aside.
Add some pockets to the inside cover of the album.
And now for the fun, to create the inside signatures!  I created three signatures, each with two page sets and covered them with Tim's new Halloween papers, along with die cuts old and new.  The pockets were all created with paper left over from cutting the pages.
A couple more of the pages, I love the witch and cobweb!  I attached the signatures in pairs, with black elastic and threaded an Idea-ology charm and word band to the side of the Journal.  To finish off I made a hanging charm using Tim's Idea-ology.  I also used Remnant Rubs and die cuts to complete the front and back covers.

I just love the way my mini Journal turned out and hope that it inspires you to join in the fun at Mini Album Makers this month!

Our very generous Sponsor this month is Gypsy Soul who will be offering a fabulous Laser Cut Prize Pack to one lucky randomly chosen winner!  Thank you Gypsy Soul!


I am entering this Journal in my dear friend Darnell's NBUS Challenge #12 here.  The Raven, Cobweb, Idea-ology and some of the Tim Holtz papers are all NBUS!

Thanks so much for your visit!

Hugs, Anne xx
Related Posts Plugin for WordPress, Blogger...

Labels