Pinterest

Friday, 29 July 2016

Tag Friday at A Vintage Journey

Hello!

As there are five Fridays in July, it is time for another Tag Friday over at A Vintage Journey!

I do not do monochromatic very often but I had this beautiful seahorse left over from
another project so he was my starting point.  I used lots of other Tim Holtz items
to make the tag, you can see what my teamies have made here.

 I used Tim's Stripes Stencil and Peacock Feathers Distress Ink to create my background. 
The seahorse was coloured with Salty Ocean Distress Stain and given a good coat of 
Clear Rock Candy Distress Paint.
 The leaves were cut and painted with Clear Rock Candy Distress Paint.  I added some burlap, painted with Picket Fence Distress Paint and finished off with a word band and 
some dyed seam binding.

Our current challenge, Monochromatic still has a few days to run at A Vintage Journey, I hope you will join us there, we have a $25 voucher from The Funkie Junkie for one lucky winner!

As always, thanks for looking!  Hope to see you soon.

Hugs, Anne xx

Edited - some of my post just disappeared for a while, but seems to be back now - my apologies if you do not see the whole post!

Friday, 22 July 2016

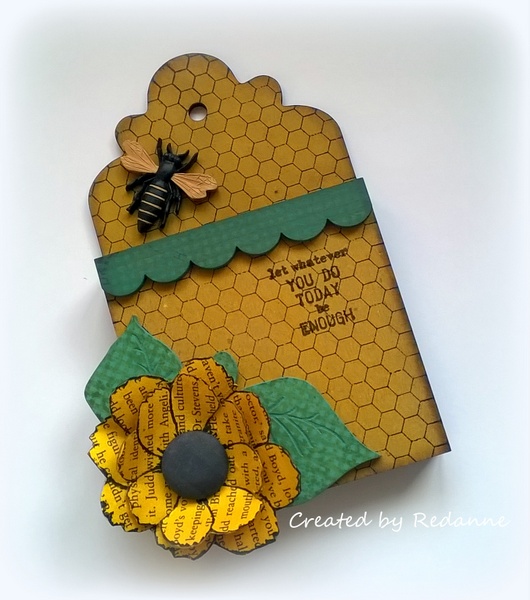
Blossoms and Bookpages

Hello!

This month at Creative Carte Blanche the lovely Hels has chosen the theme of 
Blossoms and Bookpages.  The CCB team have made some stunning creations,
it is definitely worth a look!

I have been saving hoarding Wendy Vecchi's Art Parts for several years now and as some of
my friends know, I don't like opening new packets, I just like to save them to look at - BUT, I 
opened the 'Create a Container' package to make my piece.

To create the background I painted the parts with Scattered Straw Distress Paint.
I used Wendy's Art for You background stamp for the back and front piece.  The trim and
leaves were painted with Lucky Clover Distress Paint and then over-stamped with Wendy's 
Nature's Art background stamp.  I assembled the pieces of the container.
To create the book page background, I ripped up a few pages from an old book and used
Glue 'n' seal to glue the pages to a piece of Wendy's Clearly for Art (clear).  I stamped
Wendy's Art Works flowers using Ranger Black Archival ink.  
The flowers were cut out and sprayed with Scattered Straw Distress Spray Stain and heated
with a heat gun to shape them.  The button brad centre was coloured with Ground
Espresso Distress Spray Stain.
The sentiment is from Wendy's Art and You stamp set, stamped in black Archival ink and
embossed with clear embossing powder.

I added the bee at the top - one of Wendy's Blossom Bucket Range.

I really enjoyed making this, I think I may just have to crack open a few other
Art Part packages and use them now!


Edited:  I have just noticed that the Funkie Junkie Boutique is offering an extra discount
of 15% off Wendy Vecchi stamps, in their Friday Focus this week.  Linda's prices are always
discounted anyway, so this makes buying Wendy's stamps even better!

As always, thanks for looking!

Hugs, Anne xx


Tuesday, 19 July 2016

Tim Tag July 2016

Hello!

Just a quick post today, to share my Tim tag for July.  You can see Tim's original HERE.
For the July Technique Remix Tim is using Watercolour Resist from July 2015
and Layered Words from April 2015.

I won't describe the techniques as Tim does that much better!
I used my Tim Holtz ruler to add the stitch holes and I used a fine pen to 
create faux stitching.

To finish off I added one of Tim's Idea-ology pieces and some vintage ribbon.

Thanks, as always for looking, hope to see you again soon.

Hugs, Anne xx

Saturday, 16 July 2016

Tim Holtz Surf Shack / Beach Hut

Hello!

I have not made a project just for fun, for a while, so this project is just for fun, just for me!
I love the sea and have always wanted a real beach hut, but I think this is the closest I will get.

I was not able to find the Village Surf Shack die to go with my Village Dwelling die, but 
my lovely friend Julia offered to send me some - to say I was thrilled is an understatement!
For my first project I created a very 'British' looking beach hut rather than a surf shack.
I hope you like it!
I started with the Village Dwelling die, Tim's Textured Surfaces (corrugated card) and a set of 
the Surf Shack die cuts.
First I die cut and built the Village Dwelling from thick cardstock.  I also covered the door
step with some bamboo sticks to give the appearance of boarding.
I cut a set of house walls from the corrugated card.   The beauty of Tim's Textured Surfaces
is that they are adhesive backed.  I painted the corrugated ridges in Broken China and Picket
Fence Distress Paint.  The window frames were painted in Picket Fence.
I attached the blue and white card to the house and painted the inside of the house in Broken
China.  I assembled the palm tree, the surf board, the step and the safety ring  and then painted
them with Distress Paint.
The roof was covered with Hessian from Tim's Textured Surfaces, adhesive backed again!
I covered some mount board with coarse texture paste and coloured this with a mix of 
Antique Linen and Vintage Photo Distress Paint to resemble sand. I placed all the
pieces in position and voila - a little beach hut diorama! 
A view from the left side, I attached some faux fishing net.
A view from the back...
A view from the right side... I added a few tiny shells on and around the porch.

I do like the 'clean cut' look of the beach hut, it could be typical of a British beach hut,
with the exception of the palm tree!  Now I want to make a proper Surf Shack, so watch
this space....

Thanks so much for looking, I hope to see you again soon.

Hugs, Anne xx

Tuesday, 12 July 2016

Sizzix Party Decor Ideas

Hello Everyone!

Summer is in full swing and backyard BBQ's and bashes are our thing this month over at
Eileen Hull's place!  For the month of July the Inspiration Team will be sharing their creative
 ideas for Sizzix Party Decor.  You will find ideas for storage, centre pieces and much more,
that you can create with your favourite Sizzix dies!  Let's get this Sizzix party started!

Having said that, here in the UK, parties are likely to be indoors due to our constant
rain (well here in the north at any rate) so I have created a cutlery holder to make
my party table look a little prettier...

I want to show you how versatile Eileen's dies can be!
I used Eileen's Sizzix Box with Scallop Flap (656546) die for the case and Eileen's  
Sizzix Heart & Soul Flower die (661108) to decorate the holder.
I used Eileen's beautiful Honeycomb Embossing Folder (Sizzix 661447) to create
a pattern on my mat board die cut.
I painted the die cut with Tim Holtz Distress Paint in Scattered Straw.

To create some interest, I dry brushed the folder with some Tim Holtz Distress Paint
 in Vintage Photo.
After die cutting the flower, I painted the pieces with Distress Paint in Squeezed
Lemonade and then spritzed them with Abandoned Coral Distress Spray Stain.  This
gives a lovely mottled look to the petals.
I coloured some vintage seam binding with Ground Espresso Distress Stain.
A view of the folder before adding the cutlery and napkin.
A close up of the flower, which I finished off with a large fabric brad, also coloured
with Ground Espresso Distress Stain.

I hope that has given you a quick and easy idea to decorate your party table.  You can
see some more inspiration over at Eileen's blog HERE where my lovely team mates
Tracy Evans and Pam Bray are sharing some ideas too.

As always, thanks so much for looking, I really appreciate your visit!  Hope to
see you again soon.

Hugs, Anne xx

Tuesday, 5 July 2016

Summertime Fun at Anything But Cute

Hello Friends!

It is my turn to host the challenge theme at Anything But Cute and I have chosen 'Summertime Fun' !  What does Summertime fun mean to you?  Spending time by the seaside, foreign travel,
camping in the great outdoors or simply enjoying time in your garden.  Create a MIXED
MEDIA project focusing on how you like to spend your Summertime.  Don't forget
to tell us how your project relates to the theme!

Here is my project....


Those who know me, know how much I love the seaside and anything to do with the sea.  My
dream has always been to own a beach hut, so it seemed natural to create my ideal beach scene....


I gathered together the items I wanted to use.
I used:  Tim Holtz Vignette Box - Medium
DecoArt Media Crackle Paint
DecoArt Media Texture Paste
PaperArtsy Beach Hut stamp
DecoArt Media Fluid Paint (Pyrole Red, Phthalo Blue, Primary Cyan, Cobalt Teal Hue,
and Titanium White)
Tim Holtz Letterpress letters
Extras:  card, chit chat stickers, Embossing Powder, wire mesh, kebab sticks,
hand drawn seagulls

I painted the box with a mix of Cobalt Teal Hue and Titanium White.  I did not apply
any base coat.
Once dry I applied a coat of Crackle Paint to the outside of the box and when
dry, a thin coat to three of the sides on the inner part.
DecoArt Crackle Paint dries quickly, this was the outside of the box before I even 
started on the inside.

The beach hut was cut out several times and layered up to give it some dimension.  It was painted  with a mix of Primary Cyan,Titanium White and Distress Markers.  The lifebuoy ring
 was cut with two hole punches and painted in Pyrole Red, as was the heart for the door.
The bunting was painted with Phthalo Blue and Pyrole Red.

The 'net' is a piece of wire jewellery net which I coated with Gesso.
The letterpress was coloured in a mix of Phthalo Blue and Titanium White.  I splattered some white paint on the inside of the box.

The box was a little unsteady on the letterpress alone so I added some bingo chips
to the back to steady it all.
The 'sand' was made with a mix of light coloured embossing powders, set into a base
of Texture Paste.   The surf board was hand, painted and coated with Crackle Accents.  

The board walk is made from kebab sticks and glued in place with Glossy Accents.  The words 
are Tim's Chitchat stickers.

I added a couple of hand drawn seagulls, painted with Distress Markers.

So, what do you like to do in the summer?  I hope you will join us this month at
Anything But Cute with a mixed media project.  In the meantime I hope you can find the
time to pop over there to see what my talented team mates have made.

I would like to enter my project into the following challenges:
Simon Says Monday Challenge - Red White and/or Blue
Craft Stamper - Anything Goes
Southern Ridge Trading Co - Anything Summer

As always, thanks so much for looking and even bigger thanks if you leave me
a comment, I do love to read them!

Take care.  Hugs,  Anne xxx

Friday, 1 July 2016

Monochromatic for A Vintage Journey

Hello Everyone!

It is time for a new challenge at A Vintage Journey and this month the talented Tracy has
chosen Monochromatic as her theme.

In Tracy's own words 'I love monochromatic themes in artwork, I love the balanced look
it gives to a design.  If you ever struggle with knowing what colours to use, this should
be right up your street - one colour alone or hues of one colour (plus black and/or white) - simple!

Our sponsor this month is the Funkie Junkie who have a $25 gift voucher for one
lucky person!

Monochromatic is not something I do very often, as I usually love to use lots of colour. I have been wanting to ink up my Tim Holtz Sideshow set of stamps, so I created a trio of simple black and white cards with just a touch of red on each.  

I just love how dramatic the black and white look!
I gathered the items I wanted to use - Tim Holtz Sideshow stamps, Tim's Torn Notebook die,
and Tim's Thinlits - Handwritten Celebrate and Love sets.
I am not going to take you through step by step, I think you can see how I used the items.
The images were stamped in Ranger Black Archival Ink.
I think this one might just be my favourite... I love that wheel...
On each of the cards, the red was done in Festive Berries Distress Ink Marker Pen
and highlighted with Glossy Accents, fussy cut from a separate
sheet of card and then attached.

I hope you like my set of fairly clean and simple cards - they were incredibly
easy to do, all completed in under an hour.  I think they will be useful for
lots of different occasions.

Thanks so much for looking, I hope you will check out what my teammates have done
over at A Vintage Journey - you won't be disappointed!

I hope to see you again soon.  Hugs, Anne xx


Related Posts Plugin for WordPress, Blogger...

Labels