Pinterest

Friday, 18 December 2015

Tim Tag December 2015

Hello Everyone

Just a quickie from me this time, to share my Tim Tag for December.  You can see Tim's original HERE.

I have to say a huge thank you to Tim and Mario for choosing me as a winner for November!  I have been doing these tags for a good few years now and I am always so excited when I win, it's  like winning the lottery....

My December tag pretty much follows Tim except I used the 'Holiday Knit' stencil for my background.
I do not have the punches that Tim used so I improvised and used the thinlit dies to create my wreath.  I did have the cute little jingle bells though - I love them!
I had to improvise with the sewing too, my little sewing machine would not go through the sticky backing on the burlap, so I did a bit of hand stitching.
To finish off I used the largest of the stars which I stained with alcohol ink.

Thanks for looking, I hope to see you again soon.

My Christmas starts today with family coming to visit, so I apologise if I have not or do not get to visit you over the next few days.  If I do not get the chance again, I hope you and your families have a wonderful Christmas and I wish you all the very best for 2016.

Hugs, Anne xx

Sunday, 13 December 2015

Secret Santa at A Vintage Journey

Hello Everyone

We decided to have a Secret Santa again this year at A Vintage Journey, it was such fun last year and who doesn't like to get a lovely surprise at Christmas?!

I was so lucky to receive my gift from my lovely friend and talented teamie, Julia of Create With Me.  Julia made me a mini book which is gorgeous and a beautifully decorated box (one of Eileen Hull's Artist Trading Block dies) to keep it in!  I absolutely love it.

The little book is adorable and is packed with Tim Holtz goodness!  How clever and thoughtful of Julia to combine two of my favourite Designers, Tim Holtz and Eileen Hull too!
I cannot believe how much Julia packed into this beautiful little book, I will treasure it always and it will take pride of place amongst my Christmas decorations!  Thank you so much Julia!

The recipient for my gift is my wonderful teamie Nikki of Addicted to Art.  I wanted to make something for Nikki that was a little different to my usual papercraft projects.  As I have a lovely stash of Tim Holtz fabric and I saw a pattern in a magazine, I knew I wanted to make one of these make up purses for Nikki as her Secret Santa gift.  I really enjoyed doing some sewing again and thanks to Nikki, I will be doing a lot more! I am pleased to say that Nikki loved her gift, I hope you will too!

This is my favourite of all of Tim's Eclectic Element fabrics, it is wonderful quality and so easy to use, either for hand or machine sewing.  I used a bit of each to make this purse.

The clasp at the top is sewn on by hand with a linen thread in a coordinating colour and using a back stitch.  This was the trickiest part but I was not keen to glue the fabric in place.
I lined the inside with some soft cream fabric that had a thin batting already fused to it, which saved me from trying to sew through three layers of fabric.  I also lined around the inside with some gorgeous lace to hide the hand stitching around the top.  There is a way to do it without the stitches showing but I have not mastered that technique yet.

To finish off I added a couple of Idea-ology typed tokens, hanging from one of Tim's Idea-ology swivel clasps.

Christmas really is THE most wonderful time of year, a time for sharing with family and friends, I have really enjoyed doing Secret Santa again with my teamies at A Vintage Journey and I hope you have enjoyed seeing our gifts.

It would be lovely to see you join in our current 'Vintage Christmas' challenge, details of which you can find HERE.

As always, thanks for looking, I hope to see you again soon.

Hugs, Anne xx

Tuesday, 8 December 2015

Art With Heart - Favourite Things

Hello Friends

Our theme for this month's challenge at Art With Heart is 'Favourite Things'.  The Inspiration Team are sharing their favourite things all this month and we would love to have you play along!  It really is an anything goes challenge - just share your favourite things, whether it be a die, paint, colour or project - how easy is that!  Please do join us....

The biggest problem I had was trying to decide what my favourite thing is.... in the end I settled for Eileen Hull's fabulous new Cantilever Sewing Box.  I just love doing 3D projects and this sewing box goes together like a dream, it is such a useful box too - ideal as a real sewing container or as a gift box, or a jewelry box, like the one I made here.

I recently attended an Andy Skinner class (with some of my lovely blog friends) and I wanted to do  this box using one of the techniques we learned in class, to give the box a vintage feel.
I won't go into a lot of detail about the construction because I showed that in my previous sewing box post, but I will show you how I covered this one.
Once I had painted the whole piece I decided I would rather cover it in paper, than leave it as it was.  However the coat of DecoArt Americana Decor paints gave me a good strong base.
I used several sheets of thin card, first coating each with DecoArt Media Gesso and letting them dry.
Next was a thin coat of Cobalt Teal Hue DecoArt Media Fluid paint.
Once dry I covered it with DecoArt Weathered Wood Crackle Medium and let this dry before applying a thin coat of DecoArt Titanium White Media Fluid.

Once dry (it dries very quickly) I applied a coat of thinned down DecoArt Quinacridone Gold to give it an aged look.

I cut the sheets into strips and applied them to the base sewing box and to the struts before attaching these to the box.

I lined each of the boxes with some co-ordinating paper (Maja Design) and used a couple of Tim Holtz hitch fasteners on each of the box lids.
The flower is a Tim Holtz die - Tattered Poinsettia.  I spritzed the petals with Antique Linen Distress Spray Stain.  I added some Tim Holtz greenery and covered the central bauble with the fabulous Tim Holtz Vintage Platinum Distress Glitter Dust.
I did not want the box to just be for Christmas so I attached some sticky back velcro to the box and to the flower so that it can easily be removed.

Here is another look at the finished box.  I have got my fingers crossed that the recipient likes it!  I hope you will join in our challenge at Art With Heart, HERE.

Thanks, as always, for looking and I really appreciate any comment you leave, I hope to catch up with you shortly.  Hugs, Anne xx

Monday, 7 December 2015

Destination Inspiration - December - A Vintage Journey

Hello Everyone

Over at A Vintage Journey it is my turn to share our first Destination Inspiration post for December and this month we have some interesting things in our travel bag.

The technique we are using this month is Extreme Masking as found in Tim Holtz's Compendium of Curiosities I, page 61.


I do hope you will pop over to A Vintage Journey to take a peek at what I made with the technique and the other required elements in the travel bag.....

Thanks so much!  Hugs, Anne xx

Saturday, 5 December 2015

You've Got Happy Mail !

Hello Everyone

It is time for a new challenge at Anything But Cute and our host this month is the wonderful Niki of Pawsitively Creative Crafts. The theme is 'You've Got Happy Mail' and Niki says she would love to see some mixed media Christmas cards, ATCs or whatever papercrafts you are mailing to a friend, inspired by the Spirit of Christmas.


I love giving and receiving cards from friends and family, especially those we do not see as often as we would like.  For me the Spirit of Christmas is all about family and friends and less about gifts. I love non traditional colours for Christmas and blue and white are my all time favourites.

(Apologies for the darkness of my photos, the light here is so poor at the moment)
     
I was inspired by Niki's wonderful challenge to make this card for a special person in my life.  I used lots of crackle, texture paste and a hint of sparkle to create my 'Happy Mail' card.
I took a piece of heavily patterned paper (this is a great way to use up patterned paper that you may not like) and I painted the whole piece with a mix of DecoArt paints in Primary Cyan and Titanium White.  The paints are pigment rich and you only need a small amount of the dark blue to create a beautiful soft blue.
Once the paint had dried (it only takes moments) I gave the whole piece a coat of  DecoArt Weathered Wood Crackle Medium.  I applied it quite thickly with an old credit card.  If you are in a hurry, use a thin coat, but I wanted quite large crackles.  I left this overnight to dry thoroughly.
The next day I applied a thin coat of the Primary Cyan and Titanium mix again and then some beautiful crackles appeared.  I took a small paint brush and dipped it into a watery mix and also some plain white and flicked these over the entire piece, to create a kind of snow effect.
To create the frame I applied some coarse modelling paste (purchased from Indigo Blu) to a Tim Holtz die cut frame and left it to dry.  It is an amazing texture paste that dries to a beautiful white finish, it would be wonderful to create snow effects.  It is the same paste that I used for my church project (if you missed it and want to see it you can find it HERE, it was my first DT piece for Anything But Cute).
The Poinsettia and leaf embellishments are Tim Holtz dies, the Poinsettia was cut from some blue patterned paper from my stash.  I added some Stampendous Shabby Blue and Shabby White Embossing Powders for added texture.
To create the silver ball in the middle I coated a plain silver bauble with Cosmic Shimmer dries clear glue and dipped the whole thing into some Stampendous Silver crushed glass glitter.
The sentiment is a Tim Holtz stamp which was stamped with Wendy Vecchi's Cornflower Blue Archival Ink.

To finish off I added some white baubles, gauze, some dyed vintage seam binding and a few pearls from my stash.  I also used some beautiful Maja Design paper to mat onto my card before adding my crackled layer.

I hope you like my card and that you feel inspired to join in with us at Anything But Cute, we would love to see what you have created for a friend.  I hope you will pop over to see what my talented teamies have created for your inspiration too.

 Thanks so much for looking, I hope to see you again soon.

I have, rather belatedly realised I could enter this into Craft Stamper's latest challenge - Take a Technique, Sharing the Season - details can be found HERE.

Hugs, Anne xxx

Friday, 27 November 2015

Tim Tag November 2015

Hello Everyone!

Apologies, I have been missing for a wee while - nothing serious, just a few technical issues which, fingers crossed, have been resolved now. Apologies if I owe you a visit!

You can see Tim's tag HERE, as usual I did not have many of the things he used so I had to improvise.  I ended up doing two tags and I could not decide which I liked best, so I will show you both!

I used the Acorn Blueprint stamp and the background was created using the Dots Stamp from the Dots and Florals set.
I followed Tim's instructions using Picket Fence Distress Paint, followed by Distress Spray Stains in Rusty Hinge and Antique Linen.
The acorn has been coloured with Distress Inks and the edges of the tag were finished off with Ranger Foil Sheets (Vintage set).  You can see a little of the shine in the above photo, I love these foil sheets, they do give a lovely vintage feel.

Now for my second tag:
I tried an experiment with the fabulous new Lucky Clover and Ground Espresso Distress Spray Stains, I was not sure at first about the combination but when it dried I just loved it!
I also wanted to try out Tim's technique where he creates his own colour of ink pad, but unfortunately I don't have the clear base ink pad so I spread a lot of different autumn colours onto my glass mat, spritzed with water and dragged my Ranger Watercolour card through it.  Not as good a Tim's but I did like the result.  I stamped and cut out my maple leaf from one of the pieces.
I really like the colour of the leaf against the background...

Thanks for looking, I hope to see you again soon.

Hugs, Anne xxx


Tuesday, 17 November 2015

A Stitch in Time

Hello Everyone!

It seems ages since I blogged but I had a few days away.  I am here to share my Inspiration Team piece for Eileen Hull's Art With Heart Challenge - A Stitch in Time.  Do come and join in the fun!

Eileen has designed a fabulous new range of sewing themed dies which are either in the stores now or will be coming very soon!  This week I chose to use the Cantilever Sewing Box die and next week I will be sharing projects made the new Stitchlits border and flower dies.  The sewing box is SO clever, just like the one your Mum or Grandma used to have, only in miniature!

This is a picture heavy post so I have kept the words to a minimum.
Using the die I cut out all the pieces and looked at the brief instructions.
Since I intended to cover my box with paper I attached strong red liner tape all around each box and painted the bottom and edges with Tim Holtz Aged Mahogany Distress Paint.
I chose the fabulous new Graphic 45 Christmas Carol papers to cover the box.
With the boxes covered, I painted the struts with DecoArt Media Fluid paint in Titan Buff.
I used some metal brads from my stash (the colour matched too!!) for the struts, and two knobs by Wendy Vecchi's Blossom Bucket range on the top.
At this point I decided to make it a jewelry box and lined each compartment with more of the papers and then some black felt.  Two of the compartments were fitted with concertina folded felt to create places for rings and earrings.
To decorate the top I cut a Tim Holtz Poinsettia, partly from G45 paper and partly from canvas fabric which was backed with Wendy Vecchi's Clearly For Art so that I could shape the flower and it would stay in place.  The greenery is from more Tim Holtz dies and the pearly embellishments are by Anna Marie Designs
Here is a close up of the finished top.  I also painted the stars on the little knobs.
One final look at the completed box.  The finished set measures 6.1/4" x 2.1/4" approx.
(16 cm x 7 cm approx) - perfect as a little jewelry box or for several small gifts.
I do hope you like it!  I can see myself making a few of these to put small Christmas gifts in, they would be brilliant for Valentine gifts too, but I also think they would make wonderful mini sewing boxes to keep all your sewing bits and bobs in.  They go together incredibly easily too.

So do please come an join us at Art With Heart in our A Stitch in Time Challenge HERE, where you could win one of Eileen's fabulous new dies!  At the moment you stand a very good chance of winning - just saying.....!

Thanks so much for looking, I hope to see you again soon.  Hugs, Anne xx

Thursday, 5 November 2015

It's Ornamental - Anything But Cute Mixed Media Challenge #7

Hello Everyone

I would like to say a huge thank you for all the amazing good wishes I received here, on the Anything But Cute blog and on social media, I was completely blow away - thank you!

This is my first post for Anything But Cute Mixed Media Challenge where the lovely Cec (CW Card Creations) is our hostess for this month.  Cec has chosen 'It's Ornamental' as her challenge theme.  Here is what Cec has to say:

'Since the holiday will be coming up pretty quickly, we want you to create a mixed media
ornament for your Christmas tree or a Christmas decor item for your home or table'


I love to make home decor pieces for Christmas so this challenge theme was just perfect for me!  I recently purchased one of the Tim Holtz Bigz XL 'house' dies (Village Dwelling), along with the additional die that allows the house to be made into a church or chapel and so, with Cec's wonderful theme, I felt inspired to create this piece of Christmas home decor:


As well as the Tim Holtz house and accessory dies, I also used Tim's beautiful sleigh and reindeer dies and some of his Idea-ology trees.

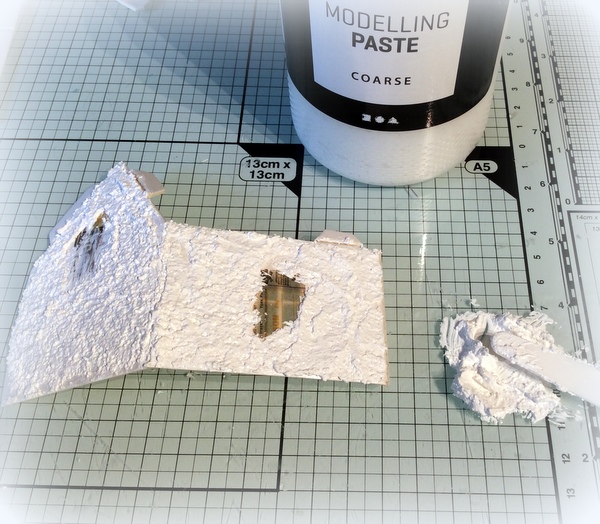
I started by die cutting the pieces from mount board/mat board, but you could also use chipboard.  I laid them out and taped over the windows and door so that there would be room for the window frames and door, once I covered the building with modelling paste.  I cut another door and all the window frames from black card to give a contrast.
I chose to use a coarse modelling paste that I purchased from Indigo Blu, it is a fantastic paste that is really gritty and it dries beautifully white.  When I had covered the first part, I decided to glue the whole piece together before finishing off - as you will see in the next photo.
For the bell tower part, I assembled the tower before coating it with the modelling paste (I learned from my previous mistake on the house...), leaving a little gap around the top for the roof to fit on.  I was inspired by a programme about Patagonia that featured a tiny chapel that had rough white walls.
To create the roof, I hand cut some grey card into tiny little tiles and I glued each of the tiles in place.  I wanted it to look slightly worn so I placed the tiles in a slightly random way as you can see here.
Once finished, I added a 'ridge' tile to finish off the top.  I added an Idea-ology knob to the top of the bell tower.  (Since making this chapel I have made more houses and I used a stripes embossing folder to create a pattern on the roof - it looks good and takes much less time!).
To create the trees I used three trees from the Tim Holtz Idea-ology range.  I wanted three different sizes so I used one large, one small and then I cut down another large tree.  It is so easy, just pull the tree gently out of the base, use wire cutters to create the height you want, trim back the foliage and then push it back into the base.

To colour the trees I put them into a pizza box, on top of a white piece of copy paper, and sprayed them with Distress Stain, in two colours, to create some light and shade.
To create the sleigh and reindeer, I used Tim Holtz dies and shrink plastic.  I used translucent shrink plastic and coloured the plastic before shrinking.  In my opinion this gives a better end colour.  I used alcohol pens in red, silver and brown.  If you try this technique do be careful not to burn your fingers!  I lost count of how many times I burnt mine trying to untangle the reindeer legs and antlers....

I wanted to make the sleigh 3D so I cut and coloured two sleighs and used some light card to make a curved base for the sleigh.  I made some teeny tiny parcels and a sack to add to the sleigh.  The wreath around the reindeer's neck is a small piece of red and white twine.  The finished length of the sleigh is approximately 2" and the reindeer is just over 1", so they are very tiny!
Here is a view of the finished piece with the lights on.  I used a piece of  6" MDF board (from Indigo Blu) to mount the whole piece on.  I painted this white and then added lots of 'snow' to the base, the trees and the roof of the chapel.  I added a jingle bell because I could not find a bell small enough to fit the little bell tower.
I am adding a view of the back of the chapel, it has windows all the way round.  I can see myself building a little village now....

Thanks so much for your visit, I hope you feel inspired to join us at Anything But Cute Mixed Media Challenge, the details of which you can find HERE, along with some fabulous creations by my wonderful teamies.

Hope to see you again soon.  Hugs, Anne xx
Related Posts Plugin for WordPress, Blogger...

Labels