Pinterest

Monday, 28 April 2014

Compendium of Curiosities 3 Challenge

First of all, a huge welcome to my newest followers, both on Google and Bloglovin,  it is wonderful to have you along on my crafty journey.

I have had some wonderful news too, to share with you, it is at the end of this post - if you get that far!

The wonderful Linda Ledbetter of Studio L3 has started up a new challenge (Compendium of Curiosities Challenge 3) again this year based around Tim Holtz's fabulous new Compendium of Curiosities Volume III.  Not only that but Linda has a fantastic 'crew' of top designers on board to inspire us all.  The wonderful Mario sent me my signed copy a few weeks ago and I can assure you, if you are a Tim Holtz fan it is a must have.

Challenge #1 is based on Tim's Paint Marbling technique which you will find on page 43 of the new book.  The challenge, which runs fortnightly, is being sponsored this time by Inspiration Emporium who are generously awarding a $50 voucher to spend in the shop.  Alternative weeks will be sponsored by the lovely Linda Coughlin of the Funkie Junkie Boutique.  Not only that but Tim and Mario have sent Linda a huge pile of goodies as prizes too.  This is definitely a challenge not to be missed!

We are not able to share the 'how to' of this technique because it would not be fair to Tim but it is a great technique and I certainly had fun doing it.  Here is what I created.


I created the background for the hanging with black card on top of some corrugated card and added some string for the hanging element.  I used my newly acquired Nautical Blueprints stamps - love these!


I used Tim's Paint Marbling technique to create the background onto Ranger Watercolour card.  I was trying to simulate an underwater colour scheme by using Salty Ocean, Peeled Paint and Broken China colours.  I stamped the seahorse onto the prepared card, stamped it again onto Speciality Stamping card, cut it out, coloured it with Distress Markers in Broken China and Peeled Paint and decoupaged it up to give it some dimension.  I also stamped the 'sea horse' words separately and added this.


I stamped the sand dollar and starfish, again onto Speciality Stamping card and coloured with Distress Markers in Antique Linen and Worn Lipstick.  I coated them with Rock Candy Distress Crackle Paint to give them a more realistic appearance.


To finish off I added a word band and some string both here and at the top of the hanging.  This is just one of the 30 plus techniques in Tim's new book, I hope you will join in the challenge too!

Now, if you are still with me, on to some good news for me!  I am shamelessly exercising my bragging rights, as I have had three pieces of good news in the last week or so and I will tell you in the order that I received them.

First up, I won the Design Team Special Mention Award from Country View Crafts for my Tim Holtz inspired mini storage box and I have the opportunity to be a Guest Designer with them too!  I am still thrilled at the number of comments I received on my box but really, it was down to Tim's wonderful Wallflower papers, which I am now totally in love with!

Secondly, I won a Top Three place (along with my wonderful friend Jenny Buttons who has just received a Blogworthy Link Award from Tim himself!!) in the very talented Eileen Hull's Art with Heart Challenge       for my beach hut Artist Trading Block.  I do love doing 3D projects!

Last, but not least, I received a One of the Favorites Award from Craft Hoarders Anonymous for my Tim Holtz inspired Spring Flowers canvas that I did as my Design Team piece for A Vintage Journey.  There are still a few days left to join in the AVJ Spring Flowers challenge.... it would be lovely to see you there!

Needless to say, I am over the moon pleased with these wins, it is always a confidence booster to know that your work is admired and appreciated.  Thank you so much to all of those involved in the choices and thank you to my wonderful followers for all your positive comments on my work.

Hope to see you soon.  Big hugs, Anne xx

Friday, 18 April 2014

Spring Flowers - A Vintage Journey

The new challenge over at A Vintage Journey is 'Spring Flowers' and has been chosen by the Queen of handmade flowers - Jennie.  When I saw Jennie's challenge I was filled with trepidation because she really does make the most fantastic handmade flowers.  Jennie says:

We want to see your makes adorned with spring flowers.
You might want to use stamps,  handmade flowers from dies, ideology blooms 
or bought blooms as long as they have been stamped, made or altered 
using a Tim technique or product.

They don't have to be actual spring flowers but let's see the colours of spring!


Our Sponsor, Country View Crafts are offering a £10 gift voucher to the winner of the challenge, who will be chosen by the Creative Guides (DT).

I wanted to use some pretty blue cornflowers, one of my favourite Spring flowers, on my project. 


I started off with a basic 5" x 7" stretched canvas which I turned around and used the back as the frame for my project.  I covered the frame with paper from my Tim Holtz's Vintage Shabby paper pad and then distressed the paper with Gathered Twigs Distress Ink.


I measured the space inside the frame and cut some white card to size and stamped the beautiful butterfly and background from the Classic #17 stamp set.  The background was distressed with Gathered Twigs Distress Ink to tone in with the frame.  The butterfly was stamped again, coloured with Distress Marker in Broken China and decoupaged up to give it some dimension.  An Idea-ology word band was added, coloured with Broken China Distress paint.


Now for the flowers, these have been cut from the Tattered Florals strip die using just the spiky petals in all of the sizes.  I simply pinched the petals between my fingers and layered them up, adding a white centre from my stash.  You can see the finished result below.


For the trellis I cut two pieces from grungeboard using the Honeycomb Frameworks die and gave these the same treatment as Tim describes in his April tag, first coating it in Distress Paint (Peacock Feathers), sanding it off and then covering it with a darker Distress Paint (Gathered Twigs) to give it a weathered look.  I added some greenery, cut from the Bigz greenery die. 

The majority of the products I have used are available from Country View Crafts, where postage and packing in the UK is free and service is always first class.

I look forward to you joining us this time at A Vintage Journey, in our 'Spring Flowers' challenge.   I hope you will have a look over there and see what amazing creations the other Creative Guides have produced.  

I am linking this up to a fun challenge - Craft Hoarders Anonymous Challenge Blog where Challenge #5 is Pick a Stamp, Any Stamp.

Hope to see you again soon.  Hugs, Anne xx

Tuesday, 15 April 2014

Beach Hut Artist Trading Block

What do you do when your mojo goes walkabout?  I do hate when it happens and no amount of looking in magazines seems to do the trick for me.  So I build things........ in a fashion... whether it is storage albums, tag holders..... or even a beach hut.

I have wanted a real life beach hut since I can remember, it would have to be blue boarded and up on stilts so I looked at Eileen Hull's fabulous Artist Trading Blocks and thought.... I wonder...

I had seen a fabulous house made by Anna-Karin of Layers of Ink HERE on the Sizzix blog last year.  I think she used a very large block to make it but I have used a 3" block to make mine.   I took some thick card, cut a couple of the large 3" blocks (with one of my lovely new dies!) and set to work with scissors, knife, lots of glue and a score board......

I went from this.......


To this....
Click on the photos for a better view


I cut one basic white ATB for the body and cut a second one in half diagonally to create a 'roof'.  I used Tim Holtz's Movers and Shapers Mini Openings Set of dies to cut the door and windows.  I used the negative part of the die and cut round it to create window frames for the outside

After gluing the base and roof together I cut some Ranger Distress Core'dinations card to fit and then scored the card to give the appearance of wood paneling and glued this to the base.  I cut another piece to overlay onto the roof and added strips of card to form the roof tiles.  The ridge has been made by using the negative cuts from the On the Edge Plaque and Postage die (the postage shape).


This picture shows the detailing a little better.  I created a door (with missing door knob!), a platform, stilts, fence and stairs from plain white card.  The surf board has been painted in Ripe Persimmon Distress Paint and a pattern has been added to the board with a Shapie pen.  I added a charm in keeping with the beach theme.  It is not meant to be to scale, I used a lot of artistic licence here!


This is a view from the other side so you can see the platform, stilts and surf board a little better. I mounted the whole piece onto a square of Kraft card to give a feeling of sand.

So, that's my beach hut, the only one I am ever likely to own, but I am very pleased with it and hope you like it too.  If you have not used Eileen's ATBs yet, I hope you will, they are great fun!  I am entering this into Eileen's Art With Heart Challenge where the theme this month is April Showers.

Thanks so much for looking and I hope to see you again on Friday when the next A Vintage Journey challenge begins.  Big hugs, Anne xx

Saturday, 12 April 2014

Featured on Sizzix UK

Hello Everyone

A huge welcome to my latest followers, I am thrilled to have you along on my journey and I have some very exciting news to share with you today.

I think you all know how much I love working with the latest craft phenomenon - Eileen Hull's Artist Trading Blocks.  Eileen designs innovative products for Sizzix and together with the lovely Amy Bowerman they have set up a blog called Artists on the Block, which is well worth a visit.

Well, I am beyond excited to tell you that today, my lovely and uber talented friend Jenny (Buttons) and I are FEATURED on the Sizzix UK blog with our wedding favour boxes (one sample below) that we made with Eileen's fabulous dies!!!  Thank you so much Eileen!


You may remember that Jenny and I spent a day together recently, using Jenny's brilliant idea of making favour boxes and we had a ball - ideas were bouncing back and forth and we accomplished quite a lot in that one day.

Jenny and I hope you will go over to Sizzix HERE to have a look at our feature!  Thank you again Eileen.

Big hugs, Anne xx

Wednesday, 9 April 2014

Tim Tag April 2014

Thank you to my latest followers both on Google and on Bloglovin, I am thrilled to have you along on my blog adventure.    I am incredibly grateful too, to the people who have looked (and are still looking) and/or commented on my mini box HERE using Tim's new Wallflower papers.  I have made another one but I can't show you yet..........

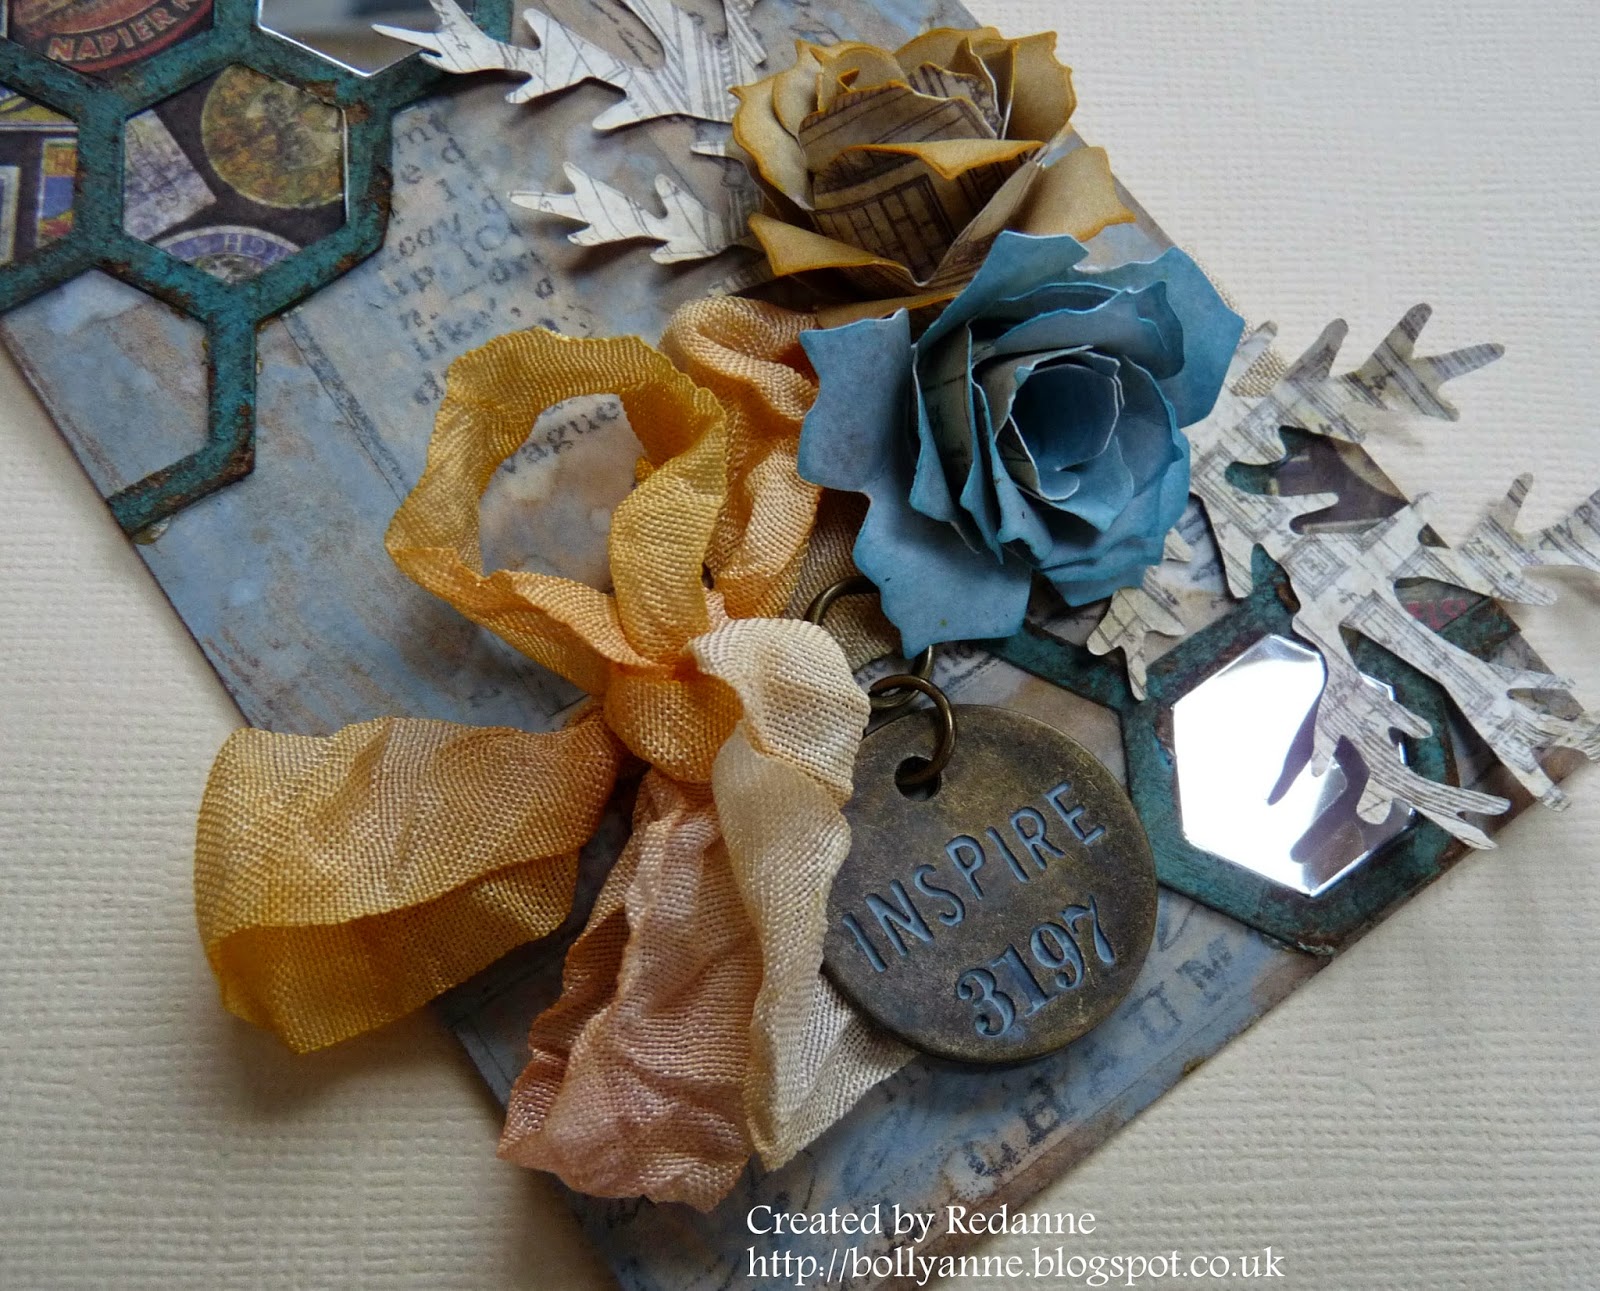
Tim's tag this month has to be one of my favourites to date, I thoroughly enjoyed using all the techniques and it never ceases to amaze me that you can make a beautiful rose from a pinecone die!

You can see Tim's tag HERE and since I pretty much followed his instructions I am not going to go into too much detail on mine.


For my background I used different colours to Tim - Weathered Wood Distress Paint and Gathered Twigs Distress Ink, using Tim's technique.  I don't have the fancy Trellis Framework die because I opted to buy the Honeycomb one instead and I love it!  I die cut and coloured my grunge paper one with Peacock Feathers DP and after sanding applied Gathered Twigs DI.  It gives such a wonderful timeworn look.


Here is a closer look at the top of the tag with the mirrored Idea-ology sheet filling in some of the spaces and others filled using the Menagerie paper pad.  I love the way the tissue tape still shows through the paint and ink in the background.  I used Idea-ology jute string in two different colours at the top.


The roses and leaves are cut from the Vintage Shabby paper stack, the roses are coloured with Broken China DI and Wild Honey DI and the leaves have been left uncoloured.  The ribbon is coloured with Worn Lipstick and Wild Honey DI's.  You can see more of the mirrored sheet here at the bottom.  I finished the tag with an Idea-ology tag (inspire) which was coloured with Broken China DP.

Thanks for looking, hope to see you again soon!  Hugs, Anne xx

Friday, 4 April 2014

A Little Bit French - A Vintage Journey

Hello and welcome!  Over at A VINTAGE JOURNEY it is the very talented Astrid's time to introduce a challenge and she has chosen 'A Little Bit French'.   In Astrid's own words:

The theme I have chosen is "A Little bit French". So whatever you decide to make, give your project that little bit of a French feel. Tim has so many products that can be used to create a Springtime in Paris make, or if that does not take your fancy, why not something grungy or vintage but with a bit of a French flair?  Think stamps, embossing folders, Distress products, dies, - the possibilities are endless. Whatever you do, enjoy the journey, but for this challenge, take it to France!

                                                           **********************
Our wonderful sponsor is Country View Crafts who offer a £10 voucher to the winner who will be chosen by the Creative Guides (DT).

I went to Paris, once, in the Spring time and my lasting memory is that of the Eiffel Tower, so I used several dies and embossing folders, some Letterpress and  inked my Tim Holtz Paris Memoir stamp set to create a little hanging.


There is quite a bit to talk about in this because I added so many elements.  The base is heavyweight black card.  The next layer is white card which I embossed with Tim's French Script Embossing Folder, I had to do this twice to cover the whole piece of card.  The card was then coloured with Broken China and Gathered Twigs Distress Inks.


The next layer is Tim's Picture wheel, to which I added some mini photos of Paris.  The frame was cut from the Postage Frame die and then painted with Black Soot Distress Paint, some Distress Crackle Paint and then 'grunged' up with some Gathered Twigs Distress Paint.

Behind the frame is white card, coloured with Broken China and Tea die Distress Ink and then overstamped with Tim's Paris Memoir stamp set.

The Eiffel tower was cut from the Eiffel Tower die and then embossed using the Eiffel Tower Embossing Folder.  Treasure Gold (Pewter)  was lightly rubbed over the surface to highlight the embossing.  The words Je t'aime were computer generated.  I wanted to reflect my love of Paris and they were they only words that sprang to mind....


I was so excited when Tim brought out the Letterpress alphabet!  I love them.... lots.  They are much chunkier than I had imagined and will be great for all sorts of projects.  I sanded down the top of the letters and then, with my finger, I dabbed some Peeled Paint  Distress Paint over the letters and wiped some off with a baby wipe to give a more weathered look.  I attached them to the frame with jump rings and little eyelets screwed into each of the blocks.

To finish off the piece I added some twisted rusty wire and an Idea-ology charm with the word 'journey' on it. 

I look forward to you joining us this time at A Vintage Journey, in our 'A Little Bit French' challenge.   I hope you will have a look over there and see what amazing creations the other Creative Guides have produced.  

I am rather belatedly joining in the Paris or French challenge over at The Kraft Journal where a random prize of $15 will be given away to spend at www.KraftOutlet.com and participants have a chance to be selected as a Featured Artist. 

Thanks so much for looking, hope to see you again soon.  Hugs, Anne xx

Related Posts Plugin for WordPress, Blogger...

Labels