Pinterest

Friday 31 March 2017

Favourite Eileen Hull Projects

Hello Friends

Today I am sharing some of my favourite Eileen Hull projects as Sizzix USA is having a huge sale of Eileen's dies and Eileen's team are sharing some inspiration.  Some of our projects are being shared over on the Sizzix blog today too, you can find them HERE.  The sale only lasts 3 days....

Eileen is offering a prize if you link up a project made with one of her dies HERE.

I think you all know I don't need much encouragement to create with Eileen's dies, the hard part was choosing my most favourite projects!  

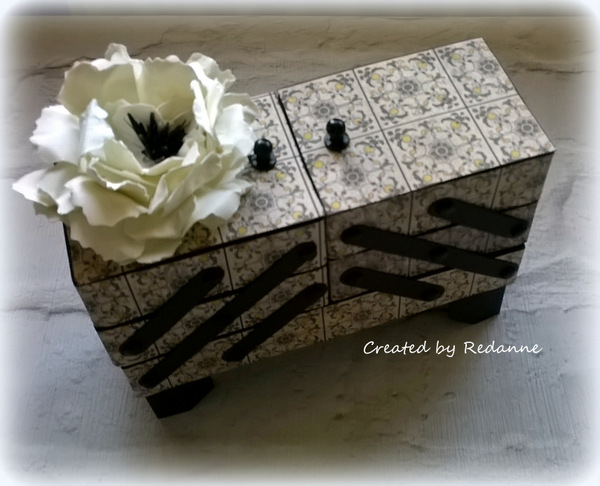
The Cantilever Sewing Box die (Sizzix 660768) is possibly my most used die,
I have made several of these for friends, they are great size  for storing trinkets, bits and bobs etc. and like all of Eileen's dies they go together like a dream!
 I have also used the Bag, Caddy (Sizzix 657123) many times, here it is used to house drinks mats
but it will also hold a pad and pencil.  It would make a great Easter egg holder too....
This is the large 3" Block/Cube/Bank (Sizzix 658983) and the very first of Eileen's dies that I bought.  Here I used an Andy Skinner technique to make a Valentine gift.  The box opens up to take a gift inside.
This is the second of Eileen's Block/Cube dies (Sizzix 658984) and has three sizes of box on one die.  This was a gift for a new baby named Leo, I also used Eileen's Thinlit dies, Lion & Monkey (Sizzix 658973) and also Elephant & Giraffe (Sizzix 658972).  The top of the largest box has a money slot, turning the box into a Piggy Bank.
This is a more recent die, Flower Pocket (Sizzix 661112), Romance Flower (Sizzix 661110) and Sunburst & Waffle Embossing Folder (Sizzix 659879)
My last share is the Cookie Box die (Sizzix 659874).  I always like to find new ways of using dies and I made a pincushion, this is one of my most favourite projects!

If you are still with me, I hope you enjoyed my trip down memory lane!  At the time of publishing, all of these dies were listed in the sale.  I am hoping that Sizzix UK might follow with a sale but there is no news on that at the moment - sorry!  If you are in the USA, I hope you find a bargain!


Some of my DT buddies are also posting, if you would like to have a look!

Eileen Hull
Pam Bray
Julia Aston
Lisa Hoel
Karen Bearse
Anna-Karin Evaldsson
Donna Braaten-Budzynski
Diana Hetherington
Nicole Wright
Mitsyana Wright
Tonya Trantham

Thanks for looking, hope to see you again soon!

Hugs, Anne  xx

Sunday 26 March 2017

Eileen Hull - Heartfelt Creations Journal die

Hello and Happy Mother's Day to all you UK Mums today!

Today I am sharing another journal that I made with Eileen Hull's fabulous new Journal die, by Sizzix,  which is due out very soon now!  You can Pre-order it now in the UK from Country View Crafts HERE.
As I love anything to do with the sea, I used Andy Skinner's Fossil stencil, Andy's Mega Crackle Technique and lots of DecoArt products to create the Journal cover.
This is how the journal starts off, this one was cut with Sizzix |Mat Board which is similar to Mount Board, it is very sturdy and will take a lot of wet products without warping.
I used Andy's Mega Crackle Technique to get to this stage (do dry naturally after each stage).
1) Cover the piece with Gesso or Paint (I used a mix of black, green and blue paint)
2)  Apply a coat of DecoArt Weathered Wood Crackle Medium
3) Apply a coat of DecoArt Crackle Paint
4)  Apply a coat of DecoArt Ultra Matte Varnish
 I applied a wash of DecoArt Paint in very watered down Prussian Blue
I stencilled in black and once it was dry I stencilled again with DecoArt Modelling Paste.

At this point I was not happy with the black showing through and I gave the whole thing a coat of thinned down white Gesso.  It did cover up some of the crackles but I wasn't too unhappy about that, it still had a nice 'rough' surface.

Next, I applied a wash of my favourite colour of DecoArt paint - Cobalt Teal Hue randomly over the base and Quinacridone Gold (again watered down) for the stencilled fossil area.
I love the colours now!  Next, I over-stamped the journal using Cobalt Teal Hue and a bubble stamp from IndigoBlu.  The sentiment is also from the same IndigoBlu set - Under the Sea.  I added lots of splatters in blue and white paint.  To finish off I added one of the closures that comes with the die, and some hand dyed ribbon.
I love to finish off my journals with a matching hinge clip and charm.  The clip and the seahorse were embossed with Stampendous embossing powder and I strung some tiny shells with elasticated jewellery thread.
I created three signatures for the inside, in the style of a junk journal, using up papers from my 'left over' box.

I hope you like my sea themed, Andy Skinner inspired Journal!

If you would like to see another of my Journals, there is another one being shown by Susan from Country View Crafts HERE.  It is one that I have not shown before and it is quite different to the one I am showing here today.

I am so thrilled that Susan at Country View Crafts has Eileen Hull's fabulous new HeARTfelt  Journal die on Pre Order too, at a fantastic price!

And last, but not least, Eileen Hull has created a Journal too, this is being featured over on the A Vintage Journey blog.  If you do have time, I hope you will have a look, it is a real beauty!

Thanks for you visit, hope to see you soon.
Hugs, Anne xx

Sunday 19 March 2017

Metropolis

Hello Friends

As soon as I saw Tim's new release video, I wanted these Sizzix Cityscape dies, even though I knew it might be a challenge for my less than dexterous hands.... they are such fun to use!
I used three of the Sizzix dies to create my 'Metropolis' - Tim Holtz Cityscape Suburbia, Cityscape Metropolis and Cityscape Commute.  It took me a couple of days as I painted each item individually, using the fabulous new Distress Oxide inks.
I just love the little clothesline!  On a visit to Hong Kong, many years back it was so interesting to see that even in such a large city, people actually had strings of washing out on lines between the buildings and that was my inspiration for combining the Suburbia and Metropolis die sets.
The word Metropolis was made from Tim's new Typography plastic letters, they were painted with Tumbled Glass Distress Paint and simply glued to the top of the Vignette box.  I was pleasantly surprised at how well the plastic takes paint.  Don't you just love the little helicopter!!
The whole scene was created using a Tim Holtz Vignette Box (the largest size) which measures 5.1/2" x 3.3/4" x 1.1/2" deep.  I covered the back and sides of the box with the beautiful new Memoranda papers, also by Tim Holtz.

If you want to be totally WOWED by a creation using the Cityscape dies, please have a look at what my dear friend Jenny Marples has made HERE.  It is breath-takingly beautiful!!  I wish I had thought to cut the buildings from already Oxide coloured cardstock - I will know for next time!

As always, thanks for looking and I hope to see you again soon.

Hugs, Anne xx

Tuesday 14 March 2017

Eileen Hull - Journal for Creativation

Hello Friends

During the month of March Eileen Hull's Inspiration Team are sharing details of Eileen's latest release for Sizzix - Heartfelt Collection. The collection was showcased at Creativation (CHA) in January 2017.  You can see the whole release HERE.

The collection includes the fabulous new Journal that Eileen has designed (Sizzix 661906).  This is a Scoreboard XL die which creates a Journal measuring 8.1/2" x 4.1/2".  It will take the popular Midori inserts, or you can easily make up your own inserts, using items from your stash.  A few people have asked me what they could use a journal for and I have put some ideas at the end of this post.**
This is the first journal I made for Creativation.
The Journal covers were die cut from Matboard (you can also use Mount Board).  The die cuts the holes at the sides and also provides the score lines to fold the sides.  The die also comes with two 'closures' and a label.
To create the journal I used Paper Leather, a wonderfully strong product by Sizzix, which I embossed using one of Eileen's embossing folders (Sunburst #659879).  It is a great folder as it has a repeat pattern, so I was able to match up the pattern to cover the whole of the front and back of my journal cover.  If you line it up carefully, you cannot see the join at all - result!!
After cutting the cover to size I used a strong wet glue to adhere it to my journal blank and put it to one side for the glue to dry.   

For the inside, I created three signatures and  I added a handmade envelope at the back. I lined the insides of the cover with grey card to match the leather paper on the outside.
I used a traditional bookbinding method to attach the signatures to the Journal.  It is called the 3 hole pamphlet stitch and you can see how it is done in a tutorial HERE.

You can, if you wish, add a simple elastic type closure, which is much easier to achieve and allows signatures to be removed and new ones added.  I like the bookbinding method as it creates a nice neat appearance on the outside of the Journal.
Next I created a closure.  I decided to do one by using Eileen's Twist & Style Tool and some soft metallic string from my stash.  Once twisted I made a button shape and stitched it in several places so that it would hold its shape.  I also stitched it to the Journal cover.  I twisted a further piece to use as the closure, which you can see above.
I die cut the word Journal using one of Tim's thinlit dies and I added some pearls and gems to an Ideaology Hinge Clip as a decoration.  Finally I added some sparkly stars to 'bling' up the front.
I have made a few of these Journals now, the second one I made also went to Creativation.  This one was covered in some fabric from my stash.
Covering it with fabric is very easy to achieve.  The insert you can see here is a purchased Midori insert and I added a couple more made from manila card.
  There are endless possibilities for covering the Journal, whether it is card, fabric, leather, paint etc., whatever takes your fancy.

I hope you will find time to visit Eileen's blog to see the other projects my teamies have created with the new release.

Thanks so much for looking, I hope to see you again soon.

Hugs, Anne xx

**  Potential uses for the Journal die
  • Art Journal
  • Travel Journal
  • Diary
  • Address Book
  • Phone Book
  • Wedding Planner
  • Wedding Guest Book
  • Wine Journal
  • Meal Planner
  • Gardening Journal
  • Wine Lovers Journal
  • Students Study Journal .... and so on!!

Friday 3 March 2017

All Aboard at A Vintage Journey

Hello Friends

This month at A Vintage Journey it is our Third Birthday and the talented Brenda is our host!  We are celebrating with an 'All Aboard' Happy Birthday challenge, which essentially means Anything Goes.  Here is what Brenda had to say:

'Come join in our All Aboard challenge where you choose what you want to step on board with and although we still need to see you working in the styles and genres listed in the banner at the top of the page, you can choose whether you share a card, some altered art, a journal page, a painting, in fact, whatever you fancy, but with no theme to follow.  Let's have some fun, share your current creations and enjoy the informal feel of our birthday celebrations!'

I just got some of  new releases by Tim Holtz, including the large (very large) Ecetera tags - I used the smallest one, which is 5.1/2" x 10" - so it's big!
I only have a couple of step outs as I got a bit lost in the process....

I prepared the tag first, using several layers of Distress Paint, followed by Distress Collage Medium - Crazing, scraped a few bits off and then applied a layer of Distress Collage Medium - Vintage.

Next I decided on a few pieces of Tim's Ephemera, Letterpress and the smallest Vignette Box.
I felt that the base needed a little more and so I added some stencilling.  I like it better now!
This is the point I stopped taking photos, I added the Ephemera pieces and used a Distress Crayon to edge each of the pieces, to give them a lift.

'Celebrate' and the 3's represent our birthday at A Vintage Journey.  The collage is my homage to the hugely talented Brenda, the owner of AVJ, who does the most amazing collage creations!  I am so thrilled to be here three years down the line and to be a part of this fantastic team.
In my internet search for a 'vintage' lady to add to the collage, I found a photo Amy Johnson, a pioneering English aviator, the first to fly solo from Britain to Australia.  Can you see the little airplane Remnant Rub to the left of the photo?  There is yet another '3' at the bottom of the  Idea-ology photo strip....
Finally, at the bottom of the tag, I added a small Vignette Box, painted in Weathered Wood Distress Paint.  I coloured the Letterpress in the same way and then over-stamped both the letters and the Vignette Box.
A few more Remnant Rubs and some random splatters of paint finished the piece.  I hope you like it!

We hope that you will join in our birthday celebrations at A Vintage Journey, you can find all the details and see what my talented teamies have made HERE.

This month we are sponsored by Country View Crafts where there is a £20 gift voucher for one randomly selected person.

I would like to add this to Country View Crafts challenge - Inspired by Tim Holtz (except for the photo, the entire tag is made with Tim Holtz products)

Edited:  I have just noticed that Creative Carte Blanche's theme this month is Numbers, Numbers, Numbers - so I am joining in there too with all my number threes!

As always, thanks for looking, hope to see you again soon!
Related Posts Plugin for WordPress, Blogger...

Labels