Pinterest

Tuesday 28 June 2016

Eileen Hull / Crescent collaboration 2

Hello Friends!

All this month Eileen Hull and Crescent Artists are collaborating and the Inspiration Team
have been given some wonderful Crescent products to play work with.


This project used the Crescent Artists Photo Mat Art Board.  It is a large board measuring
11" x 14" and will take a 4" x 6" photo in the recess.


The board can withstand quite a lot of mediums, paints, inks and sprays.  I will take you
through some of the steps ...

First of all, I put the die cuts I wanted to use, on the board, and roughly marked where I
wanted my curved element to be.  I gave the board a generous coat of Daler Rowney Acrylic Gesso.
Next, I applied a good layer of IndigoBlu Texture Paste.  I was trying for an 'arty' feel so
I left the top and bottom bare.  I also added some Prima art stones for extra
texture, to the bottom 'sand' section.
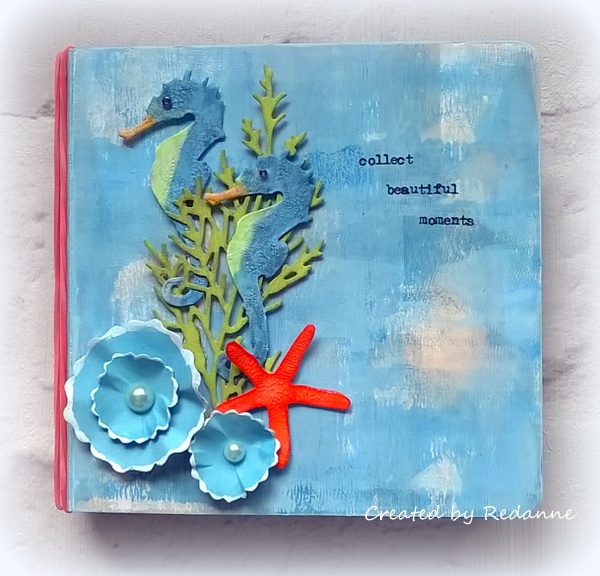
For my 'ocean' element I mixed a dot of DecoArt Media Fluid Acrylic in Primary Cyan to 
some Titan White.
To create the 'sand' element I mixed a dot of Raw Sienna into some Titan Buff.
Once the colours were applied, I left it to dry naturally.  The board did warp ever so
slightly, but once dry it flattened out again.
Next, I added my elements.   First, I added a layer of gauze - some white and some dyed blue to create some softness.  I used Eileen Hull's Romance Flower die and Rendr Paper to 
create the clam shell flowers, Tim Holtz die cut dollar and star fish, some other random
die cuts from my stash, some real shells and lastly some wooden elements from 
To create the window part I cut some Eileen Hull mat board and marked the window area.  
The area was coated in a thick layer of Golden Fiber Paste.  
Once the paste was dry I sprayed it with Tim Holtz Distress Spray Stains in 
Twisted Citron and Salty Ocean.
Once I had added my die cut elements I created a recess by cutting a 1/2" piece of mat
board which I glued to the inside of the frame before attaching the inner piece to create
a shadow box effect.
Finally, a close up of some of the elements I added.

I really enjoyed using the Crescent Artists Photo Mat Art Board.  You can see a short video clip
of ways to use the Board HERE.

If you have the time, please do pop over to Eileen's blog where you can see my hugely talented
teamies' makes with both the Photo Mat Art Board and the Rendr Paper.

As always, thanks for looking, I really do appreciate any comments you leave
and I look forward to seeing you again soon!

Hugs, Anne xx

Saturday 25 June 2016

Tim Tag June 2016

Hello Friends

This is a very quick post to share my Tim tag for June.  No step by steps today as you
can see the details in Tim's post here.

I went completely 'off piste' with my version, simply because I did not have many
of the items Tim used for his....


I decided to create an 'angel' which I had to do by die cutting a set of wings,
tracing around them and cutting them in the right place on the tag.


I used the same techniques as Tim did and finished my tag off with some dyed seam
binding, machine stitching, small talk stickers and a couple of Idea-ology roses.

Also, because of holidays, I have been really short of time this month but didn't want to
miss out, so I am joining in with the fabulous ladies at Creative Carte Blanche, as
their theme this month is Winged Things.

Thanks for looking, hope to see you again next week!

Hugs, Anne xx


Tuesday 21 June 2016

Eileen Hull and Crescent collaboration

Hello Everyone!

Eileen Hull and Crescent are collaborating all this month and the team has had the pleasure of working with Crescent RENDЯ Paper and also Crescent Photo Mat Art Board.  Today I am sharing a project made using the paper and also Eileen Hull's 
mat board (Sizzix 656491) to create a mini album.

Crescent developed the RENDЯ Paper so that stamps, sprays, paints, inks and other mediums can be used with no leakage onto the other side.  This makes it ideal for use
 in journalling.  For my project today I used Paper Artsy paints and am pleased to 
say that none of it bled through.


I'll take you through some of the steps I took to make this album.
I started by cutting Eileen Hull's Mini Album die (Sizzix 658982) from mat 
board and the album pages were cut using the same die and the
RENDЯ Paper.
Each of the pages and the album cover itself have been painted in exactly the same
way.  I used a brayer to apply the paint - first I used the PaperArtsy Stone, then 
the Glass Blue and finally the Blue Oyster.  The three colours give wonderful 
coverage.  As you can see above, there is no leakage onto the other side of 
the RENDЯ Paper.  However, since I wanted both sides to look the same, each 
page was painted in the same way on each side.
Here are some of the finished inside pages.  I did cut some more sets of pages so 
that I could create some pockets and smaller pages.
To cut the flowers, I used Eileen Hull's new Romance Flower die (Sizzix 661110) and the RENDЯ Paper. The flowers were coloured in Distress Spray Stain 
(Tumbled Glass) and the edges were painted with DecoArt Media Fluid 
Acrylic in Titanium White.
To finish off the project I used some Tim Holtz die cuts that were left over from another project (come back next week if you want to see that one).
To finish off, I added some Tim Holtz Remnant Rubs and put the album together, with 
some red elastic bands.  I love this method of constructing the album as it gives you the opportunity to add more pages as and when you need them.

Thanks so much for looking, I hope you will come back next week to see another 
Eileen Hull project and also visit Eileen's blog to see what my teamies have made too.

Hugs, Anne xx

Thursday 16 June 2016

Guest Design Team Member - Frilly and Funkie!

Hello Everyone

I am just back after a wonderful family holiday, just in time to tell you that I am
delighted to be Guest Design Team Member at Frilly and Funkie today !!  It is such
an honour to be guesting for such an amazing challenge blog - thank you so much to 
Linda Coughlin and her wonderful team.

The challenge this time at Frilly and Funkie is Pastels and Pearls and is being hosted by
Nancy of Tattered Treasures, one of the Frilly side of the team.  I was given the choice to create a Frilly or Funkie piece but I thought it might be
fun to combine the two, so here goes....

I created a mini album using Eileen Hull's Passport Book die (Sizzix 660331) and some old corrugated packaging to cut the album shape.
All three pieces were coated with DecoArt Media Fluid Crackle Paint and left to dry.  To create the pink colour I used DecoArt Media Fluid Titanium White, mixed with a dot of Primary Magenta.
It was a little too pink for my liking so I added some DecoArt Media Fluid Acrylic in Titan Buff, here and there.
To make the signature pages I used Eileen's die along with a manila file (I left the tabs intact).
I found some cream coloured lace and linen cord in my stash.
I used the lace to decorate the edge of the book, and I glued this in place, before tying in the signatures with the linen cord.
The metal holder is from Tim Holtz Idea-ology range.  I painted it and the metal fasteners with Titan Buff, left it to dry and lightly sanded the edges.    The word 'remember' is from Tim's chit chat stickers.  I coated the word with Ranger Crackle Accents.
To finish off I added some pink ribbon and I also added some pearls to a head pin and added them to the linen cord binding.
Another look at the finished mini album.

Thanks again to Frilly and Funkie for having me as a Guest and thanks to all of you for your always kind words.  Now that my holiday with family is over, I hope to get back to visiting you, I really have missed being out of touch for nearly two weeks!

Edited:  I would like to add this to Country View Challenge where the challenge is Crackle.

Big hugs,  Anne xxx

Sunday 5 June 2016

The Birds and the Bees at Anything But Cute

Hello Crafty Friends, welcome to this scheduled post!

It is time for a new challenge at Anything But Cute and the wonderful Niki is our hostess.  Niki has chosen 'The Birds and the Bees' as her challenge theme.  I was so thrilled with the theme
as I have had a Tim Holtz bee die cut in my stash for ages (courtesy of my lovely friend Mo) and this was a great opportunity to use it!

Since it is a sad fact that bees are in decline, I wanted to create a little wall hanging as a reminder that we should do what we can to try and 'save our bees'.


Here is what Niki has to say:  With the lovely warmer weather in my neck of the woods, I am seeing so many wonderful birds and bees, so I would love to see these in your mixed media makes!  Pull out those bird stamps, think of feathers and maybe some honeycomb.  Or you could even go for a non-traditional interpretation like a family crest that has a bird emblem on it.  The sky is the limit!  NO BUTTERFLIES please!

Take a piece of card (or 6" x 6" board in my case) and cover with a coat of Gesso.  Add some book page pieces here and there.  Some stenciling was added to the bare diagonal corners (the photo was too blurry to show).
Spray with various colours of Distress Spray Stains (you can see the stencilling in this shot).
Add some Tim Holtz Honeycomb Frameworks die cuts (these have been stained with Distress Spray Stains)  Put back some of the die cut honeycomb pieces and then apply some Tim Holtz Distress Collage Medium - Crazing.  This gives a very subtle crackle.  A good layer of Glossy Crackle Accents was added to some of the spaces.
This is how the bee had been left in my stash, he had been painted with Black Soot and Mustard Seed Distress Paints.  

Here is the finished bee, with Glossy Accented legs, acetate wings, a coat of Distress Collage Medium - Crazing on the card layer of his wings and his body is coated with Distress Crackle Paint in Clear Rock Candy.

I really hope you can join us at Anything But Cute this month, it would be lovely to see your birds and bees mixed media creations!

As always, thanks for looking, I really appreciate it if you take the time to comment too!

Hugs, Anne xx


....................

If the bee disappears from the surface of the earth, man
would have no more than four years to live....
Albert Einstein


Related Posts Plugin for WordPress, Blogger...

Labels