PRIVACY POLICY

Friday, 27 February 2015

Eileen Hull / Stampendous ATB Blog Hop

Hello!  If you have not been to my blog before - then Welcome!

I am so thrilled to be part of a wonderful Blog Hop between the talented Designer, Eileen Hull and the wonderful Stampendous and their respective Inspiration and Design Teams!  All week long the teams have been using Eileen's Artist Trading Blocks to make some fabulous creations!


I was given three wonderful sets of stamps to use as you will see below, although in the end I did not use them all - well not yet anyway!

 The stamps from left to right are:
Stampendous - Cling Wild Roses - CRR191
Stampendous - Say It Today - SSC1190 (not used in my project)
Stampendous - Butterflies - SSC028

I used the flower stamp to create a background for the larger block and I cut and watercoloured an extra layer of flowers, to give the flowers some dimension. 
Part of the larger flower stamp was used to create a background for the smaller block.  I also used Stampendous Cling Butterfly Post (CRP147) on the larger block.  The butterfly matched one of the butterflies from the clear Butterflies cling set SSC028.  I stamped this, coloured it and layered it up on the other two sides of the larger block.
In the view above, you can see more of the flower stamp and also the tiny butterflies from the butterfly stamp set.  To finish the top I attached a beautiful little rose shaped knob, from my stash.
I painted and crackled the spool feet using DecoArt products.  The base card, flowers and butterflies have been coloured using watercolour pencils and paints.  I stamped, coloured and fussy cut out loads of butterflies, which I did not use in the end, I think I will just have to make another project now!

You can see more of the wonderful work by the Blog Hop participants from both Eileen's Inspiration Team and Stampendous Design Team, if you want to catch up, by following these links:

Today, you can also see work from Eileen's Inspiration Team here:
Anne Redfern (that's me!)
 
and from the Stampendous Design Team

There are fabulous prizes on offer too; three random winners will be chosen from all the blogs participating in the hop and from the randomly drawn winners there will also be one winner of a GRAND PRIZE.  Two of the winners will receive Stampendous PenPattern Petal and PenPattern Flutter cling stamps.  They will also receive enough pre-cut, premium matboard from Sizzix to make two boxes of your own, plus some extra pieces for fiddly bits!  The GRAND PRIZE winner will receive the stamps above, a whole package of matboard AND the Sizzix die to cut your own ATB's. 

The comment deadline for the hop is extended to Sunday March 8th 2015 to give you plenty of time to see and comment on the participating blogs.

Eligibility for these amazing prize packages also includes international fans too.

.  If you are joining in the hop and you get lost along the way, Stampendous will post a cumulative list of links so far on Saturday Feb 28 and on Saturday 7 March.

Thanks for looking, hope to see you again soon!  Hugs, Anne xx


Here are all the important links for Stampendous, Eileen Hull, and The Artists on the Block:
Shop Stampendous
Stampendous Blog

Follow Stampendous: Facebook * Twitter * Pinterest
Eileen Hull Blog
Shop Eileen Hull Sizzix Dies

Follow Eileen Hull: Facebook * Twitter * Pinterest * Google +* Instagram

The Artists on the Block Blog
Follow The Artists on the Block: Facebook * Twitter * Pinterest

Monday, 23 February 2015

Compendium of Curiosities #22

Do you ever buy things, put them in a safe place and then forget about them?  Well that is what I did many months ago, so when the chance came along to use it, I broke open the packet and set to work. I enjoyed using it and ended up creating three pieces, two of which I will show you today.

Challenge #22 at Compendium of Curiosities is a product specific challenge which requires the use of the Dimensional Cutting Pad.  You can find details of the challenge HERE on the lovely Linda Ledbetter's blog.  Details on how to use the Pad can be found on Page 62 of Tim's Compendium of Curiosities III.  If you do not have your own copy of CCIII you can buy one here and Tim will sign it.

Linda Coughlin of the Funkie Junkie is sponsoring the challenge with a $25 prize to spend in her on-line shop for one lucky winner.    The Curiosity Crew will choose their favourite and that person will receive a parcel of goodies from Tim Holtz himself and Mario Rossi, his Operations Director.

So here is the first of my creations and my entry to CC3C Challenge #22:


Yvonne Blair, one of the Curiosity crew used a bottle as a body for her beautiful butterfly and I loved it so much I did one too.  My bottle was given Tim's Faux cracked glass treatment and then filled with some beautiful toning Swarovski crystal beads.  The butterfly is Tim's Layered Butterfly die and embossing folder.  The words are from Tim's new Big Chat.

I cannot share the technique with you but this is how the butterfly looked before I mounted it.  I 'splattered' the background with Distress Paints in Peacock Feathers and Abandoned Coral (love it!).
The butterfly itself was embossed and then painted (painstakingly) with Peacock Feathers Distress Paint in all the embossed grooves.  The whole butterfly was then coated with Clear Rock Candy Distress Paint before the bottle was mounted.  The colours are wonderful in real life!  I added some curly wire to create the antennae and also to the top of the piece, as a hanging.

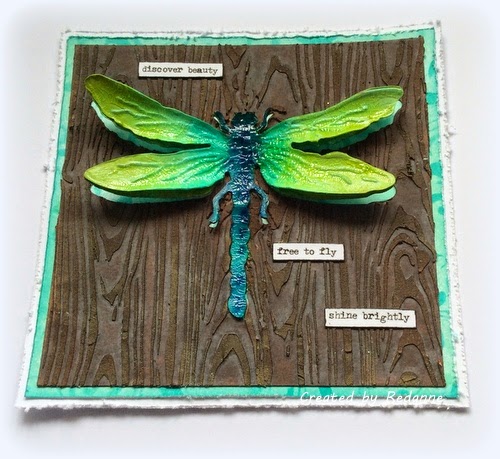
My second piece was created using the Layered Dragonfly die and embossing folder.
The background was created using the Woodgrain Stencil and Ranger Embossing Paste coloured with Gathered Twigs Distress Stain.  I went over the dried Embossing Paste with another coat of Distress Stain in Vintage Photo this time.
I cut another dragonfly, each was coloured with Distress Stains in Peeled Paint, Broken China and Chipped Sapphire Distress Stain before being coated with Clear Rock Candy Distress Paint.  The background was created using the Flourish stencil and Peacock Feathers Distress Ink.
This is a close up of the dragonfly, the words were created using Remnant Rubs.

Over at Inspiration Journal the current challenge is 'Love is in the Air' and we are asking for creations inspired by Valentine's Day or by new products that you may have in your stash.  My own Inspiration Team pieces include several new products which will be available at Inspiration Emporium.  There is still nearly a week to enter the Challenge, there is a fabulous prize of $50 to spend at Inspiration Emporium's on-line shop for one randomly selected winner.  If you do shop at Inspiration Emporium and you use my code Redanne, you can save 10% on your whole shop.

I hope you like my creations, I have spared you the third, I think I have gone on long enough now! Thanks so much for looking and I hope you will come back again soon.  Hugs, Anne xx


Products Used:
Dimensional Cutting Pad
Layered Butterfly die and embossing folder
Layered Dragonfly die and embossing folder
Distress Paint
Distress Stain
Embossing Paste
Clear Rock Candy Distress Paint
Big Chat
Remnant Rubs

Thursday, 19 February 2015

Butterfly Album

After being absent from my Craft room for a few days I thought I would just love to create something useful, just for me, not for any special reason but just for fun.  I got out all my new Tim Holtz goodies (and yes there are many....cough, cough) and finally settled on making an album.  I have no idea what I am going to use it for.... and will probably give it away...

If you follow Jenny's (Buttons) blog you will know that she generously shares her wonderful new techniques, through tutorials and videos and I wanted to refresh my mind on her faux wood technique which you can find HERE.  It really is a fantastic technique and the wood looks so realistic (and weather worn) when it is finished.

I started by die cutting an album shape from Eileen Hull's wonderful Mini Album Scoreboard XL die using ivory coloured Daler Rowney mount board (mat board in the US).  The finished album measures approximately 5 inches square.

The picture below shows the album cover after I used Jenny's technique, with the colours I chose, although you can choose any colours you like.  It also shows one of the new thinlets die cuts - Mixed Media, there are four fabulous dies in this collection.  I 'rusted' the die cut by using a mix of Distress Paint and Distress Stains in Rusty Hinge and Gathered Twigs.  I wanted it to represent an old trellis.
The beautiful butterfly was stamped using Tim's new Perspective stamp set.  I love that he did a proper Swallowtail butterfly in this set and I have coloured it using Scattered Distress Paint onto plain white card and stamping with Archival Ink before fussy cutting it out and mounting it onto the album with foam squares. I also added some greenery from Tim's Garden Greens die, coloured with Peeled Paint Distress Stain.  The words 'remember to fly' are from Tim's new large chit chat stickers.
I used the same faux wood technique inside the album and added one of Tim's Idea-ology Ring Binders.  I wanted to tone down the silver and I 'rusted' it by giving a it coating of gesso and then layers of Gathered Twigs and Rusty Hinge Distress Paint, followed by a layer of Ranger multi matt medium.  I love how it turned out!
Finally here is a picture from the top showing how the Ring Binder is held in the album.  As you can see from the photo I added a second 'trellis' to the back.
It was such a lovely feeling to create something for no particular reason!  I hope you like it.  Thanks so much for visiting and even bigger thanks to those kind enough to leave a comment!

Hugs, Anne xx

Tuesday, 17 February 2015

Art With Heart - Love Grows Here

I am loving using my Eileen Hull dies and this one is no exception.  My creation for Art With Heart this month features Eileen's Window Box die.  If you join in the 'Projects to Love' challenge this month you could win one of Eileen's fabulous cookie box dies.  See here for more details.

Since we are still in the month of love, I created a love themed window box card for some family members who are moving house soon.  I used my new DecoArt Media Fluid Acrylics, which are just fantastic.  If you want to see more of the paints and how to use them, just visit DecoArt's Mixed Media Blog for more information.
The wall at the back is created using Wendy Vecchi's wall stencil and DecoArt's Media Texture Sand Paste.  Once this was dry I spritzed it with some watered down DecoArt Quinacridone Red, mixed with a little Quinacridone Gold.  The bricks have a wonderful textured feel to them and they look amazingly realistic.
The window frame and window box were given a coat of DecoArt Titanium White and once dry I applied some Weathered Wood Crackle Medium and finally a coat of Titan Buff Medium Fluid Acrylic.  Once dry I went over the whole area with Raw Umber Antiquing Cream.  The beauty of the cream is that it can be rubbed gently into the cracks and edges but until it is sealed (with All Purpose Sealer) it can be easily removed or just placed here and there to give an aged appearance.

The heart flowers were created by punching out three hearts for each flower, these were scored down the middle and placed back to back and then glued to the stems (also part of Eileen's window box die).  The words were stamped with a small alphabet stamp from my stash.
The curtains were created using Tim Holtz Eclectic Elements fabric and some lace from my stash.  Behind the window I added some of Tim's Wallflower paper to give the impression of wallpaper.

There is still plenty of time to enter Eileen's 'Projects to Love' Challenge and it would be lovely to see you there.

Thanks so much for looking, I hope to see you again soon.  Hugs, Anne xx

Friday, 13 February 2015

Tim Tag - February 2015

Just a quick post today to share my Tim Tag for February 2015 and my third DT piece for Inspiration Journal.  I know I say it a lot but this is one of my favourites of his tags, I do love the collage look, although it is not something I am very good at....but I really enjoyed making this tag.

You can see Tim's fabulous tag HERE.  I have pretty much followed Tim's tutorial albeit not with the same background materials.

I really enjoyed getting my little craft sewing machine out again to stitch the felt heart and the little piece of lace.
I tried to be a bit clever and stitched an arrow in my heart.  I loved using the wire to attach my little heart to the metal arrow too.
You can see the different background elements I added and as Tim did, I went around each piece with a black Distress Marker and smudged them.

At Inspiration Journal, the challenge is 'Love is in the air' and there is still plenty of time to join in.  There is a prize for one randomly selected individual, of $50 to spend at Inspiration Emporium's on-line store.  If you do buy from IE and you used my code Redanne, you will get 10% off your whole order.

So there you have it, my entry into Tim's Tags for February 2015.  Thanks for you visit and I hope to see you again soon.  Hugs, Anne xx


Products Used:
Tim Holtz Wallflower Paper Pad
Tim Holtz Idea-ology Arrows
Tim Holtz Idea-ology Heart Charm
Tim Holtz Idea-ology Industrious Stickers
Tim Holtz Word Sticks

Wednesday, 11 February 2015

Compendium of Curiosities #21

I would like to welcome my latest followers, thank you so much for taking this crafty journey with me, I appreciate all of you - new and old!

My second DT piece for Inspiration Journal this month uses the gorgeous butterfly from Tim's new Perspective (CMS213) stamp set.  I am so pleased that Tim has brought out a wonderful range of new stamps that can be coloured and this set also includes some of the nicest sentiments that Tim has done, in my opinion!

Compendium of Curiosities #21 uses Tim's Rock Candy Distress Glitter technique which can be found on Page 55 of Tim's Compendium of Curiosities III book.  In order to enter the challenge you must work from your own copy of Tim's Book and out of respect for Tim you must not discuss the technique.  Tim's book can be ordered direct from him here.

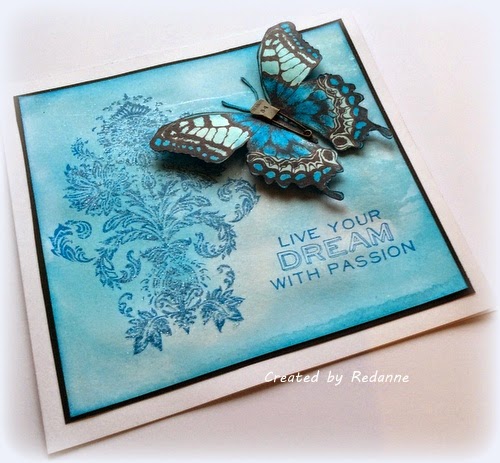
I have gone for a fairly clean and simple look and made a card for my entry to the CC3C Challenge.

The background and damask stamping were done using the Rock Candy Distress Glitter technique and the colour I used is Salty Ocean.
The butterfly was stamped and coloured with Salty Ocean and Tumbled Glass Distress Stains and the body is an Idea-ology pin.  The sentiment is from the same stamp set as the butterfly.
A close-up to show you some of the gorgeous, but subtle sparkle.

The sponsor for challenge #21 at CC3C is Inspiration Emporium who are offering a $50 spending spree to one lucky randomly selected winner,  The main winner will be chosen by the Curiosity Crew and this person will receive a fabulous box of goodies, kindly donated by Tim and his Operations Director Mario.

If you enter the 'Love is in the air' challenge this month at Inspiration Journal there is also a $50 spending spree available for one randomly selected person to spend at Inspiration Emporium.  We would love to see your love inspired creation!  If you do shop at Inspiration Emporium and use my code Redanne you will receive a 10% discount on your whole order.  Shipping rates are excellent at $5 for USA purchasers and $10 for International purchasers.

As always, thanks so much for looking, I will be back on Friday, hopefully.  Hugs, Anne xx


Products Used:

Monday, 9 February 2015

Faux Granite for Inspiration Journal

My first DT project for Inspiration Journal this month uses Wendy Vecchi's fabulous technique - Faux Granite.  The challenge this month at Inspiration Journal is 'Love Is In The Air' and you will find all the details HERE.

I had such a lot of fun turning a plain and simple little jar into something that really does look like granite!  Wendy demonstrates this wonderful technique HERE on the Ranger blog, so I won't go into any great detail as Wendy explains it so much better!

I used Wendy Vecchi Sky Blue Archival Ink and also Sky Blue Embossing Powder to create the base on my little glass jar. The stamping was done with Wendy's Splatter stamp from the Ticket to Art set (LCS001) and white Archival Ink.  The little heart has had the same treatment but with Red Geranium Archival Ink and Embossing Powder.

I  attached the little heart (from Tim Holtz Idea-ology range) with some twine from my stash.


The flower is made from Tim Holtz's Tattered Floral die and card from Tim's Core'dinations Distress Collection, in Fired Brick.  The stem and leaves were created from florist wire and tape.

The sponsor at Inspiration Journal, as always, is Inspiration Emporium who offer a very generous prize of $50 to spend in their on-line shop, to one randomly selected individual.  Postage rates are excellent - $5 in the USA and $10 to Europe.  Also, if you do purchase from Inspiration Emporium and use my code Redanne you will get 10% off your whole order.

I would like to enter my piece into Wendy's  Make Art Challenge, the theme this month is 'Hearts'.  

Thanks so much for looking, even bigger thanks if you leave a comment, it means such a lot.  I hope to see you again very soon.  Hugs, Anne xx


Inspiration Emporium Products Used
Wendy Vecchi Sky Blue Archival Ink
Wendy Vecchi Sky Blue Embossing Powder
Wendy Vecchi Carnation Red Archival Ink
Tim Holtz Core'dinations Distress Card - Fired Brick
Wendy Vecchi Ticket to Art stamp set (splatter)
Tim Holtz Idea-ology Heart Charms
Tim Holtz Tattered Floral Die

Friday, 6 February 2015

A Vintage Journey - Tic Tac Toe

It is the turn of the wonderful Annie to host Challenge #25 at A Vintage Journey and Annie has chosen Tic Tac Toe for her theme.  In Annie's words, you must choose at least 3 items from the grid and incorporate these into your project.  You can choose items horizontally, vertically or diagonally, it's your decision.  Please, please include the names of the items you are using within your post, not just in the link.

Idea-ology or any metal embellishmentSpraysRibbon/twine
PaintEphemeraDie cuts
Foil tapeTexture fadesStains

For my card I chose line 3 - Ribbon, Die cuts and Stains, I also used a Spray.

I fell totally in love with the Flower Garden stamps in Tim's new range.  He is not usually known for doing stamps which are so delicate and feminine but these certainly are.  There is a range of flowers in the set, along with separate stems, which is great for placement on projects.

The base card was created by spraying Tumbled Glass Distress Spray Stain on my work mat and dragging the card through it.  When dry I flicked some water on and let it dry again. On a slightly smaller second piece of white card (I used watercolour card) I stamped the beautiful daisy and coloured it in with Distress Ink in Spun Sugar, Wild Honey, Spiced Marmalade and Peeled Paint.
I wanted the flower to be raised up so I put a Sizzix square die on top of the card and lightly traced around it.  I then fussy cut around the whole part of the flower that was inside the lightly traced frame.  I then slipped the die underneath the cut flower (see above) and die cut the aperture, leaving the flower intact. 
It is a little tricky with the die and it does take a bit of practice but the effect is quite nice.
The beautiful sentiment comes from another new set of stamps by Tim Holtz, called Perspective. I think it goes well with my simple design.

Annie's challenge was great fun to create for, I hope you will join in with us at A Vintage Journey.  Do pop over there to see what my very talented teamies have made.  There are also some changes taking place at A Vintage Journey at the beginning of March and Brenda will be outlining a couple of those changes over there today, so do please have a look.

 As always, our wonderful Sponsor, Country View Crafts offer a prize of £10, for one person, chosen by the Creative Guides, to spend at their on-line shop.  Susan always gets Tim's latest products in super quick and for UK buyers there is no postage to pay.

Thanks for looking and for any comments you may leave.  I hope to see you again soon!  
Hugs, Anne xx

Tuesday, 3 February 2015

A Valentine Artist Trading Block

Thanks so much to my latest followers, it is lovely to have you along on my crafty journey.

This month, for my Design Team piece for The Artists on the Block I have used an Andy Skinner technique - Faux Letter Press.  You can find Andy's tutorial HERE.

I am very lucky as I received a box of paint and other mediums from DecoArt, as part of Eileen Hull's Inspiration Team.  The new Media Range of paints from DecoArt are my latest love, you can create soft colours with them or vibrant or grungy colours, as you will see in my piece today.
I have not done step by step photos because Andy explains them really well in his tutorial - and to be honest, I got a bit carried away and forgot!
Andy did use a variety of colours and sizes for his blocks but I used similar sized pieces so that I could add whole words, (Love You, Be Mine) rather than random letters.

The base is one of Eileen Hull for Sizzix Artist Trading Blocks, this is the largest one and measures 3" on all sides.  I painted the whole of the base block with black Gesso so that it would not soak up too much paint and then painted over with Raw Umber DecoArt paint. It only needed one coat.
The letters are from Tim Holtz - Ideaology Kraft Resist Chipboard Alphabet.  It is quite an old set, I simply sanded the shiny top, applied Gesso and then painted them the same way Andy did.  I used  Pyrrole Red paint for the letters, then flicked Carbon black paint over and then covered each letter with Quinacridone Red paint (it is transparent) which gives the letter a slight sheen.  The punched hearts were done in exactly the same way and then stamped with some latin type script.  The base for each letter is painted with Raw Umber and edged with Vintage Photo Distress Ink.
The flower was created using Tim Holtz's Tattered Floral die.  I used two of each design on the die, except for the spiky one.  It is years since I made one of these flowers but you can see how I did it in my blog post HERE - yes it is VERY old, but the technique works beautifully with any of Tim's Tattered Floral dies.

To finish off I added some wooden beads, as feet, also painted with Raw Umber.  I also tied some lovely red jute twine around the middle of the block.

I would like to enter my block into Pamellia's first challenge over at Frilly and Funkie, which you can find HERE.   The challenge is called Valen-twine and you must use twine, jute, cord or string. There is a $25 prize for one lucky winner to spend at the Funkie Junkie online shop.

I would also like enter Julia's challenge at the Artist Trading Post Exchange which is Flower Power! I hope my single big flower qualifies. There is a £10 voucher for the winner to spend at the Artist Trading Post on-line or bricks and mortar shop.

Thanks so much for looking, I will be back on Friday when we have a new challenge beginning over at A Vintage Journey, I hope you will join us then.  Hugs, Anne xx