PRIVACY POLICY

Monday, 31 March 2014

Artist Trading Blocks - Wedding Favours Part 2

Hello Everyone

Thank you so much for your fantastic feedback on part 1 of the wedding favours that Jenny (Buttons) and I did and also for the amazing feedback on my mini box, I don't think I have ever had so many comments!

Welcome to my latest followers, both on Google and also Bloglovin, it is lovely to have you along!

This post is going to be picture heavy so I will keep the words to a minimum.  You will know from part 1 that Jenny had an idea to make wedding favours from Eileen Hull's fabulous Artist Trading Block die by Sizzix.  Amy Bowerman of Plucking Daisies and the Artists on the Block sent us some ATBs to work with and I have to say that they have been an amazing surface to work on (matboard, similar to mountboard) and the boxes go together like a dream.  Jenny and I thoroughly enjoyed making these wedding favour boxes. They would be so perfect for weddings, any other parties, for gifts or for Easter.

The next couple of sets are Jenny's design, I just finished them off, following her great ideas.  Click on any of the photos for a closer look.


Embossing ink was used through Tim Holtz's Dot Fade stencil, covered with white embossing powder, heated and then covered with a mix of Shaded Lilac and Tumbled Glass Distress Inks.  The flowers are cut from a Sizzix die that came free with my Big Shot.


This is just to show how one of the boxes can be used, it is small enough for the best man to fit into his pocket to keep the rings safe.


These boxes were created using Tim's doily stencil and white embossing powder and then the boxes were rubbed over with Tattered Rose Distress Ink.  The butterflies are cut from a Sizzix die and the butterfly bodies were covered in white pearls.

And now on to my other designs....


These boxes were painted with Picket Fence Distress Paint and then crackle glaze was applied over the top.  Guipure lace was added to finish off the edges and the hearts are die cut with Tim Movers and Shapers heart die.  The hearts were embossed and attached to some strong wire so that they would remain standing up (standing the hearts up was an idea by my lovely DH).

And finally,


The last two styles of box - on one side of the large one is a tuxedo and there are two embossed gold rings on the top.  The small box was covered with Wendy Vecchi's translucent embossing paste and once dry Broken China Distress ink was applied.  There is a beautiful pair of rings (charm) on the top.


This is the reverse side of the tuxedo box, showing a wedding dress made from lace and pearls. The box itself was simply stenciled using Antique Linen Distress ink.

Jenny and I are both convinced that ATBs will be popular in lots of different forms in the coming months, we both have a few more to play with and I think you will be seeing more of them on each of our blogs.

Thanks for looking and hopefully leaving a comment.  Take care.  Hugs, Anne xx

Thursday, 27 March 2014

A Mini Storage Box .....

Thanks for all your comments on the Wedding Favour Artist Trading Blocks/Boxes, Jenny and I are both thrilled that you love them.

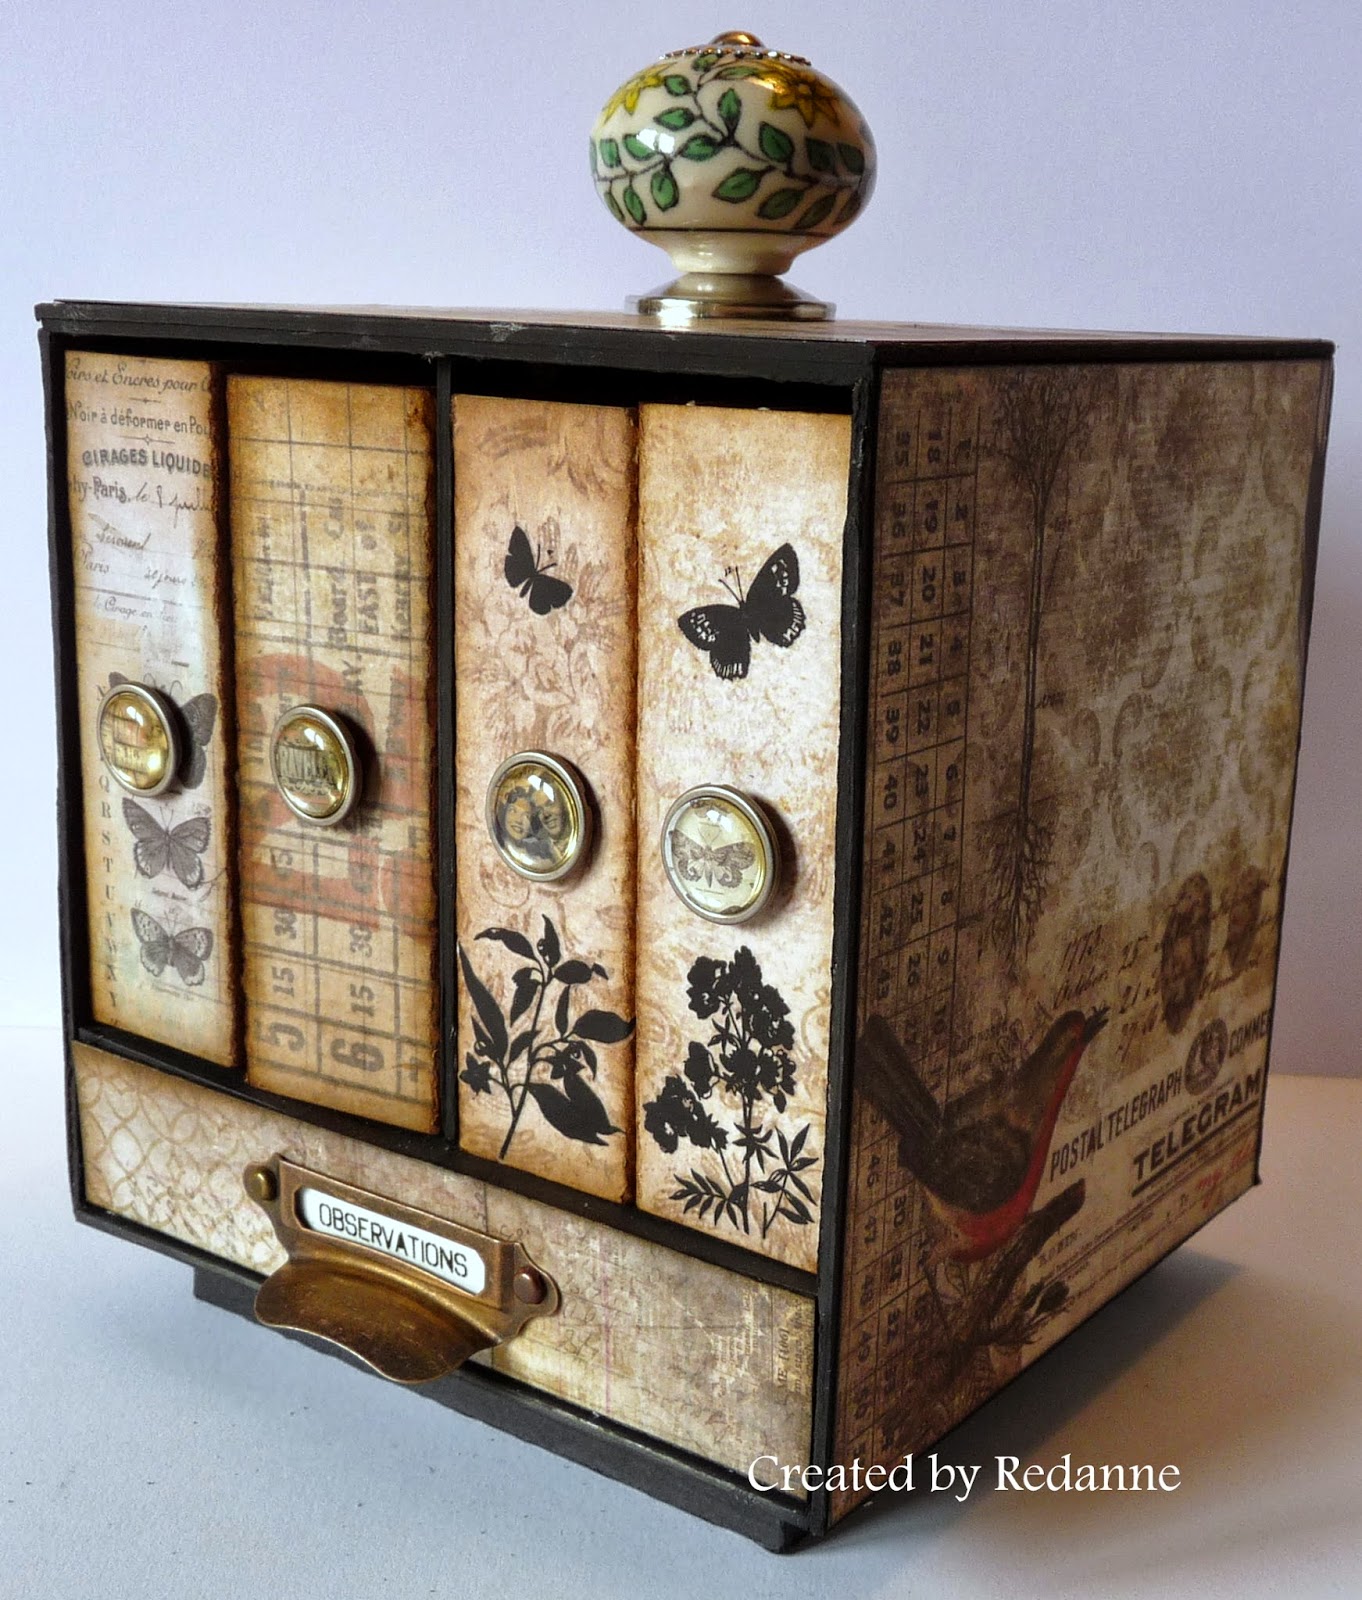
I still have boxes on the brain.  A couple of years ago I wanted to purchase a project for making a storage box HERE, but it had been discontinued in 2010, just my luck.  I kept the picture of the box and decided to have a go myself.   What's so hard about a bit of measuring and gluing (?)  ........well I persevered and here is what I created.  Apologies, there are a lot of photos, but not too much chat so I hope you will stay with me!

To make my box I used greyboard (about the thickness of mount board or mat board), Tim Holtz's new Wallflower 12" x 12" paper pad, black Distress Paint, Gathered Twigs Distress Ink, Idea-ology pieces, Remnant Rubs, Stampers Anonymous Classic Favourites #1 stamps,  a tiny door knob from Marks and Spencer, a lot of measuring and a few choice words!

This is the front view, the finished box measures 5" square. Lots of Idea-ology and Remnant Rubs were used here. Click on any of the photos for a better view. 


Side view, right side, love that bird!


I wish I had put this gorgeous piece at the side, instead of the back.


The left and final side.  For each side I cut the paper to fit, inked the edges with distress ink and simply glued them on to the assembled and painted box.


This is a view from the top showing the lovely little door knob, it is made from pottery and hand painted (not by me!) with some little flowers.


This first piece in my box is a little storage box, made to store ATC type projects


This is one of my books which is just under 4" x 5" in size.  I added some pages in thick card.

I won't show you inside as I have not added anything to the pages as yet.


Another little book.  All of the books are covered in the Wallflower papers and all the edges have been coloured with Gathered Twigs DI.


This shows the inside of the final book.  I have added lots of pockets, these will take mini tags or tickets or other small items.


Finally (if you are still with me!), in the little drawer I have stamped the dragonfly from Classics #1 and then I coloured some of Wendy Vecchi's Clearly for Art with alcohol inks, stamped the dragonfly in Stazon and fussy cut it to add to the base stamping.


Here is the final piece again.  You can just about see the little platform at the bottom.  It is simply a 4" square box that I made up from thick black card and glued to the base.

If, like me, you love all things Tim, there is still time to enter our challenge over at A Vintage Journey where the lovely Alison has chosen the theme, Say it with Words..... we would love to see you play along.

Speaking of challenges, I would love to enter this into Country View Challenges HERE which is 'Paperchase' and this month there will be two lucky winners, each receiving £20 voucher so spend at Country View Crafts.

Thanks so much for looking and hopefully leaving me a comment. Take care.  Hugs, Anne xx

Monday, 24 March 2014

Artist Trading Block Wedding Favours and a touch of Tim Holtz

My lovely friend Jenny (Buttons) and I had a craft day together a couple of weeks ago.  Our mutual friend Amy Bowerman (Plucking Daisies and The Artists on the Block) had sent us some die cuts from Eileen Hull's Sizzix  range.  I was lucky enough to be featured on the Artists on the Block for a valentine ATB I had made (which you can see HERE), so I was thrilled when Jenny and I got more die cuts to play with.  Thank you Amy!

On the day, we concentrated on the Artist Trading Block dies (ATBs) and Jenny had the brilliant idea to use the ATBs as wedding favours and so we spent the next few hours designing and making up blocks. We made too many to show you all today so I am going to show a few today and then some more next week.

The first couple of samples just show how Tim Holtz inks, stains and stencils and dies can be used to create items suitable for weddings as well as his normal 'grungy' style.  I just love the versatility of that man! The base of the boxes we used are cut from a product called 'mat board' in the US, I think it is much the same as mount board here in the UK, it is a lovely thickness and takes inks, stains and paints really well.


The one above is the first one that I did, using an idea that Jenny wanted me to try.  Using Tim's lattice stencil and embossing ink I covered all of the sides and then heat embossed with clear embossing powder.  After this had cooled Tarnished Pewter Distress Stain was applied as well as a little Tarnished Pewter Distress Paint.  This caused some of the card to rub off a little, but it created the wonderful aged look.  A couple of simple corrugated hearts cut from a Movers and Shapers die and the box was finished with a Tattered Floral in plain cream card.

This is the largest size of box, just over 3 inches square and could hold a gift for the Bridesmaids, or to hold confetti or even a piece of wedding cake for the guests to take home.  The die for this particular size of box is sold separately to the three smaller boxes which you will see below.


For this set I used a Memory Box Stencil and stenciled direct with Peeled Paint Distress Ink which was then covered in clear embossing powder.  I tapped a little away, just like Tim does, so that some areas are raised and darker (those that have the embossing powder applied more thickly).  The gorgeous little rolled flowers on top were gifted to me by the lovely Nicola (Paper Profusion) and the leaves are ones that Jenny cut for me using her new Tim Greenery Bigz die (mine had not arrived at that point).

I do love seeing the three sizes together, the largest of these is about 2.1/2 inches square, just to give you an idea of size.


This photo shows the smallest box filled with heart confetti but it could equally be used to house something more precious to be used on the day - but you will have to come back next week to see what that is!

And then, just for fun, I though I would try making some of the boxes out of heavy acetate and I was so pleased that it worked.  Sadly neither Jenny nor I, have the Block/Scoreboard die as yet so these were cut by hand using my own measurements.  This is not something I recommend because the fit is nowhere near as good as Eileen's dies but I wanted to see if it would work.


I filled one with sugared almonds (a commonly used wedding favour in the UK), one with truffles (which could be used for a dinner party or a wedding) and one with mini easter eggs, all these needed to finish them off was just a little ribbon.

Next week I will show you some more of the designs we came up with, I think you will love what Jenny did and I tried my hand at a little origami too.  The boxes are a dream to put together (I will show you that next week too) and are really sturdy.

Jenny and I certainly had a fun day and we cannot wait until our dies arrive now, they are due to arrive in the UK at the end of April.  I hope if any of you are anticipating weddings in the family this year that you will find some inspiration in some of the boxes that we created between us.

Thanks for looking and I hope to see you again soon.  Hugs, Anne xx

Friday, 21 March 2014

Say it with Words at A Vintage Journey

The lovely and talented Alison (butterfly) is our host this week at A Vintage Journey and not surprisingly, Alison has chosen 'Say it with Words'.  In Alison's own words:

Tim Holtz makes it so easy to "say it with words".  You could use one of the many fantastic sentiment stamps, or ChitChat stickers, AlphaParts, Grungeboard lettering (either pre-cut, or using the fabulous WordPlay die), or any of the other alphabet stamps or dies you can think of, or all of them together!  Whatever you pick, let the words be at the heart of your project.


Our regular Sponsor, Country View Crafts are offering a £10 voucher to the winner, who will be chosen by the Creative Guides (DT).  CVC details are on my sidebar.  We would love to see your entries to Alison's challenge and would ask that you read our challenge requirements, to ensure your entry is considered for the prize.

For my project this fortnight I wanted to use some new dies, namely my enjoy the journey strip die and my umbrella man die and also one of Tim's latest stencils - Speckles.  To use so much I knew I needed to use a very large tag and so I have used a No. 12 tag - they are certainly large!


I cut about 1 cm off the tag, all around and reshaped the top corners.  I used Broken China and Gathered Twigs Distress Stain 'smooshed' onto my craft mat and dragged the tag through, drying after each drag through until I was happy with the look.  I gave the same treatment to a No. 5 tag which I wanted to use as a topper.  After distressing the edges of both tags, they were edged first with Gathered Twigs Distress Ink and then again with Black Soot Distress Ink.


I cut off a section from the bottom of the tag, distressed the raw edges and punched four holes in each so that I could make a hanging part with some Tim Holtz Idea-ology rings.  I die cut the 'enjoy the journey' from the Stacked Artful Words strip die.  Umbrella man was cut from black card and then he was stamped in Picket Fence Distress Stain using a script stamp from Tim's Shabby French stamp set.  Whilst he was drying I stamped  the beautiful swirl stamp from the Shabby French set onto the bottom of the tag and also to the hinged section, using Gathered Twigs Distress Ink.  Stamping in the DI gives a much softer look.

 Umbrella man needed to be 'grounded' so I added some tissue tape under his feet and in a couple of other places on the tag.


The Life quote from the Good Thoughts set was stamped onto the No. 5 tag with Ranger Black Archival ink.  After assembling the tag I added some of Tim's natural ribbon to the top of each tag. 

It would be wonderful if you could join us at A Vintage Journey, thanks so much for your visit, I hope to see you all soon.  Hugs, Anne xx

Monday, 17 March 2014

Tim Tag March 2014

Hello and welcome!

I had it in mind to something completely different than Tim Holtz did this month, as I normally do not have all the required items.  But, this month I had purchased the stamps Tim used, albeit the mini set so I decided to go with what he did.

Doing this tag reminded me of growing up in Canada.  Each year we had a two week idyllic holiday on Manitoulin Island in the northern part of Ontario.  We stayed in a log cabin and there was a lot of forest around where my Brother and I would go to 'collect' things.  I would collect dead moths, broken bird eggs and feathers - I thought I was going to be a world famous Ornithologist when I grew up.  I would race back to the cabin and 'pin' my finds on a board and number them............. those were the days!

So, on to my tag.  Like Tim, I did a main one and a second generation one, just as Tim did:


Because my stamp set is the smaller one, I used a No. 5 tag.  I followed Tim's instructions so I won't repeat them all here.  I stenciled over the tag as Tim described and then stenciled over a No. 8 tag and mounted the smaller one on top.  This gave me a little more space to add the jute string and the word band.


I used different colours of Distress Ink for my feather stamping (Peacock Feathers, Gathered Twigs and a little Scattered Straw) and also for my vintage ribbon at the top and colouring the word band using Peacock Feathers Distress Paint.


I do love the look of this second generation stamping, although mine dried quite quickly and my 'smudging' did not work as well on the second stamping.  I added Tissue Tape to both tags, just as Tim did, I love the effect it gives.

I just wanted to tell everyone too, that I have stepped down from the Our Creative Corner Design Team.  I thoroughly enjoyed my time there, it was a great experience.  I will miss my team mates (although some of them are also on A Vintage Journey, so I have the pleasure of working with them there.  Thank you to all my blog friends who supported OCC, they have some amazing challenges coming up which I hope you will join in.

Thanks for looking, hope to see you soon.  Big hugs, Anne xx

Friday, 14 March 2014

Tag Friday for A Vintage Journey

Thank you so much to those who visited here and over at A Vintage Journey last Friday, we have had a wonderful response to the challenge and also some fantastic comments.  Thank you to my latest followers too, I so appreciate you joining me!

As we are new at A Vintage Journey we will not be announcing our winner for another week so we thought we would share some Tim tags with you which we hope will inspire you to join in the challenge.  I hope you like mine!

I decided to use some stamps that I have had for some time and this is what I created.


I took a No. 8 tag and coloured it very gently with Gathered Twigs Distress Ink and then I ran it through two embossing folders.  I embossed the top two thirds of the tag with Tim's Travel Signs Texture Fades set.  I wanted to create a train track effect so I embossed the bottom tip with the track folder from the same set. Once embossed I ran over the tag with Gathered Twigs DI again and also some Vintage Photo DI.   I then distressed the edges and then went round with Black Soot DI.


I stamped the tickets, and railway crossing sign from Tim's On the Railroad set of stamps.  These were lightly coloured with Frayed Burlap DI and then I spritzed and flicked them with water to give them an aged look.  I marked today's date on the coupon.  The ticket at the side of the tag is from Tim's Idea-ology Journaling Ticket set, this was aged with a touch of Vintage Photo DI.


 The train was stamped in black Archival Ink, fussy cut out and then coloured with a mix of Antique Linen, Pumice Stone and Black Soot Distress Inks.  I tried to make it look quite grungy.  Behind the train I stamped some signs from the Railroad set directly onto the tag and then put the train on top with foam pads.

To finish off I used one of Tim's metal word bands which I painted with Picket Fence and then wiped it with a baby wipe.  At the top I added some of Tim's Natural Trimmings.

Since my tag is made up almost entirely with Distress Inks I am going to enter the Simon Says Monday Challenge where the theme is D for Distress!

Thanks for looking, I hope you will go over to A Vintage Journey to see what my amazing teamies have made.  Hope to see you again soon.  Hugs,  Anne xx

Friday, 7 March 2014

A Vintage Journey begins...

Are you ready to go on a Vintage Journey? 

I am thrilled and delighted to say that today is the first day of our exciting new fortnightly challenge blog over at  A VINTAGE JOURNEY which I mentioned in some detail in my post here.  The challenge blog is the brainchild of the uber talented Brenda Brown.  The whole emphasis of the blog challenge is focussed on the shabby vintage style, ideas, techniques and products of Tim Holtz.  

  
Our very first challenge is being hosted by our Creative Guide (DT) Leader Brenda, who has chosen the theme of 'ANYTHING TIM'.  We would love to see your shabby vintage style entries based on Tim's style, his ideas and his techniques.  Do please, read the Travelling Instructions (rules) which are on the sidebar over at A Vintage Journey.

A winner will be chosen by the Creative Guides (DT), the winner will receive a £10 voucher sponsored by Country View Crafts (where p&p is always free!). You will also find many of the items used in my DT piece at Country View Crafts, there is a link to them on my sidebar.


If you need some further inspiration, on Monday next week our Creative Guide, Chris will share a Design Team Focus over at A Vintage Journey and provide you with a technique tutorial and step by step process for your inspiration, all linked to Tim, his style and his ideas, which are an inspiration to us all.

Those who have been following me for some time already know of my slight 'obsession' with all things Tim and I am so pleased to be involved in the first challenge.  I love using colour, whether it is Tim's inks, paints or stains and Tim's Blueprint stamps are some of my favourites. I loved making this, if you want to see a closer view just click on the photos:


The background was created with a combination of Festive Berries, Barn Door and Picked Rasberry Distress Inks which I layered up, one by one using a blending tool.  I then used one of my all time favourite of Tim's techniques, spritzing and flicking with water to create this lovely mottled effect.  It is simple but so effective - I just love it.  The edges have been distressed and I used a blending tool and Black Soot DI to finish the edges off.  


I then took my splatter brush (a technique Tim used HERE) and flicked Black Soot Distress Paint lightly over the whole background.  This can just about be seen in the photos above and below.  I stamped the game wheel from the Ringmaster Blueprint set of stamps, onto the card.  I stamped it again, twice onto white card and coloured the wheels with Distress Markers, being careful not to cover up the numbers on the wheel.


To give some dimension I fussy cut the wheels and layered these up with foam pads after colouring the edges with Black Soot DI.  I wanted to give the impression of looking into the Roulette wheel to make it look more realistic.  I added some of Tim's Idea-ology cogs to the centre of the wheel.

To finish the card I added some of Tim's Remnant Rubs to three of the corners and the word 'Play' in the last corner is from one of Tim's Alpha Part sets.

I hope you will go over to A Vintage Journey to see what my very talented Creative Guide teamies have made, there is an incredible amount of inspiration there.  Please come and travel along on this Vintage Journey with us. If you can't make it this time we hope that you will leave us a message to let us know what you think and we hope to see you in a future challenge.  And don't forget, there will be more inspiration for you over at A Vintage Journey on Monday too.

I would love to enter this into another new challenge blog That's Crafty where the challenge is Anything Goes and there is a prize of a £20 voucher to spend in the online store.

Edited:  I would love to enter this into Inspiration Emporium's 'Splash of Color' Challenge too.  There is a prize of $50 Inspiration Emporium dollars for one randomly chosen winner.

Thanks so much for looking and I hope to see you again soon.  Hugs, Anne xx

Saturday, 1 March 2014

Let's Get Scrappy for Our Creative Corner

Not sure where February went but as it is the 1st day of March it is time for a new challenge over at Our Creative Corner.

Our Sponsor this month is Tando and their products will be spotlighted throughout the month.


The wonderfully talented Linda (of the Funkie Junkie) is challenging us to 'Let's Get Scrappy' by using scraps and left-overs from previous projects, pieces of paper, scraps of ribbon, embellishments made and never used.  Sounds like such fun doesn't it?  Who does not keep their scraps and bits?

I am hanging my head in shame because when I was tidying my craft room at the end of last year, I threw away tons of scraps - literally.....  But, I did have to make lots of man cards during January and February so I had some bits left from that, enough to make this little 6 inch square canvas.  Click on any of the photos for a closer view.


Last year I had the pleasure of attending a Finnabair class and earlier this month I did a weekend class with Hels Sheridan and both of these hugely talented ladies used a very similar technique of paper blocking.

I had lots of bits of Prima Engraver papers left over and I cut them up and trimmed these to fit my canvas.  It was so easy because the papers were collage style and very easy to cut into blocks.  I went around each of the paper pieces with Pumice Stone Distress Ink. Once I glued these to my canvas with Ranger Glue and Seal, I went around each square with a charcoal pencil to give some definition between the shapes.  


Next I took some Wendy Vecchi Black Embossing Paste and a diamond stencil and added some to the top right of the canvas.  I dabbed some Picket Fence Distress Paint onto my craft sheet, watered it down slightly and then 'flicked' this over the whole of the canvas.  You might just be able to see the effect in the above photo.

I added some gauze, some metal leaves which had previously been painted with Distress Paint.  The flower is cut from some leftover card from Hels' class and I used Tim Holtz's Tattered Floral die.  I stamped the petals with an Indigo Blue script stamp and then made the flower up.


To finish off I added a Tim Holtz Idea-ology metal frame and the sentiment is one of my first ever stamps, a real favourite, by the wonderful Wendy Vecchi.

So there we have it, bits of papers from Prima, left over card from a class, a bit of gauze and some left over leaves from  previous projects and a stamped sentiment left over from another project.  I have to admit this was much more fun than I was expecting it to be!  

I hope you will get your crafty bits and pieces out and join in the fun over at Our Creative Corner.  Our sponsor this month is Tando Creative and there will be a prize for one randomly chosen individual.

Thanks for looking!  Big hugs,  Anne xx