PRIVACY POLICY

Sunday, 1 May 2022

Idea-ology Vignette Card File

 Hello Friends

Since Tim Holtz released his new Idea-ology range this year I have been dying to make something with the Vignette Card File.  After seeing Jan Hobbin's creation for Tim's reveal video where she created a file box to hold special dates throughout the year, I decided to create something similar.

I have been collecting addresses of blog friends for the past 10 years, keeping them in a small notebook, this has become a bit dog eared over the years and so I decided to make a card address file....

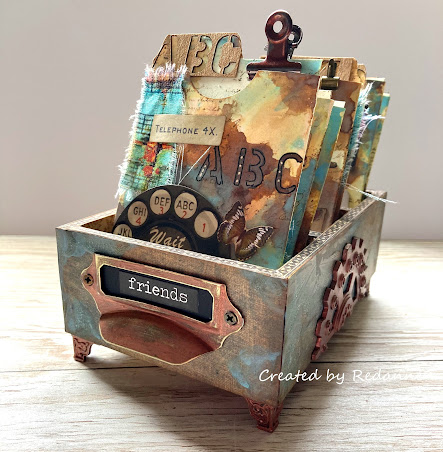
I started by covering the box with Backdrops Volume 3 papers before adding design tape to the edges.  
To finish off the box I applied Tim's Translucent Crackle Paint randomly around the box and when dry I spritzed over it with Distress Oxide Spray in Salvaged Patina and gently wiping some off here and there to give a distressed look.

The hardware was painted with Distress Foundry Wax in 'Mined' before attaching to the box.  I love how easy it is to use Foundry Wax and the finish is beautiful.
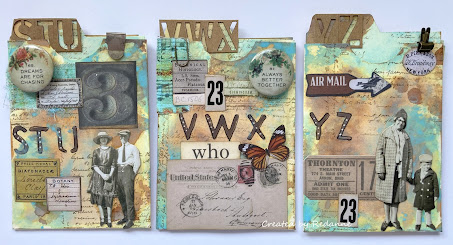
I took nine sets of the new Idea-ology File Cards and coloured them with Distress Oxide Distress Sprays and added a little stamping here and there for added texture.
Each pocket card will hold three letters of the alphabet.  I used Idea-ology Stencil cards to label the folders.  Each pocket contains one folded card and one tabbed card, so plenty of room for names and addresses.
I used a whole mix of Idea-ology Ephemera to collage on top of each pocket.
I also added some of Tim's Eclectic Elements fabric on the front of each pocket along with some stencilled lettering.
To finish off I added the word 'friends' from Idea-ology Big Chat collection of words.

All I need to do now is transfer the names and addresses!

Thanks so much for your visit.  I apologise for not being around much these days, either here or on social media, but I have a few health issues I am working through and Facebook is playing silly beggars with my feed at the moment.....

Take care and keep safe and well.

Crafty Hugs,  Anne xxx


Thursday, 7 April 2022

Easter Wishes

 Hello Friends

Whilst waiting patiently for my Tim Holtz Chapter 2 dies to arrive, I was looking through some of my older products and decided to create an Easter mini clip board.  My dear friend Kath cut some of the beautiful bunnies for me (how could I have missed buying that die!!).

The base is a Tim Holtz Idea-ology mini clip board.  The mechanism comes off easily so that you can add a background and then return the mechanism.  I used Distress Oxides onto Ranger watercolour card, smooshing the colours until I had the result I wanted.

I die cut Tim's Flower Field die (665369) from watercolour card, coloured it using Distress Inks and attached this to the background.

I layered up the bunny and coloured it with Gathered Twigs Distress Ink before applying a layer of Vintage Photo Distress Embossing Glaze to give him a nice sheen.

To finish the bottom I added another layer of the Flower Field, with the flowers chopped off, adding a Distress Ink dyed piece of seam binding, topped with Idea-ology Velvet Trim (warm).

Turning my attention to the clip mechanism, I used a small paintbrush to add some of the new Tim Holtz Foundry Wax in 'Mined' tone.  I worked in small patches as the Wax dries incredibly quickly.  Once coated entirely I heat set it and watched it turn almost immediately into a wonderful metallic tone (gosh I love this stuff!).

I had some really old Idea-ology Floral Adornments and I used Alcohol Ink to colour these and attached to the clip with 3D glue, before re-attaching the clip to the base.

To finish off I used some ancient Idea-ology Label Letters to create the Easter Wishes sentiment.

I am adding this project to the Simon Says Stamp Monday Challenge where the theme this week is Spring/Easter.

Wishing you a very Happy Easter if you celebrate it.  Thanks so much for your visit, it is always appreciated.

Crafty Hugs, Anne xxx


Tuesday, 8 March 2022

Lady Vagabond Lifestyle Mantle Clock

 Hello Friends

This is my last official post as part of Belinda's Lady Vagabond Team, as Belinda has left Stamperia and it would just not be the same without her.  Thanks to Belinda and Stamperia for an amazing 15 months, I have enjoyed every minute.

My final project is a Lady Vagabond Mantle Clock, created from scratch.  I was inspired by Belinda's Grandma's Mantle Clock that appears in Belinda's Lady Vagabond Lifestyle 3D Paper Kit.  My clock is much larger but I wanted to incorporate a little  'room' with a fireplace inside the clock.

I started by building the little mantle clock from the Stamperia kit, along with the fireplace so that I could assess the size of the aperture that I wanted in my clock.

I used some heavy cardstock from my stash, drew the shape of the clock and cut out a front and back, measuring 11.1/2" x 16.1/2" with an aperture of 5.3/4".  I then created a 'box' to fill the aperture, as shown below.  
Once the box was in place I added a piece of card to the edge of the clock to give a finished appearance.  Below is a view of the front of the clock before I added the clock face.  The aperture measures 2 inches deep.
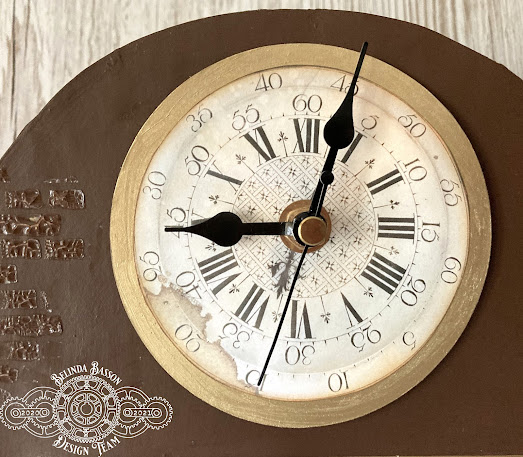
The next task was to paint the whole of the clock and I used Stamperia Allegro paints, a mix of Earth Brown and Nocciola to give a nice rich brown colour.  I added patches of Stamperia Crackle Paste (Transparent) through Belinda's new Brickwork stencil, to add some interest to the Mantle Clock before attaching the clock face.  It is a fully working battery operated clock.
To decorate the aperture I used Stamperia Rice Paper for the walls before adding the constructed fireplace and mini Mantle clock.  To finish off I added chipboard Lady Vagabond, chair and cat.
To add a little more interest I decoupaged the grate of the fireplace and placed lights behind.  They give a nice glow in the dark!
This project certainly taxed my paper engineering skills but I was really pleased with the outcome and the clock now sits proudly in my craft room.

A list of the products I used to create the clock can be found at the end of this post.  Thanks, as always, for your visit, it is much appreciated.  I apologise for not visiting you recently, I am dealing with some health issues but hope to be back to visiting soon!

Crafty hugs, Anne xxx

Stamperia Products Used:

Stamperia Lady Vagabond Lifestyle 3D Paper Kit - SPBOP08
Stamperia Rice Paper White Blossom DFSA3083
Stamperia Lady Vagabond Lifestyle Die Cuts - DFLDC52
Stamperia Crackle Paste Transparent K3P50
Stamperia Lady Vagabond Brick Stencil - KSTDL51
Stamperia Allegro Paint - Earth Brown KAL40
Stamperia Allegro Paint - Nocciola KAL108


Tuesday, 8 February 2022

Lady Vagabond Birthday Card Album - Belinda Basson DT

 Hello Friends

Being the world's worst at remembering birthdays, I have created a birthday card album where I can store a whole year's birthday cards in one place, for my Belinda Basson Design Team project for Stamperia this month.

I used the wonderful papers and moulds from the Lady Vagabond Lifestyle release by Belinda Basson for Stamperia.

The finished card album measures 8" x 8" x 4 inches.  This gave me enough room to attach six double sided pockets that I spaced 1/2" apart.

As you can see below I added moulds to the front and side of the album but kept the back plain so that it will sit flat.
To create the album cover I used some foam board that I had in my stash, cutting three pieces - two 8" x 8" and the spine 4" x 8".  I used the standard album making technique for binding the cover using construction tape which is also applied around all the edges to give a neat finish.
The pocket pages inside were created in strong black card but I am showing them here in white so that the measurements can be seen more clearly.  Each of the six pages consists of taking a 15.1/2" x 10.3/4", folding it in half lengthwise at 7.3/4" and then folding the whole of the bottom piece up at 3.1/2".  Score each of the folds well.  Fold the bottom flap up and then fold the piece so that the pockets are on the outsides.

Glue the very edges of flaps in place once they have been folded, to create your pockets.  Glue the bottom half of each of the folded pages with a thin layer of glue.  Leave the sides and top free.
To create the spine to hold each of the pages, take a piece of card 11.1/2" x 6.1/2" and score at 1.1/2", 2", 2.1/2" and each half inch, making your final score at 10".  This leaves a 1.1/2" on either side.

To fold up, start with a valley fold at 1.1/2" (as indicated by the broken line below) and fold a mountain fold at 2" (as indicated in red below).  Since we want a gap between each of the spines, the next valley fold will be at 2.1/2" and then again 3".  Continue to the end and you should have 6 spine edges.    
Score all the folds well and glue each of the spine areas together with double sided tape or strong glue.  This forms the spine for your album.  Add glue to the bottom of the spine and fix in place in your album, ready for the pages to be added.

Take one page with the pockets to the bottom and glue one to each of the spines, straddling the spine, applying glue to each side of the spine.  This ensures that the spines are hidden and the pages will lie beautifully.
Now for the fun part!
Decorate the covers, inside and out and each of the pockets with your favourite papers.  I used papers from the Lady Vagabond Lifestyle range and added die cut pieces of ephemera to some of the page bottoms.  I added a month to the top of each page. 
You can see a further selection of pages below.
I turned my attention to the moulds and decided to use the ship door mould and the anchor mould.  I used quick drying resin to cast my pieces and then used a selection of Allegro paints (listed at the end of the post) to colour them.
Here is a close up of the door, I just love how it turned out!
I then made a selection of Lady Vagabond cards to put in my album.  I used papers left over from covering the album along with various Lady V die cuts for the set of cards below.
The three cards below were created using the two new Lady Vagabond Lifestyle stamp sets (details are listed below).

Thanks very much for your visit, I hope to see you again soon.

Crafty hugs,  Anne xx


Stamperia Products Used:

Stamperia Lady Vagabond Lifestyle B/G Papers 12" x 12"  SBBL100
Stamperia Lady Vagabond Lifestyle Papers 8" x 8" SBBS49
Stamperia Lady Vagabond Lifestyle 6" x 6" Papers SBBXS10
Lady Vagabond Lifestyle Mould - KT3PTA4517
Stamperia Lady Vagabond Lifestyle Die Cuts DFLDC52
Stamperia Lady Vagabond Stamp Set WTKCC206
Stamperia Lady Vagabond Stamp Set WTKCC208
Stamperia Allegro Paint - Old Ivory KAL50
Stamperia Allegro Paint - Brick Red KAL20
Stamperia Allegro Paint - Earth Brown KAL40
Stamperia Allegro Paint - Prussian Blue KAL96
Stamperia Allegro Paint - Grey KAL73
Stamperia Transparent Crackle Paste K3P50
Stamperia Mixed Media Glue DC28M 


Tuesday, 11 January 2022

Lady Vagabond Lifestyle - Time - for Belinda Basson DT

Hello Friends

Belated Happy New Year wishes to you all!  This is my first post for 2022!

Today I am sharing a project I made using Belinda Basson's, for Stamperia, wonderful recently released Lady Vagabond Lifestyle products to create a clock.  I have this vision of Lady V stepping into the clock to travel through time .... fanciful I know but hey, it was just how my brain was working when I made the clock!  Wouldn't it be lovely to be transported off somewhere magical, if only occasionally.....

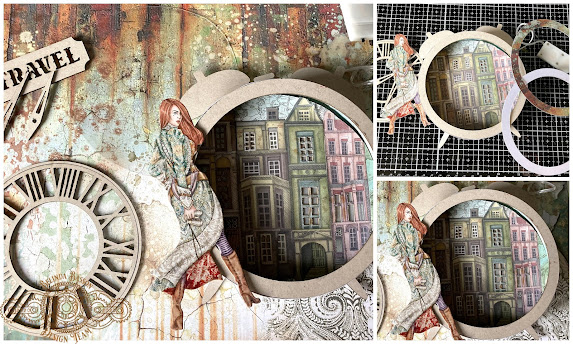
I started with Belinda's Greyboard clock and  I assembled it, adding a one inch spacer to create a 3D clock.
 I then used a variety of the Lifestyle papers to decorate the clock.  I added some of the original Lady Vagabond papers to create the scene inside the clock, cutting out the windows in the houses so that I could add some mini lights.

I added a circle of acetate to the clock front so that I could add the clock face and the clock hands.
Once constructed I applied Cerantica wax to the clock bells and clock front and then gave the whole clock a coat of Stamperia Crackle Paste, adding a Lady Vagabond chipboard die cut to the outside of the clock.  I am really smitten by this image of Lady V, ordering more so that I can use her on lots of future projects!

Below is a view of the clock lit up.
Thanks very much for your visit.

Until next time.  Crafty hugs,

Anne xx


Stamperia Products Used:

Stamperia Lady Vagabond Lifestyle Greyboard Clock KLSPDA447

Stamperia Lady Vagabond Lifestyle Die Cuts DFLDC52

Stamperia Lady Vagabond  Lifestyle 8" x 8" papers SBBS49

Stamperia Lady Vagabond 8" x 8" papers SBBS27

Stamperia Mixed Media Glue DC28M

Stamperia Crackle Paste Transparent K3P50

Stamperia Cerantica Metallic Gold K3P15G