PRIVACY POLICY

Tuesday, 19 October 2021

Belinda Basson DT - Lady Vagabond Book Nook

 Hello Friends

It is time to share my monthly Belinda Basson Design Team for Stamperia project and I cannot begin to tell you how much fun I had creating it! 

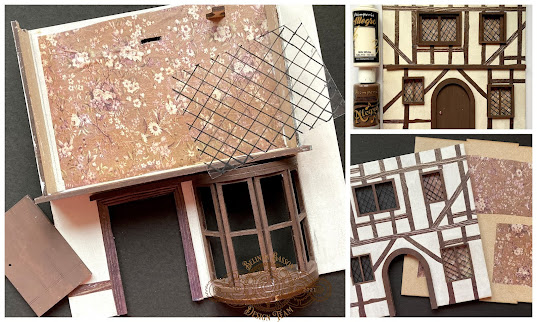
For many years now I have wanted to create a book nook but frankly did not know where to start!  So when I saw that CoolKatz have designed a kit, I knew I had to make one for Lady Vagabond.  The period style properties suited Lady V so well (in my mind anyway!).

A book nook is literally a miniature world that you tuck into a book shelf between your books.  If it lights up, it just makes it so much more interesting.  A strategically placed mirror at the back makes the 'street scene' look never ending...

The wonderful Stamperia products I used to decorate the book nook are listed at the end of this post.

Here is Lady V outside the pub named after her, all packed up for a trip on her beautiful airship.
It was great fun building the kit, I used Stamperia Allegro paints and Stamperia Rice paper to decorate the house and pub.  To create the illusion of leaded windows I used a permanent black pen on acetate.
I used the Lady Vagabond 8" x 8" papers to create some mini books, that were then placed in the bookshop window.
For the window above the bookshop I added a doll's house sewing machine, just for the sake of authenticity, even though it is hard to see once the book nook is fully constructed.  I know it is there and it just made me happy!
The floor of the book nook was created with Stamperia Cream Paste and I used the end of a knife blade to create the cobbled effect.  Once dry I applied Stamperia Allegro Paints to give it worn cobble colour.

The Lady V sign over the pub was created by hand from a piece of card.
Once the book nook is filed away in your bookcase you don't really see the outside but I wanted it to have a finished look and I used the Lady Vagabond 8" x 8" papers and they fitted perfectly.

I placed Lady V (Stamperia die cuts) and her luggage in the opening to the street scene so that she would not get lost inside.  Lady V's cat was stamped onto Stamperia Shrink Plastic sheeting with archival ink.  Once shrunk she was the perfect size to sit alongside her mistress.

A final view of the book nook, I just love how it looks all lit up!  I really hope you might consider making one of these, they are so much fun and they would make a wonderful gift for any avid reader.

Thanks so much for your visit, I really appreciate you taking the time.  

Take care and keep safe and well.

Crafty hugs, Anne xxx


Stamperia Products Used:

Stamperia Lady Vagabond 8" x 8" Paper Pad SBBS27

Stamperia Lady Vagabond Rice Paper White Flowers DFSA3083

Stamperia Lady Vagabond Die Cuts DFLDC27

Stamperia Lady Vagabond Flying Ship Stamps WTKCC190

Stamperia Allegro Paints - Milk White KAL110, Brown KAL106, Grey KAL73, Black KAL03, Rame Metallic KAL117

Stamperia Cream Paste - K3P53

Stamperia Extra Forte Glue DC075

Stamperia Shrinky Bits (Shrink Plastic) - DFSBA4W

Monday, 11 October 2021

Tim Holtz Village Collection 2021

 Hello Friends

Well, what can I say, it is October (to me that signals Halloween) and Tim Holtz has released a fabulous new die set, called Village Collection along with some new mini embossing folders.  I do have the original Village collection but I like the size of this new one... so I just had to didn't I; especially after seeing all the wonderful inspiration from Tim's amazing Makers.  If you missed the 'live' you can see it HERE.

I have to thank Art From The Heart for their always fantastic service, my dies and folders arrived last Friday and I just had to get started right away.  I don't have a step by step for you because this project just took on a life of its own as I was building it...

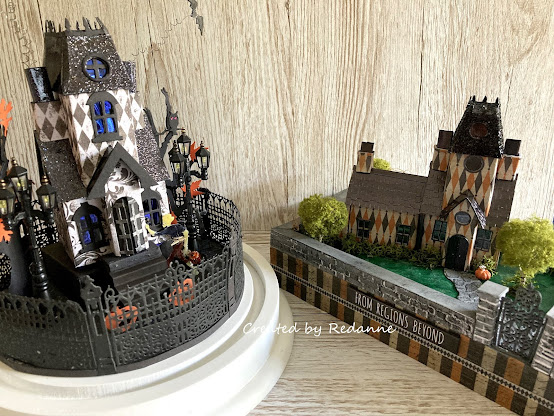
I built the Manor House first and then added House #2 and (just out of view) I added the additional side building.  

I had some of Tim's Halloween papers from a few years back and had just enough of the orange and black to complete the buildings.  The windows each have 'glazing' from some cobweb acetate from the same paper pack.  Just like the original set of dies, the houses go together like a dream!

The base is a wooden box 10.1/4" x 6" and I covered it with some of Tim's design tape (Halloween) from a few years back.

The trickiest part of the piece was the brick wall.  I knew I wanted to use the gate from Tim's Village Graveyard die set to create an entry.  

The new embossing folders are approximately 4.1/2" x 3" and I repeat embossed some cardstock to give me some longer strips to create parts of the wall.  I used Hickory Smoke Distress Paint, watered down, and randomly swiped paint over the embossed brickwork to give a distressed look.

I scored each long strip to create the wall (3 bricks deep for the sides, two bricks deep for the top and three bricks for the back).  I mitred the corners to give nice corner edges. I cut strips of card to join onto the base.  Because the top was a little uneven I put a strip of card along the whole top to give a finished appearance.  I also created some 'pillars' to hold the gate in place.

I created the cobbled paths in the same way as the brickwork fence and fussy cut around some of the cobbles to make them look realistic.

The graveyard was added by die cutting the tombstones from black card, again using the Village Graveyard die set.  I put four layers together to give them strength and dry brushed them with Hickory Smoke Distress Paint.

All that remained was to paint the 'ground' with various colours of green paint and once the Manor was in place I added some moss, a few (model railway) trees and twigs together with a small pumpkin charm from my stash.
Some of you may be wondering at this point, whether I added lights to my creation.... well, of course I did, it is for Halloween!  I added a set of Tim's Halloween mini lights in green.  It has quite the eerie glow at night time!

Not the best of photos but I have photographed the original Manor house I built a few years back alongside the new one, just to give you an impression of the difference in size of the Manor house.

To finish off my new Manor house diorama I added a word chip. The light switch for the tiny lights is hidden underneath.

Thanks so much for your visit, it is much appreciated!

Take care, keep safe and well.

Crafty hugs, Anne xxx