PRIVACY POLICY

Friday, 20 April 2018

Leather Journal

I have been making leather journals for many months now but rarely show them on my blog because they are generally gifts to family and friends.  In Eileen Hull's Fan Club on Facebook there have been quite a few questions about using leather to make journals.  I thought I would try and answer some of those questions with this short tutorial on how I create a leather journal.

If you visit and read this tutorial and you still have questions, please leave your questions in the comments, along with a way that I can get in touch with you and I will do my best to answer them.
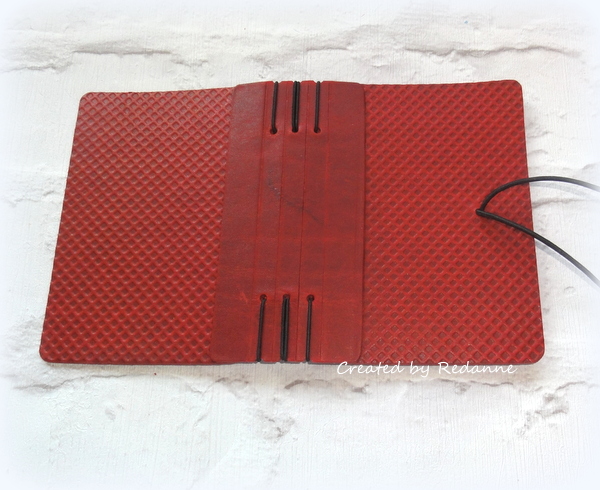
Here is my latest embossed leather journal.
I gathered together the items that I wanted to use to make the journal, these are:

  Eileen Hull's Passport die by Sizzix (660331)
 Eileen Hull's Embossing Folder by Sizzix - Waffle (659879)
A piece of good quality red leather
  Red cardstock to match the leather - for lining the journal and also for signatures
 A Premium Crease Pad (by Sizzix) - I only use my Crease Pad for leather as there is less tendency for the die to cut completely through the leather on the score lines
Leathercraft Glue

TIPS

1.  You do not need to buy expensive leather, I use between 1.5 and 2mm where possible.  If you are based in the UK, you can buy excellent quality leather from www.artisanleather.co.uk - An A4 (8.1/2" x 11.1/4" approx) piece of leather will make one Passport sized journal, with a little left over.

2.   I glue cardstock to the 'fuzzy' side of the leather, this gives the leather a little more stability.  I found that if I did not glue cardstock to the leather, it 'stretched' when die cut.

3.  It is not essential but I always use a Premium Crease Pad when cutting leather as there is less tendency for the die to cut completely through the leather on the score lines.  If you do not have or don't want to invest in a Crease Pad, and the die cuts right through the spine, you can add some Washi tape, or regular cardstock to the inside of the spine to hold it together.

4.  I strongly recommend that you use a good quality leather glue and that you follow the instructions carefully.  I always leave the glued elements overnight to ensure good adhesion.

Top left - die cut the leather pieces (in my case, backed with cardstock)
Top right - leather embosses beautifully with standard embossing folders
Bottom left - the embossed leather
Bottom right - embossed front and back but no embossing to the spine

TIPS

5.  Embossed leather is very beautiful but it can be tricky!  It is a good idea to 'practice' on an off-cut of leather before committing to embossing your die cut leather pieces.

In the above example I used a Big Shot to cut my leather, using the base plate and also the A plate, and passed the embossing folder through without the two cutting plates.  It embossed beautifully and quite deeply.

For thicker leather you may need to adjust the plates that you use, it really is trial and error, but be careful - if it doesn't go through your machine, stop and try a different configuration of plates.

6.  When gluing the spine to the front and back of the journal, especially if you have embossed it, it is a good idea to leave it to set, overnight if possible.
Once you are satisfied that the glue is completely dry, go ahead and add bindings of your choice. A view from the outside.
A view from the inside, ready for the signatures.  I usually add a pocket to the inside back cover to hide the elastic closure.


I created three signatures, using the Passport die to cut the inserts for each signature and then made covers from red cardstock, slightly larger than the inserts.  The beautiful images on the signatures are from Alexandra Renke's gorgeous design papers and Washi tape range.
One final look - I always add charms to the side of my journals, using hinge clips.  You can also create a loop to hold a pen, which is always useful when you want to keep notes!

Thanks for looking, I hope you picked up a tip or two.  Hope to see you
again soon.  Hugs, Anne xx

Tuesday, 10 April 2018

Spring Showers

The theme this month for Eileen Hull's Inspiration Team is 'Spring Showers'.  If you live in the UK, we certainly get plenty of those!

But this is slightly different, we are celebrating Showers of a different kind - Baby Showers, Wedding Showers or different types of parties.  I chose to create for a Baby Shower/Party.
I made a Shabby chic card using beautiful Maja Design papers and Eileen Hull's Pansy Flower die (Sizzix 661109), and hand felted a little blue teddy to go into the Eileen Hull Book & Pages, Trinket Box & Frame die (Sizzix 662360).

Starting with the card, I simply mat and layered the beautiful Maja Design papers, added a Scrapiniec frame which I embossed with Stampendous Frantage Shabby Blue Embossing Enamel.  I die cut the word 'baby' and coated the letters with Glossy Accents.
The flowers are made from Eileen Hull's die - Pansy Flower.  Just a few steps:
1)  Die cut flower petals, 6 for each flower, 2 of each size
2)  Spritz the petals with water and scrunch up
3)  Carefully open the dampened petals and leave to dry naturally
4)  Layer up the petals and scrunch up again
5)  Add ready made stamens to each of the flowers
Next, I made the Trinket Box.  I covered the Mount Board with Maja Design paper and then die cut the elements for the box.  I followed the instructions on the die to construct the box and I added a button and elastic closure.  The word 'baby' was die cut and coated in Glossy Accents.
Here is a picture of the inside of the box, covered again in Maja Design papers.  I lined the 'floor' of the box with some beautiful soft felt.

Long before I had my wrist replacement I loved doing wet felting, but afterwards, I was unable to put the pressure required to rub the felt, so sadly, I stopped.  Once I saw my friend Rachel's beautiful felted creations (you can see one HERE) I wanted to see if I could make something using felting needles - much easier to do than all that rubbing!!  Thank you Rachel, I have had an absolute ball creating these little creatures! 

So, to complete my project, all that remained for me to make was the teddy, one that would fit in the box!  I had to make several before I got the right size to fit in the Trinket Box - and that just happened to be the blue one, the last one I made.
I thought I would share the whole 'motley crew' of bears that I made, the three sitting bears were my first attempts and to me they look a bit cock-eyed but I am happy with the three standing bears on the right hand side.

Thanks for 'bearing' with me through this post!  My team-mates have made some fabulous creations so far this month, you can check these out HERE on Eileen's blog.

I hope to see you soon!

Hugs, Anne  xxx

Friday, 6 April 2018

Rusty and Crusty for A Vintage Journey

Hello Friends

It is time for a new challenge over at A Vintage Journey where the lovely Autumn  is our host. Autumn has chosen Rusty and Crusty as her theme - I just love that title!   Here is what Autumn has to say about the challenge:

Many of us love rust and enjoy looking for new ways to get that authentic look of rusty peeling metal.  For this challenge, include some rust in your vintage, shabby, mixed media, art journalling, industrial, timeworn or steampunk project, whether it be the real thing, a faux technique or just a rust colour on your project.

I love rust!  When Seth Apter / Kim Evans brought out the Baked Textures Embossing Powders and I knew that Rust was one of the Textures I was thrilled - another way to produce a rusty result!  Autumn's challenge theme was very timely as, after taking a couple of classes with Seth recently I fell in love with his monoprint technique and I used it to create my rusty background.


In the class we all received a set of stamps and I chose ESA 08 by Seth Apter for Paper Artsy which you can see in the above photo.

 To create the background I used two pieces of watercolour paper and Seth's paints, Mahogony, Buff, Green Patina and Smoked Paprika.  I layered the colours one by one onto the first sheet and pressed the first sheet onto the second. I repeated the steps until I had the background I was happy with.  I was going for a rusty/patina look.
I also used the background stamp, with some of the Mahogany paint to create some further texture on the background.  If you use paint on your stamps make sure you wash the stamp immediately.
I stamped the main image onto plain white card with Black Archival Ink and gave it a good coat of Distress Matte Medium in Vintage, to tone down the white and make it look more vintage.

I used the keyhole stamp onto some watercolour paper, I coloured it with a coat of Mahogany paint, then some embossing ink before applying two coats of Baked Texture - Chunky Rust to get a lovely rusty and crusty look.
I wanted the key element of the design to stand out more so I embossed a key from my stash, using Emerald Creek's Allure Embossing Powder in Oil Rubbed Bronze.  I wrapped it with some Tim Holtz thread to give it some texture.

Overall, seeing it here, I think there is something missing, I may go back and add some rub ons or a bit more stamping..... not sure - the wonders of photography on grey days here in the UK at the moment!

I hope you will join in Autumn's challenge HERE.  You could be in with the chance of being one of our Pinworthies.  Please pop over too, if you have time, to see what my talented team-mates have made, you won't be disappointed!

Thanks so much for your visit, I always appreciate them!

Hugs, Anne xxx


Sunday, 1 April 2018

Junk Journal for Mini Album Makers


Hello Friends

Although I have made many journals in the last year or so, I have never made a Junk Journal, so I thought I would take the plunge and make one for the Mini Album Makers Challenge for April.

I visited lots of blogs and watched many, many videos on how to create a junk journal and was inspired by lots of people, including Candy Colwell, Nik the Booksmith and Jenny Marples, all of whom have made beautiful Junk Journals.  In the end I was a bit overwhelmed and just did my journal with things I like using, including tea stained papers, a few digi pages (from Nik the Booksmith) and lots of fabric, modern and vintage lace, ephemera and charms from my stash.

 This is a picture heavy post, but it is a big journal measuring 8" x 6" x 2" deep.  I don't want to overburden with photos so I have collaged some.

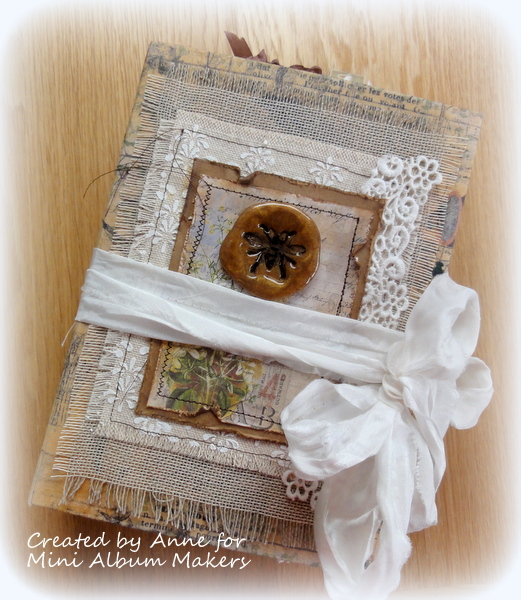
This is a Nature Journal and it contains many images of dragonflies, bees and butterflies.
1)  Choose your covering, I used some of Tim Holtz Eclectic Elements fabric - Wallflower.
2) Cut medium weight board onto two 8" x 6" pieces and one 8" x 2" 
3) Cut a piece of fabric 17" x 11" in one continuous piece
4) Apply your glue of choice (I used my Xyron) to one side of each piece of board
5)  Apply the fabric to the glued side of the board leaving 1/8" gap between the pieces.
6) Optional extra - glue a piece of Tyvek to the joints to provide extra security
6) Use Matt Medium to glue the fabric to the inside of the binding as shown, ensuring you mitre the corners carefully to avoid extra bulk on the inside.
7) Cut design paper to fit the inside covers and glue these with Matt Medium
8) Make a pocket for the inside back cover if desired
9) Gather together your elements for the cover 
10)  Add these elements to your cover (I did not use the felted flower).  I decided to 'vintage up' the cover by applying a coat of Distress Collage Medium - Vintage to the cover - this also helps to protect the cover.

I created three signatures for the inside of the Journal and below is a small selection of the pages I created for the signatures.
I added lots of lace, pockets, tuck spots, tags, stamped insects and for the front and inside I created a couple of 'insects preserved in faux amber'....
To create the faux amber on the cover and in the
signatures I used the new Baked Textures Embossing Powder from Emerald Creek/Seth Apter.  I used my Melt Pot and added some Baked Texture - Amber along with small amount of clear UTEE.  The beauty of this technique is that you can re-stamp into the EP once it is cold, if you need to 'darken' your chosen stamp.
  I poured the melted compound onto my non stick craft sheet and immediately pressed Tim Holtz Entomology stamp (s) which had been inked with Black Archival Ink, into the molten EP.  I was really pleased with the outcome of both.  I mounted this one into one of Tim Holtz's cabinet cards.

Our generous sponsor this month is Gypsy Soul Laser Cuts who will provide a prize pack to one lucky winner!  You can see an example of how I used their wonderful products here.

                                                        Website - http://www.gslcuts.com/Store/
Blog - http://gslcuts.blogspot.co.uk/
                                       Instructionals and Kits - http://gslcuts.blogspot.co.uk/p/blog-page.html

I hope will have time to visit Mini Album Makers to see what my talented teamies have made, and hopefully join in this month!  As always, our challenge is Any Handmade Book Goes.  Enter any form of handmade mini albums, scrapbooks, journals and book arts.  Our focus is on completed works, so no layouts or journal spreads that are not part of a complete handmade book project.  You do not have to provide a tutorial, but we wish you would.  Feel free to use one of the DT tutorials to make your project and give proper credit where due.

Thanks so much for your visit, I hope to see you again soon...

Hugs, Anne xxx