Pinterest

Thursday 25 April 2019

Ladybird Journal

Hello Friends

I have been wanting to create a journal with the beautiful Ladybird stamp by Tracy Evans for a while now and this week's project for AALL & Create gave me the perfect chance to do so.
The 'medium' sized Ladybird is the perfect size to fit Eileen Hull's latest (wonderful) journal die.
This is possibly the quickest and easiest journal I have ever made.  I simply die cut the journal from some mixed media art board (by Daler Rowney) and stamped the part of the image I wanted to show on the cover.  I stamped in two parts, masking off the back section to stamp the front and then masking off the front to stamp the back.

I used watercolour pencils to colour the ladybirds.
I carefully watercoloured around the bugs in a lovely sky blue watercolour paint.

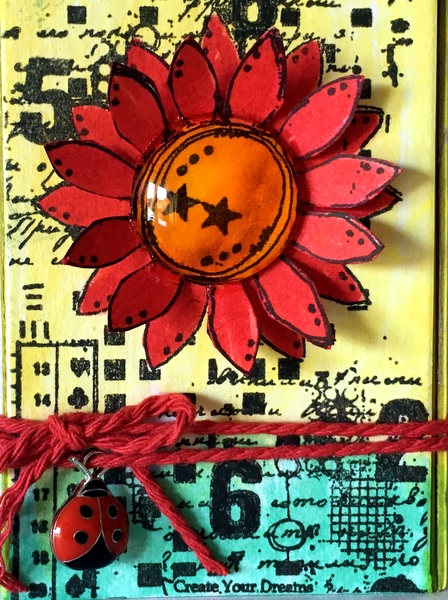
I had a piece of alcohol ink coloured mica sheet left from a previous project.  It was not quite big enough to cover the whole bug but I quite like the effect and so attached it with some Glossy Accents.
I continued the blue colour on the inside of the journal and added a pocket to the left hand side in black card mat and layered with some co-ordinating blue card.

I created two signatures, the first of which you can see above.  The cover measures 3.1/2" x 4.7/8" folded.  I used a Tim Holtz die to add some interest to the cover and stamped, coloured and fussy cut one of the ladybirds for the cover.

The second signature was created in the same way as the first.
A view from the back.

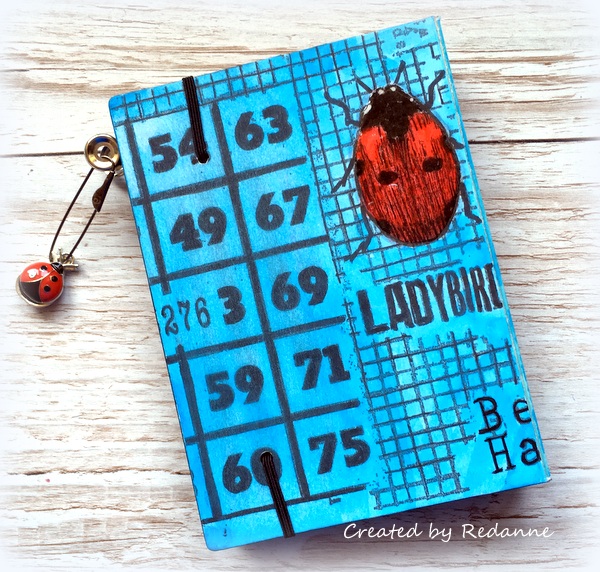
The journal will fit two or three signatures comfortably and I used black elastic to hold the signatures in place and also as a closure for the journal.

To finish off I stamped and cut out some of the words and a heart from the same stamp set and then attached a couple of Ladybird charms to a bulldog clip as decoration.

You can find a full list of suppliers who sell AALL & Create stamps, including the beautiful Ladybird stamp HERE.  You can also purchase the stamps direct but we prefer, where possible, that you support your local suppliers.

Thanks so much for your visit, I hope to see you again soon.

Hugs, Anne xx


Thursday 18 April 2019

Kings, Queens and Edison

Hello Friends

My project this week for AALL & Create includes stamps and a stencil by Olga Heldwein - Kings & Queens, Edison Game and the Geometric Grid stencil.  

The two stamp sets work together perfectly and I used them to create a card in a colourful collage style.  I think the shapes work beautifully together.
I started by painting three colours of watercolour paint onto watercolour cardstock.  On a second piece I stamped and partly coloured the image.
I placed the stencil on top of the watercolour paper, holding it in place with my fabulous new Wendy Vecchi  Stay-tion and used Distress Inks to add stencilled detail.

I also stamped extra pieces, coloured them and fussy cut them to add to the finished card.
To finish off I added all of the pieces to the watercoloured and stencilled background, raising some of the elements up to add more detail.
You can find details of the stamps and stencils I used here at AALL & Create, where you will find a full list of worldwide stockists.

Thanks so much for your visit, I hope to see you again soon.

Hugs, Anne xxx


Monday 15 April 2019

Wendy Vecchi by Stampers Anonymous

Hello Friends

I have been extremely lucky to have received some new stamps from Wendy Vecchi (and Stampers Anonymous) along with her co-ordinating Mat Minis, one for each set of stamps. I created a chunky 'wall' measuring 9" x 4.1/2".

These are the stamps and Mat Minis I received from Wendy - thanks so much Wendy, the quality of the Stampers Anonymous stamps is excellent, as always, I don't think you can beat red rubber for ease and quality of stamping.   The Mat Minis are new to me, I found them to be very substantial, easy to use and they took inks beautifully.  The Mat Minis are set WVMM32 and WVMM31.

I began by building the 'wall' using one of That's Crafty's MDF Chunkies.


Once built I gave the block a good coat of Gesso.  I then mixed some Ranger Texture Paste with some Distress Oxide Re-inker in Fired Brick and applied this to the front and all sides of the block, through one of Wendy's older stencils - Basically Bricks.

When the paste was dry I covered the whole piece with a spray of Fired Brick Distress Spray and gave a few of the bricks a touch of Gathered Twigs Distress Spray to give a more natural look.

I used each of the stamp sets: Art in a Pot SCS 168 and Window Art SCS 169 and stamped onto the Mat Minis, coloured all of the elements with Distress inks and assembled the pieces.
Here is a view of the finished plant pot together with a sentiment from the Art in a Pot stamp set.
To finish off the window I added some 'wallpaper', faux curtains and added some shrink plastic flowers to the window box.
Here is a final view of the 'wall', it comes with a hanger on the back so that it can be hung up or placed on a shelf.

Thanks so much for your visit, I hope to see you again soon.

Hugs, Anne xx

Thursday 11 April 2019

Flourish for AALL & Create

Hello Everyone

Hope you are all well.  Apologies, I have been dilatory in my visits and comments but I am still suffering with what the doctor now thinks is bronchitis, but, I am up and about again and determined to stay that way, so I hope to catch up soon!

This week for AALL & Create I have created a couple of mini houses, one a little vintage and one very bright a cheery.  I used two sets of flower stamps by Tracy Evans, #164 and #119 along with a stencil #17.

The first is the little vintage one.
I die cut the house shape from Kraft board, stamped and coloured with watercolour pencils.  The roof was stencilled using Stencil #17 and some texture paste.  I finished off with some string, a charm and a vintage looking safety pin.
The second little house is a bit brighter.
Again, I die cut the little house, coloured it with watercolour paints, stamped and coloured the flower (twice) with watercolour pencils.
To finish off I layered the flower up and added a large clear bead to the centre.  I wrapped some red string around the house and added a ladybird charm.

You can find a full list of worldwide stockists of AALL & Create products HERE.  You can also buy from AALL direct but we much prefer it if you can support your local shops where possible.

Thanks so much for your visit, I hope to resume normal visits soon!

Hugs, Anne xx

Monday 1 April 2019

'Professor' Tinkham for Mini Album Makers

Hello Friends

A new month means a new challenge at Mini Album Makers!  My very dear and generous friend Kath Stewart gave me lots of the new Tim Holtz stamps and I have incorporated two of those stamp sets into my journal, plus one older set.

A little story - Kath has always called Tim Holtz her 'adorable Professor' and Tim designed this 'Professor' stamp set and credited Kath with the name, how lovely is that!

The Professor in my case is an explorer and adventurer....

I am including a tutorial today, as I have recently joined Eileen Hull's Educator Group and Eileen is our generous Sponsor this month at Mini Album Makers, so the two go hand in hand quite nicely.  This is a picture heavy post!
I started with some cream Calico fabric and some of Tim Holtz Eclectic Elements Transportation Ticket fabric (a gift from my lovely friend Zoe Hillman).  I used Pebeo Matt Gel to attach both fabrics, one to each side of a sheet of mat board (mount board), gel is less tacky than glue.

Using Eileen Hull's Wrapped Journal die, I die cut the journal.  I felt the cover was a bit too 'light' and I dry brushed some Gathered Twigs Distress Paint over the cover and then used the same colour to dab through a Tim Holtz Burlap stencil quite randomly.
I used three stamp sets by Tim Holtz, Ledger Script, Distinguished and The Professor.
Here is a view with all the stamping added.  I also added some rough machine stitching all around the edges (I keep a separate needle for stitching card/paper)  and I cut out a couple of tickets from the left over material and used Matt Gel to affix them.  I also added some colouring to a few of the elements just to make them 'pop' more.  I used watercolour paints that are permanent once dry.
I created four signatures, using the same method for each.  I used 12" wide cardstock by Tim Holtz, cutting four pieces 12" x 5".  Scoring at 2.1/2", 6" and 9.1/2", fold on each score line.  You can glue each end flap in place completely or create two pockets by just attaching the flaps at the top and bottom.  Making your signatures this way gives the covers more stability.
I usually attach the inserts to my signatures using a simple pamphlet stitch.  As you can see I also added some more stamping to my signature covers.  I also added some Tim Holtz Idea-ology tabs to each of the signatures for added interest.
I always like to add a pocket in my journals and here is how I did it...
Using more Tim Holtz cardstock I cut one piece of card  to 4.7/8" x 5.1/4" and scored as shown above, at 1/4", 3/4", 4.1/8" and 4.5/8" and I scored at 4.5/8" across the bottom.  Fold the sides in an accordion style to give some depth to the pocket.

For the fold over top cut a piece to 3.3/8" x 2.1/2" and score at 7/8" and 1.1/8".  Cut and shape as shown above.

 I attached some closures (punched circles attached with eyelets) and then added the envelope to the middle part of the journal (glue the top part in first and then add the pocket element last so that you can 'fit' it properly to the journal).  At this point I added the elastic holders for the signatures and also the band to close the journal, all with 1.5mm black elastic, tying both off neatly.
I decided to add a ticket pocket to the inside front cover (a Tim Holtz die).  The tickets were made using another TH die and Tim stamps and coloured with Distress Inks.

Here is a final view of the back of the journal.

Our Sponsor this month is Eileen Hull who is offering a $35 Gift Voucher for her Etsy Shop to one lucky winner over at Mini Album Makers.


Website: http://www.eileenhull.com/
Blog: http://www.eileenhull.com/blog
Facebook Live: http://www.eileenhull.com/video-tutorials
Facebook: https://www.facebook.com/eileenhulldesigns
Pinterest: https://www.pinterest.com/eileen_hull/
Twitter: https://twitter.com/EileenHull
Shop - https://www.etsy.com/shop/EileenHull?ref=pr_shop_more

We do hope you will join us at Mini Album Makers this month, we would love to
have you join in.  The rules are very simple and are outlined in detail on the blog.

Thanks for your visit, I hope to see you again soon!

Hugs, Anne xxx
Related Posts Plugin for WordPress, Blogger...

Labels